This guide explains how to:
Integrate an Algo device with Microsoft Power Automate using OAuth
Verify the configuration by invoking a Power Automate flow
Invoke a Power Automate flow from an Algo 8450 button using OAuth
This configuration allows an Algo device to securely trigger a Microsoft Power Automate flow using OAuth authentication. After the OAuth profile is authorized, the device can reuse the authorization to trigger the flow without requiring the user to sign in each time. In this example configuration, after you configure an Algo 8450 button to trigger a Power Automate flow using an authorized OAuth profile, you can press the button to start a Teams meeting without signing in to Microsoft or reauthorizing the device each time.
Note
This document includes third-party configuration procedures that are subject to change. It is provided for reference purposes only, and Algo cannot guarantee that the screenshots or procedures will always be current or up to date.
Before You Start
Ensure you have:
Access to Microsoft Power Automate
A Power Automate flow configured
In this example, it’s a workflow with a When a Teams webhook request is received trigger
Procedure Overview
This procedure includes the following steps:
Creating a Microsoft Entra Application
Create a Microsoft Entra application and obtain the required credentials for OAuth.
Sign in to the Microsoft Entra admin center.
Go to App registrations and select + New registration.
 (1).png)
Configure the application details:
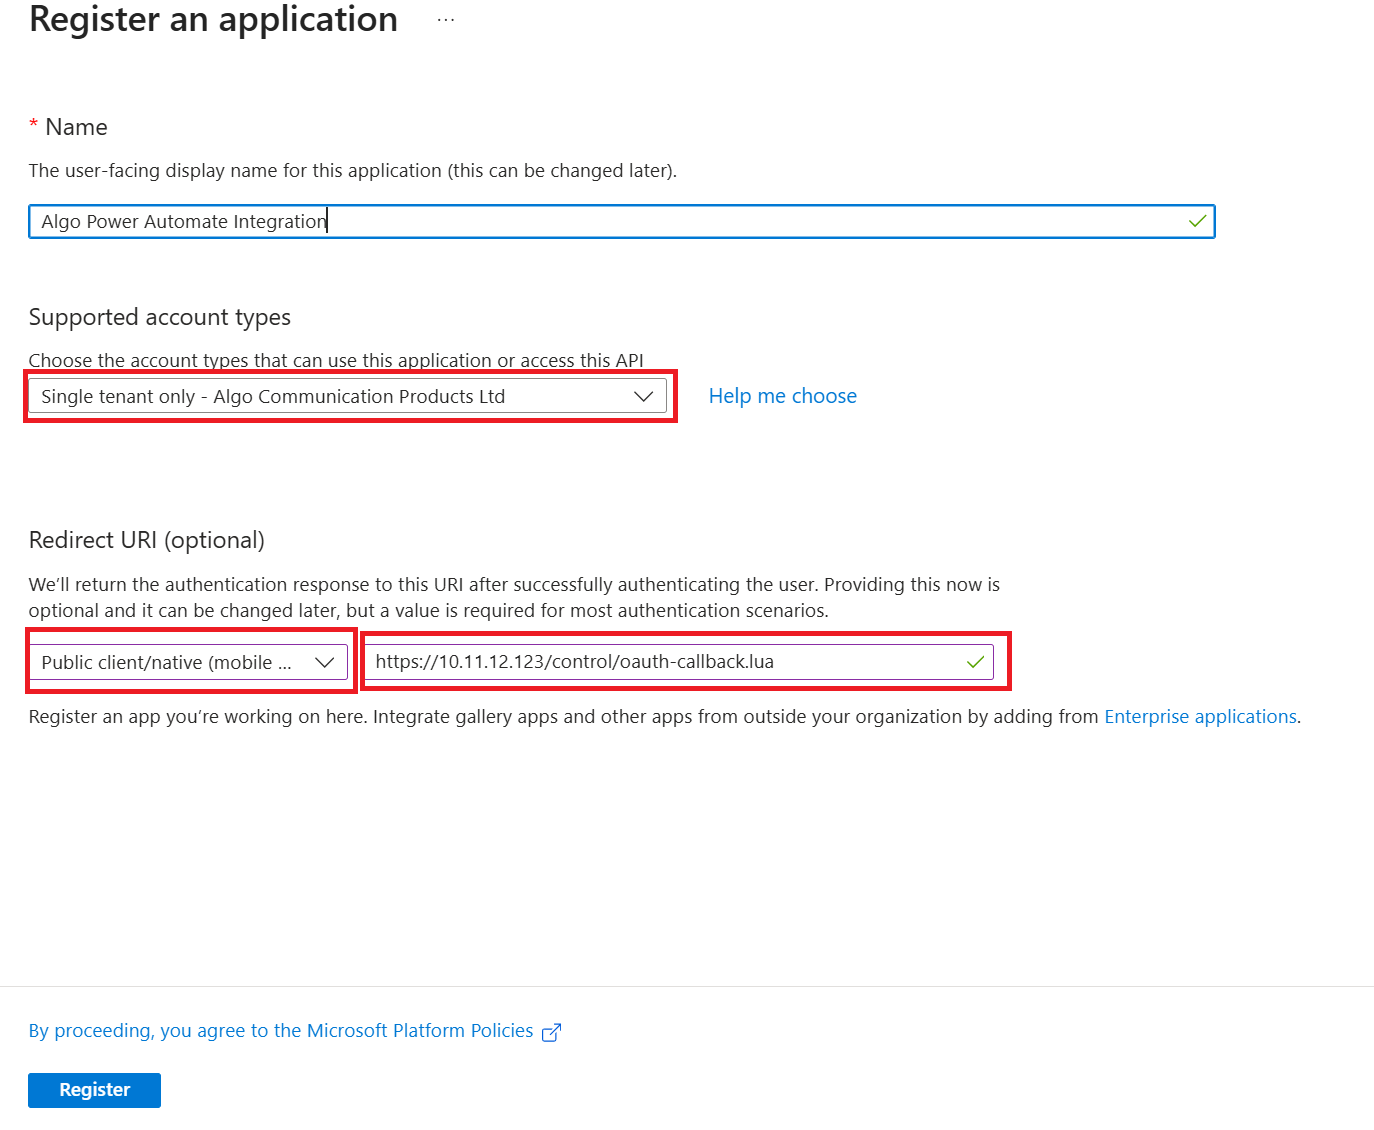
Name: Enter a name for your application. For example, Algo Device Notifier.
Supported account types: Choose the option that fits your deployment.
Enter the redirect URI: Select Public client/native (mobile & desktop) and enter your Algo device’s callback URL using this format: https://<ALGO_DEVICE_IP>/control/oauth-callback.lua.
Note
The redirect URI must use HTTPS.
The redirect URI must match exactly in both Microsoft Entra and the device’s configuration.
Select Register.
After registration, copy these values from the application’s Overview page:
Application (client) ID
Directory (tenant) ID
.png)
You need this information to configure OAuth later.
Select Certificates & secrets → + New client secret.
.png)
Enter the client secret details, then select Add.
.png)
Description: Enter a description.
Expires: Select an expiration option.
Copy the secret Value and save it securely. You will need it when creating the OAuth authorization profile later.
 (1) (1) (1) (1).png)
Go to API permissions → Add a permission.
.png)
Select Microsoft APIs → Power Automate.
.png)
Select Delegated permissions.
.png)
Search for and add the User permission.

Go to API permissions → Add a permission.
Select Microsoft Graph.
.png)
Select Delegated permissions.
.png)
Add the following permissions:
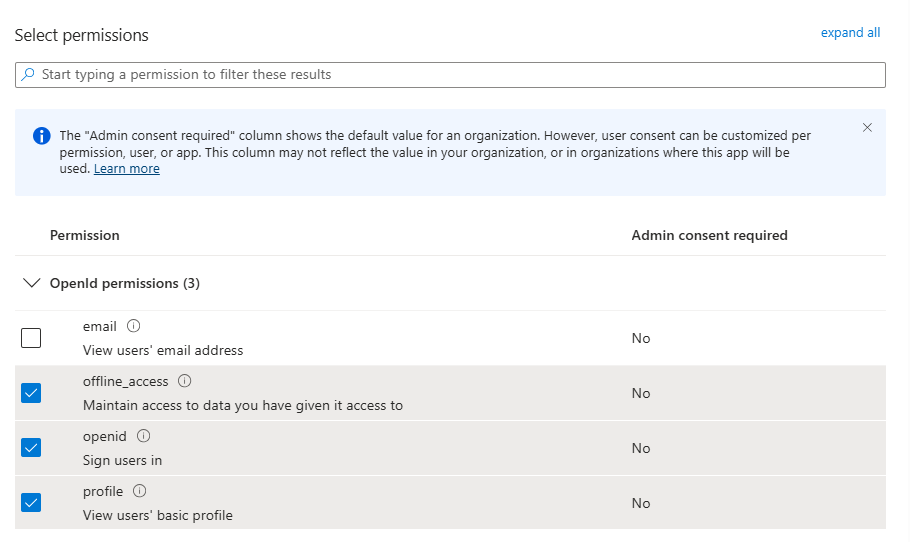
offline_access: Maintain access to data you have given it access to
openid: Sign users in
profile: View users’ basic profile
Select Add Permissions.
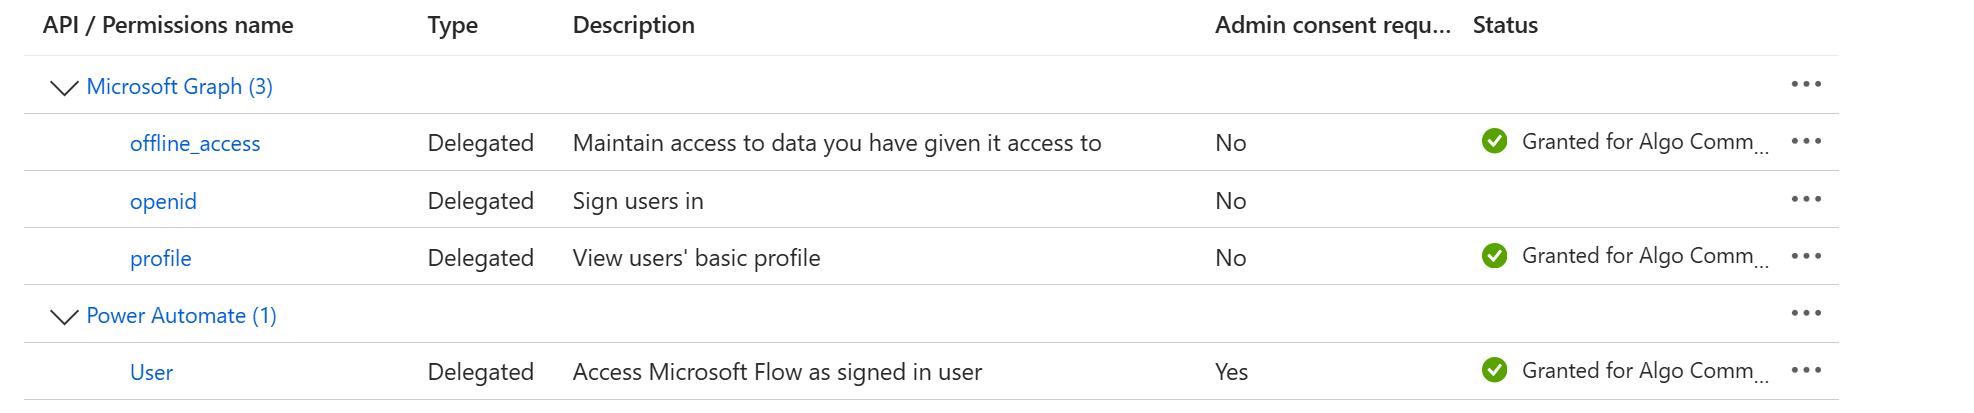
Your application should now have the following permissions:
Creating an OAuth Authorization Profile
Create an OAuth profile to store your Power Automate authentication settings.
Ensure you have the following:
Directory (tenant) ID
Application (client) ID
Client Secret
To create a Power Automate OAuth Profile:
Log in to your device’s web interface using HTTPS.
HTTPS is required by the OAuth process.
Go to the Advanced Settings → OAuth.
Set a Name for your OAuth profile.
Select POWER_AUTOMATE as the Provider Type.
Accept the following automatically populated values:
Grant Type: AUTH_CODE_PKCE
Client Auth Mode: NONE
Scope Mode: SCOPES_LIST
Scope: openid profile offline_access https://service.flow.microsoft.com//.default
PKCE Method: S256
Response Type: code
Configure the following:
Token URL: Replace the {tenant} with your Directory (tenant) ID in this URL: https://login.microsoftonline.com/{tenant}/oauth2/v2.0/token
Auth URL: Replace the {tenant} with your Directory (tenant) ID in this URL: https://login.microsoftonline.com/{tenant}/oauth2/v2.0/authorize
Client ID: Enter your Application (client) ID.
Client Secret: Enter your Client Secret
PKCE Redirect URI: Set to
https://<ALGO_DEVICE_IP>/control/oauth-callback.luaReplace <ALGO_DEVICE_IP> with your device IP.
Note
You must use HTTPS in the URI.
Leave the following fields blank. These values are automatically populated during authorization.
PKCE Authorization Code
PKCE Code Verifier
PKCE Refresh Token
Note
Refresh tokens can expire or become invalid for several reasons, such as revoked app access, password changes, unused tokens, or admin policy restrictions. Refer to the OAuth provider’s documentation for more information. If a refresh token expires or becomes invalid, your automation stops working until OAuth access is reauthorized.
Set Extra Params (JSON) as below:
Replace the <YOUR_TENANT_ID> with your Directory (tenant) ID.
{
  "tenant": "<YOUR_TENANT_ID>",
  "prompt": "select_account",
  "resource_hint": "graph",
  "jwks_uri": "https://login.microsoftonline.com/{tenant}/discovery/v2.0/keys"
}
Select START AUTHORIZATION.
Select your Microsoft account.
.png)
Upon successful authorization, the PKCE Authorization Code and PKCE Code Verifier are automatically filled.
.png)
Select Create Profile.
Your profile appears under the OAuth Profiles list.
Obtaining the HTTP URL from Your Power Automate Workflow
You will need to obtain the API Target and Custom Path from your workflow’s webhook URL for configuring the Algo 8450 button in the next step.
If you need help creating a Power Automate workflow, refer to this example.
To obtain the webhook URL from your Power Automate workflow:
Log in to Power Automate.
Select My flows and then select the workflow you created.
.png)
Select Edit.
%20(1)%20(1).png)
Click the first action in your workflow When a Teams webhook request is received.
For the question Who can trigger the flow?, set it as Any user in my tenant. Then, select Save.
Click Copy
.png) to obtain the HTTP URL (webhook).
to obtain the HTTP URL (webhook).Note
This URL is used by your Algo 8450 to trigger your Power Automate workflow.
Keep it confidential because anyone with this link could trigger your workflow and send data to it.
.png)
Paste this URL into a notebook.
Let’s use the following fake URL as an example.
.png)
Retrieve the following information from your HTTP URL.
API Target: The string between
https://and/powerautomate/...section..png)
Custom Path: The string begins with
powerautomateto the end of the URL.Note
Make sure there are no trailing spaces when you copy this string.
.png)
Save the information. You will need it in the 8450 button configuration later.
Triggering a Power Automate Flow
You can trigger a Power Automate flow to verify that the configuration is working correctly.
Before you start, you need the following information:
Your Microsoft Entra application’s Directory (tenant) ID
Your Power Automate Workflow HTTP URL
To trigger a test Power Automate flow:
Log in to your device’s web interface using HTTPS.
HTTPS is required by the OAuth process.
Go to the Advanced Settings → OAuth.
Select your Power Automate profile from the Test OAuth Profile dropdown list.
Select POWER_AUTOMATE as the Provider Type Template.
For the Target URL and Path, enter your Power Automate workflow HTTP URL.
Enter the Data Payload, if applicable for your workflow.
Select RUN OAuth Test.
Upon success:
The Power Automate workflow is triggered.
A successful response is displayed.

Related Links:
Configuring an 8450 Button to Trigger a Power Automate Workflow
You can configure a button on the Algo 8450 to trigger a Power Automate flow.
Before you start, you need the following information:
Your Microsoft Entra application’s Directory (tenant) ID
Your Power Automate workflow API Target and Custom Path obtained from the previous step
 (1) (1).png)
To configure a 8450 button to trigger a Power Automate workflow:
Create a button on an 8450 screen.
Set the Button Status to Enabled.
Configure the following:
Text: Enter the button display text.
Action: Set to Send API Request.
Number of API Requests: Set to 1.
Request 1 - Command: Set to Other.
Request 1 - Method: Set to POST.
Request 1 - Custom Path: Enter the Custom Path you obtained from the Power Automate HTTP URL.
Request 1 - Targets: Enter the API Target you obtained from the Power Automate HTTP URL.
Request 1 - OAuth Profile: Select your Power Automate profile.
Request 1 - Headers: Set to Custom Headers.
Request 1 - Custom Headers: Set to
Content-Type: application/json
Select Save.
Press the button and verify that the workflow is triggered.
Related Links:
Troubleshooting
I get a 502 error when I run the OAuth Test
You may be logged out of your Algo device’s web interface. Log in again and retry.
After I run the “Start Authorization” again, my OAuth Test fails
Each time you run Start Authorization again, select Update Profile to save the new credentials before running the test.
.png)
My OAuth profile stops working
An OAuth profile can stop working if the OAuth provider rejects or invalidates the access or refresh token. Refer to the OAuth provider’s documentation for more information. If this occurs, the OAuth profile must be reauthorized.