.png)
Using Power Automate, you can integrate an Algo device with Microsoft Teams to trigger an automated workflow.
To use this feature, you need an Algo device that supports sending API requests, such as:
IP Speaker
IP Console
IP Visual Alerter
8063 IP Door Controller
This document provides an example of how to integrate the Algo 8450 with Microsoft Teams using Power Automate.
You can integrate any supported Algo device by following the same steps shown in the 8450 example.
Note
The Power Automate configuration is the same for all supported Algo devices. However, the Algo device configuration may differ slightly, as the UI path to locate the Send API Request option varies by device model.
IP Speaker
Under Additional Features → Input/output, select Send API Request for the When Input Triggered option.
IP Visual Alerter
Under Additional Features → Input/output, select Send API Request for the When Input Triggered option.
8063 IP Door Controller
Under Basic Settings → Basic Config. Set Other Features for Input #1 or Input #2. Then select Send API Request as the Input #1 Feature.
Refer to the 8450 example to enable Restful API and configure Send API Request.
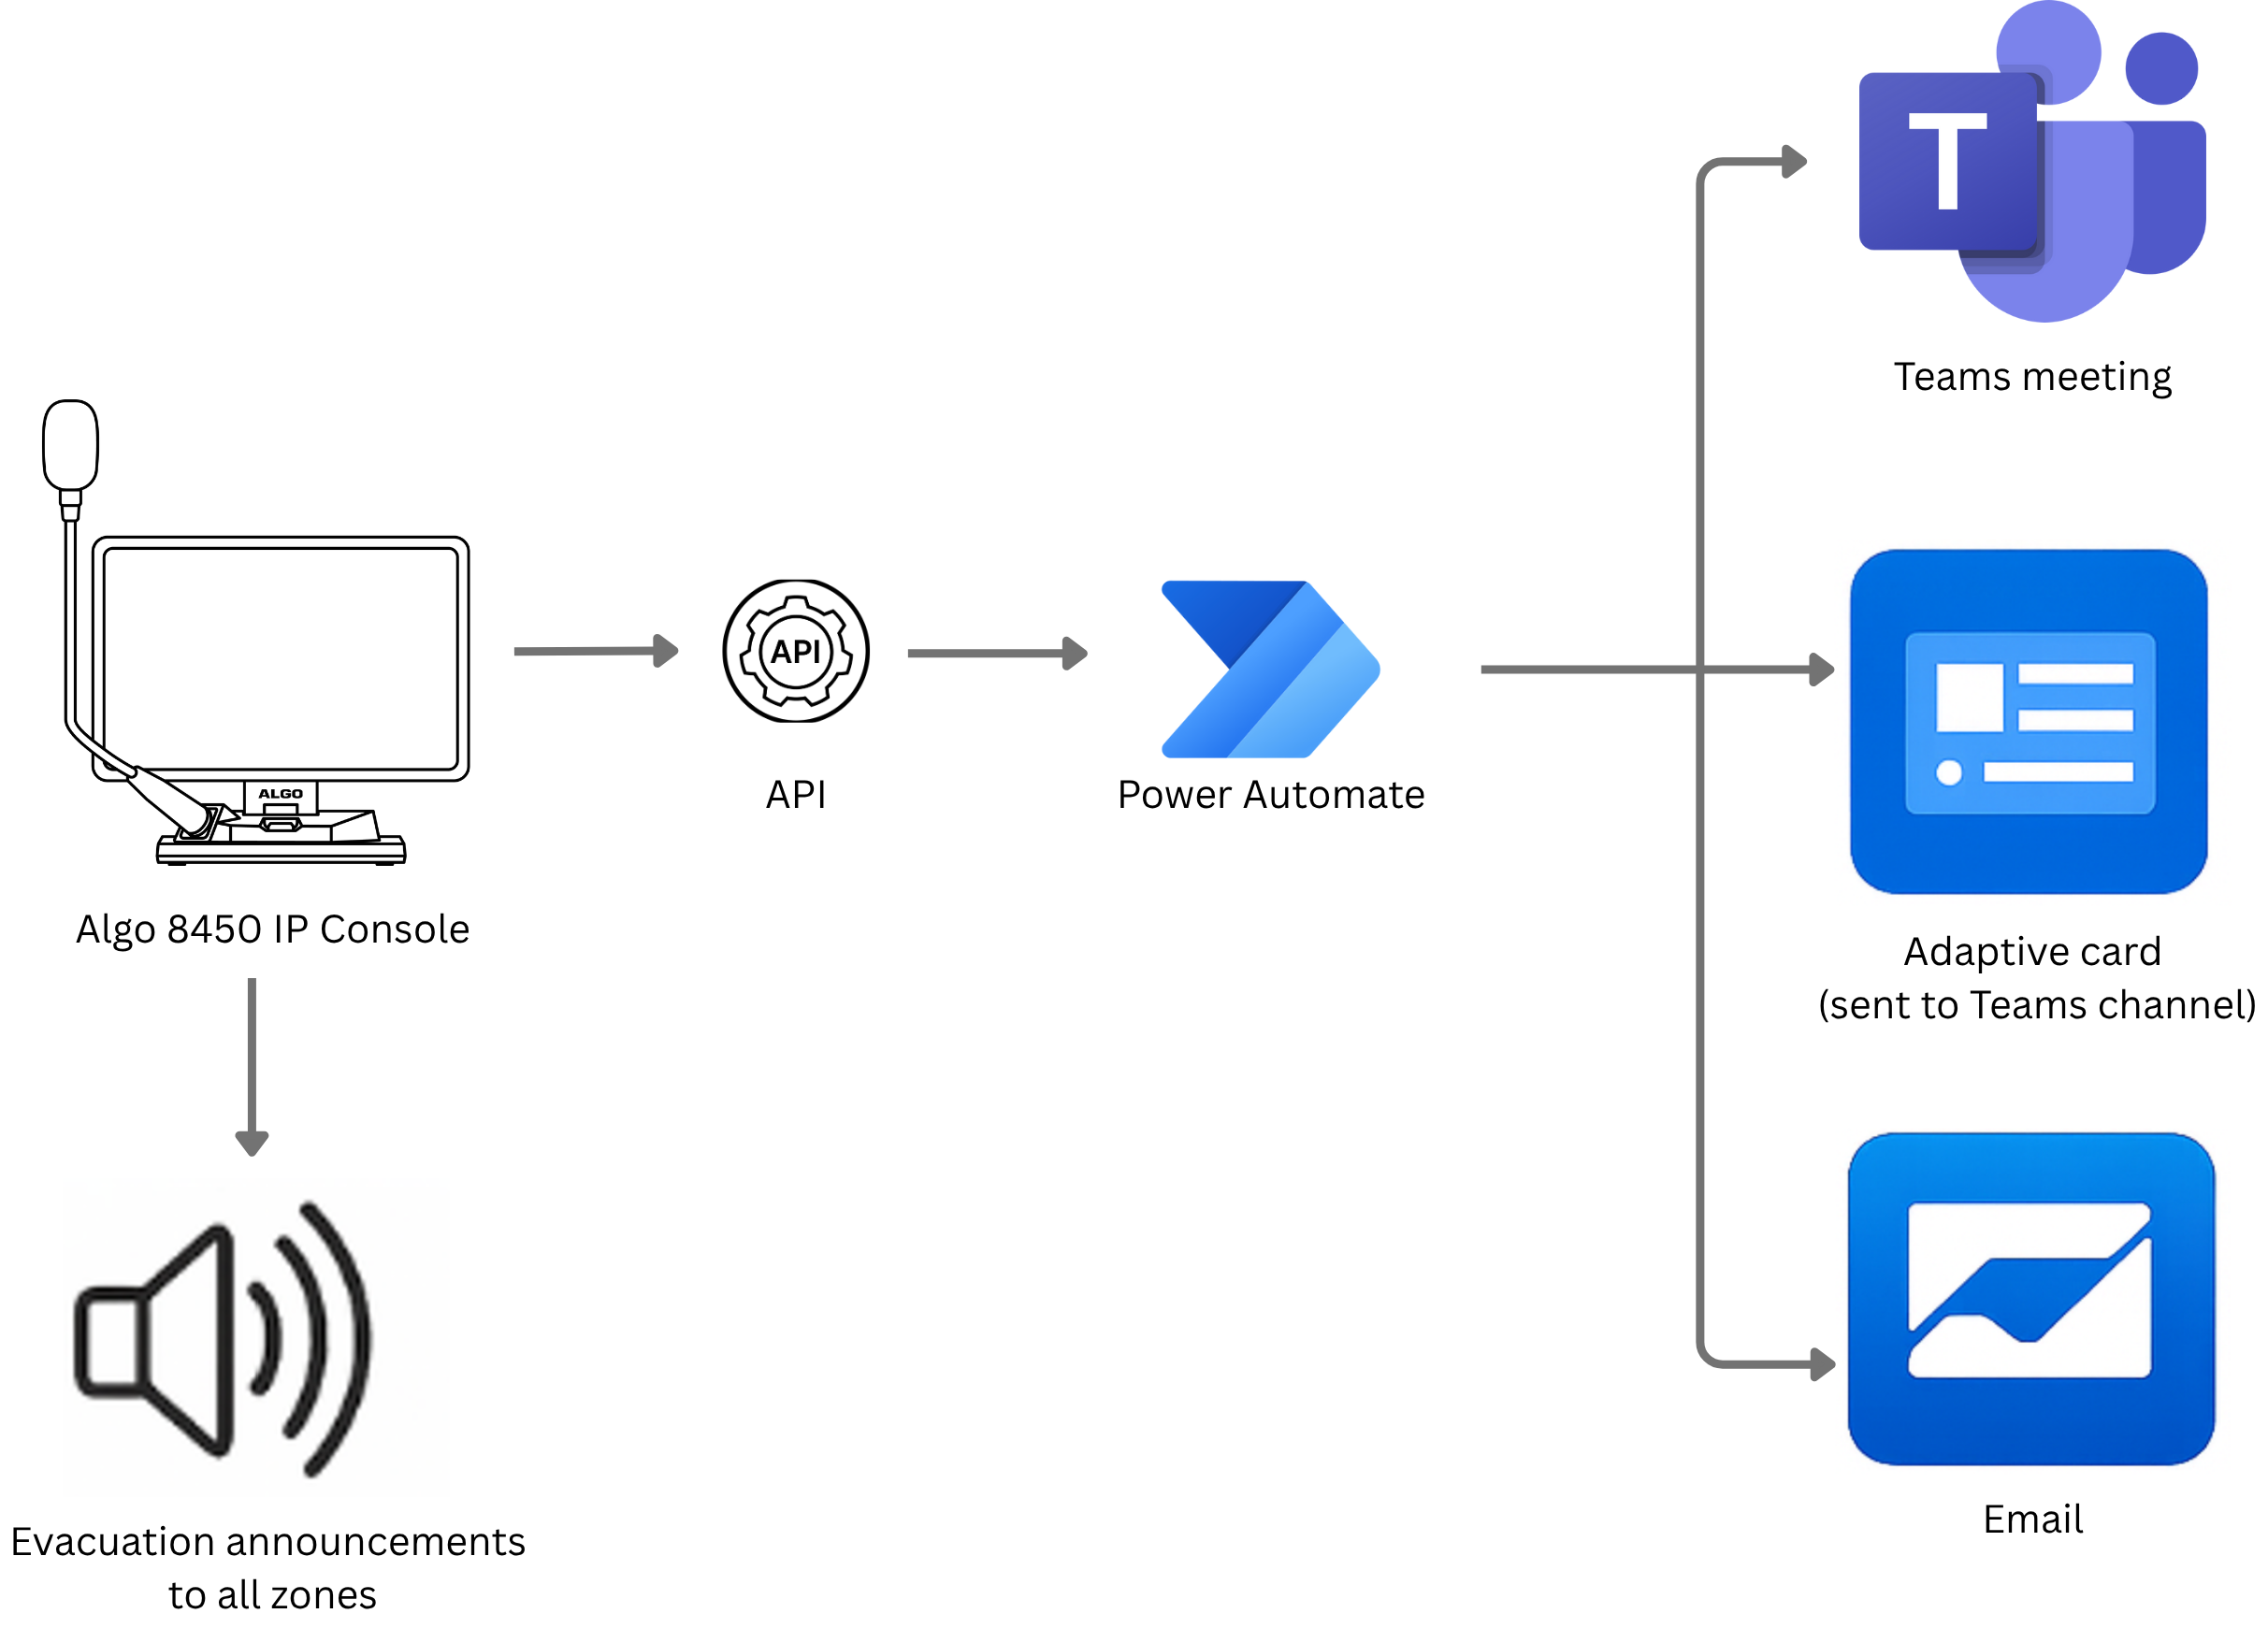
In this example, when the Algo 8450 button is activated, Power Automate immediately triggers the following actions:
Creates a Microsoft Teams meeting so responders can join a live coordination call within seconds.
Sends an email notification to predefined recipients, including the meeting link and key alert details.
Posts an Adaptive Card in Teams showing the alert details, such as the type of alert and device location.
Before you start
Make sure you have the following:
An Algo 8450 device.
A Microsoft account signed in to:
Microsoft Teams: For creating meetings and triggering workflows.
Office 365 Outlook: For sending email notifications.
A Teams channel where messages from the Algo 8450 will be posted.
In this example, a channel named “Emergency” is used.
Procedure Overview
This procedure outlines the steps to integrate an Algo 8450 device with Microsoft Teams using Power Automate.
Creating a Workflow in Power Automate
Create a Power Automate workflow that starts with a webhook trigger.
When the workflow receives an API request from the Algo 8450, it automatically performs predefined Teams actions such as creating an Outlook meeting, sending an email notification, and posting a Teams message.
Obtaining the Webhook URL from Your Power Automate Workflow
Copy the webhook URL generated by your Power Automate workflow.
The Algo 8450 uses this URL to send alert data to Power Automate and trigger the workflow.
Configuring the Algo 8450 Button
In the Algo 8450 web interface, configure a button to send an API request to the Power Automate webhook when activated.
Creating a Workflow in Power Automate
In the following example, Power Automate flow receives a webhook trigger from Algo 8450, creates a Teams meeting, sends email notifications, and posts alerts to a Teams channel for quick response and coordination.
The webhook acts as a bridge between the Algo 8450 alert and Microsoft Teams, allowing the alert to automatically trigger a Teams notification without requiring any manual action.
.png)
To create an automated workflow in Power Automate:
Go to Power Automate.
Make sure you’re in your organization’s default environment. It usually appears as your company name in the top-right corner of the Power Automate page.
Your company’s default environment is where all your Teams, Outlook, and Microsoft 365 connectors are typically available.
Here is an example:
.png)
Create the workflow trigger.
This trigger listens for incoming webhook requests from an external system (in this example, the Algo 8450 device). When the Algo 8450 sends an API request to the webhook, the rest of the workflow is triggered automatically.
Select + Create → Instant cloud flow.
.png)
Enter a name for your flow. For example: Alerts from Algo 8450.
For the question Choose how to trigger this flow, select When a Teams webhook request is received. Then, select Create.
.png)
Select Save.
.png) Now, the workflow trigger is created.
Now, the workflow trigger is created. .png)
Create a Parse JSON action.
This step reads and organizes the API request payload received from the Algo 8450.
It breaks down the raw data into easy-to-use pieces, such as the event name, location, and device ID, allowing the next steps in the workflow (like sending emails or posting to Teams) to use this information automatically.
At the bottom of your workflow, select the Insert a new action button
 .
..png)
In the Add an action section, select Parse JSON.
You can search for the phrase “parse JSON” to locate it.
.png)
Click in the Content field and choose
.png) to enter data from the previous step.
to enter data from the previous step. .png)
Select Body.
This takes the raw JSON data received from the previous step and parses it here. That is, the webhook request triggered by the Algo 8450 API call.
(1).png)
In Schema, click Use sample payload to generate schema.
.png)
Paste the sample JSON:
{
  "device-mac": "XXX",
  "device-location": "XXX",
  "button": "XXX",
  "event": "XXX"
}
Note
This sample payload tells Power Automate what structure to expect from the Algo 8450 API payload.
You can customize the fields to include additional information if needed.
However, make sure the API payload data of your 8450 button has the same field names and structure as the sample JSON (the order of fields doesn’t matter).
Click Done.
(1).png)
Create a Teams meeting.
This action automatically creates an online Microsoft Teams meeting for responders to join immediately. The meeting link (Join URL) is saved for use in the following email and Teams messages.
At the bottom of your workflow, select the Insert a new action button
..png)
Add the action Create a Teams meeting.
You can search for the phrase “teams meeting” to locate it.
.png)
Enter the following information:
Subject: Enter the meeting subject.
Body Event message content: Enter the meeting details or purpose.
Time zone: Select your time zone.
Start time: Click in the text field and choose Insert Expression
.png) .
. .png)
Then enter
addMinutes(utcNow(),5)and select Add.(1).png)
This expression takes the current time (in UTC) and adds 5 minutes to it as the meeting start time.
End time: Click in the text field and choose Insert Expression
. Then enter addMinutes(utcNow(),35)and select Add.This expression takes the current time (in UTC) and adds 35 minutes to it as the meeting end time.
Together, the Start time and End time define a 30-minute meeting.
Calendar id: Select Calendar.
This creates meetings in your default calendar (usually your main Outlook calendar).
Select Save.
Add an Email Notification
This action sends a notification email to the predefined recipient list.
The email includes the alert information and the Teams meeting link for quick access.
At the bottom of your workflow, select the Insert a new action button
.(1).png)
Add the action Send an email (V2).
You can search for the phrase “Send an email” to locate it.
.png)
Configure the following information:
To: Enter recipients’ email addresses.
Subject: Enter the email subject. For example, “Emergency Alert from Algo 8450”.
Body: Enter alert details, such as location or device ID.
Here is an example. You can paste this text directly into the Body field.
🚨 Emergency Alert Notification 🚨 Dear Team, An alert has been triggered by the Algo 8450 device. Please review the details below and join the coordination meeting immediately. 🔹 Alert Details: - Alert Type: @{body('Parse_JSON')?['event']} - Button Triggered: @{body('Parse_JSON')?['button']} - Device Location: @{body('Parse_JSON')?['device-location']} - Device MAC: @{body('Parse_JSON')?['device-mac']} 🔹 Meeting Information: - Meeting Topic: @{outputs('Create_a_Teams_meeting')?['body/subject']} - Start Time (UTC): @{outputs('Create_a_Teams_meeting')?['body/start/dateTime']} - End Time (UTC): @{outputs('Create_a_Teams_meeting')?['body/end/dateTime']} 👉 Join the Teams meeting now: @{outputs('Create_a_Teams_meeting')?['body/onlineMeeting/joinUrl']} Please join as soon as possible to assist with the ongoing emergency response. Stay safe, Emergency Coordination TeamImportance: Specify the importance of this email.
Select Save.
Post a card in a Teams Channel.
This action posts an informational Adaptive Card in a specified Teams channel. The card displays the alert summary and meeting link, allowing Teams members to discuss and respond in real time.
At the bottom of your workflow, select the Insert a new action button
..png)
Add the action Post card in a chat or channel.
You can search for the phrase “post card” to locate it.
.png)
Configure the following information:
Post as: Choose Flow bot.
This set the message sender as Workflows, instead of your personal account.
Post in: Choose Channel.
Team: Select your target team name.
Channel: Select your target team channel.
.png)
Adaptive Card: Enter card details, such as location or device ID.
Here is an example. You can paste this text directly into the Adaptive Card field.
{
  "$schema": "http://adaptivecards.io/schemas/adaptive-card.json",
  "type": "AdaptiveCard",
  "version": "1.5",
  "msteams": { "width": "Full" },
  "body": [
    {
      "type": "TextBlock",
      "text": "🚨 **Emergency Alert Notification**",
      "weight": "Bolder",
      "size": "Large",
      "color": "Attention"
    },
    {
      "type": "TextBlock",
      "text": "@{body('Parse_JSON')?['event']} — Immediate Response Required",
      "weight": "Bolder",
      "wrap": true,
      "spacing": "Small"
    },
    {
      "type": "FactSet",
      "facts": [
        { "title": "📍 Location:", "value": "@{body('Parse_JSON')?['device-location']}" },
        { "title": "🔘 Button Triggered:", "value": "@{body('Parse_JSON')?['button']}" },
        { "title": "💻 Device MAC:", "value": "@{body('Parse_JSON')?['device-mac']}" },
        { "title": "📅 Meeting:", "value": "@{outputs('Create_a_Teams_meeting')?['body/subject']}" },
        { "title": "🕒 Start (UTC):", "value": "@{outputs('Create_a_Teams_meeting')?['body/start/dateTime']}" }
      ]
    },
    {
      "type": "TextBlock",
      "text": "Please join the coordination meeting immediately.",
      "wrap": true,
      "spacing": "Medium"
    }
  ],
  "actions": [
    {
      "type": "Action.OpenUrl",
      "title": "🔗 Join Teams Meeting",
      "url": "@{outputs('Create_a_Teams_meeting')?['body/onlineMeeting/joinUrl']}"
    }
  ]
}
The above code retrieves data from the actions Parse JSON and Create a Teams meeting to create the following card layout in Teams:
 (1) (1).png)
Select Save.
Obtaining the Webhook URL from Your Power Automate Workflow
You will need your workflow’s webhook URL for configuring the Algo 8450 button.
The 8450 uses this URL to send alert data to your Power Automate workflow and trigger it automatically.
To obtain the webhook URL from your Power Automate workflow:
Go to Power Automate.
Select My flows and then select the workflow you created.
.png)
Select Edit.
 (1) (1).png)
Click the first action in your workflow When a Teams webhook request is received.
For the question Who can trigger the flow?, set it as Anyone. Then, select Save.
.png)
Click Copy
.png) to obtain the HTTP URL (webhook).
to obtain the HTTP URL (webhook).Note
This URL is used by your Algo 8450 to send alert data to your Power Automate workflow.
Keep it confidential because anyone with this link could trigger your workflow and send data to it.
.png)
Paste this URL into a notebook.
Let’s use the following fake URL as an example.
.png)
Retrieve the following information from your HTTP URL.
API Target: The string between
https://and/powerautomate/...section..png)
Custom Path: The string begins with
powerautomateto the end of the URL.Note
Make sure there are no trailing spaces when you copy this string.
.png)
Save the information. You will need it in the 8450 button configuration later.
Configuring the Algo 8450 Button
The following configuration allows the 8450 to perform the following when Button 1 is activated:
Send a multicast to all zones using a pre-recorded message named “algo-alert-evacuation.wav”.
Activate the Teams workflow as defined in Power Automate.
Note
Before you start, make sure you have the following:
Retrieved the API target and custom path from your workflow HTTP URL.
In the Algo 8450 web interface, a button is created that will be used to trigger the Teams workflow.
Note
You can integrate any supported Algo device by referring to the Send API Request configuration shown in this 8450 example.
However, the UI path to locate the Send API Request option varies by device model.
The Send API Request configuration shown in this 8450 example also applies to all other Algo devices.
IP Speaker
Under Additional Features → Input/output, select Send API Request for the When Input Triggered option.
IP Visual Alerter
Under Additional Features → Input/output, select Send API Request for the When Input Triggered option.
8063 IP Door Controller
Under Basic Settings → Basic Config. Set Other Features for Input #1 or Input #2. Then select Send API Request as the Input #1 Feature.
To configure Algo B450 Button:
Log in to your Algo 8450 web interface.
Go to Advanced Settings → Admin. Make sure RESTful API is set as Enabled.
Select Save.
Go to Screens. Locate the hosting screen of your button.
Select Save.
Configure your button.
.png)
Button Status: Set as Enabled.
Text: Enter a name for this button.
Action: Optional. In this example, Multicast with Tone is selected to trigger a multicast to all zones with a pre-recorded alert message.
Send API Requests: Set as Enabled.
Number of API Requests: Set as 1.
You can enable more than one API request, if desired.
Request 1 - Command: Set as Other.
Request 1 - Method: Set as POST.
Request 1 - Custom Path: Copy and paste the custom path you retrieved in Obtaining the Webhook URL from Your Power Automate Workflow.
Request 1 - Headers: Select Custom Headers, then enter
Content-Type: application/json.Request 1 - Target: Copy and paste the API target you retrieved in Obtaining the Webhook URL from Your Power Automate Workflow.
Request 1 - Data Payload: Enter the alert or device information you want to pass on to the Teams message or email.
Make sure the payload structure matches the one you entered in your workflow’s PARSE JSON step.
Here is an example:
{
"device-mac": "00:22:ee:11:12:13",
"device-location": "Main Office, Floor 3",
"button": "Evacuation",
"event": "Fire Alarm"
}
Note
You can customize the fields to include additional information if needed.
However, make sure the API payload data has the same field names and structure as the sample JSON (the order of fields doesn’t matter) when you configure the action Parse JSON in Creating a Workflow in Power Automate.
Select Save.
Testing Your Workflow
Now you can activate the 8450 button and test the whole workflow.
To test the workflow:
From your 8450 console, press to activate the button.
A multicast to all zones with an evacuation message shall occur.
Besides, you shall:
Receive the following email in your Ourlook email inbox.
 (1).png)
Receive the following message in your Teams Channel.
Receive a meeting invitation in your Outlook.
.png)
Troubleshooting
Problem: When I activate the 8450 button, my workflow isn’t triggered.
Solution:
Make sure you have enabled RESTful API in 8450’s web interface under Advanced Settings → Admin.
Make sure your workflow is enabled. When the workflow is enabled, the status bar shows Turn off. If it does not, click Turn on to enable the workflow.
.png)
Make sure the workflow’s HTTP URL is correct. If you delete, or re‑add the webhook trigger or clone/import a flow, the URL changes. Update the Custom Path and Target for your Algo 8450 button accordingly.
Problem: 8450 shows 401 error when I activate the button.
Solution: Make sure you have selected Anyone for the question Who can trigger the flow?
.png)