Your device includes calendaring functionality synchronized with Network Time Protocol (NTP). You can schedule events on the local device or other IP endpoints, including:
Play a pre-configured tone or alert to a multicast zone
Ideal for education or manufacturing environments where certain areas require regular bell schedules or announcements, while others do not.
Start a SIP call to trigger a pre-configured tone or alert on specific devices
Useful when triggering tones or announcements through the PBX for selected endpoints, such as targeted alerts, shift bells, or department-specific notifications.
Stream live audio to a multicast zone
Suitable for facility-wide announcements, background music, or emergency notifications that need to play simultaneously across all subscribed devices.
Schedule API calls from the device web interface to trigger actions on other devices
For example:
Activating a strobe light
Displaying a slide or slideshow on an IP display
Triggering an emergency alert
Triggering an InformaCast scenario
You can include up to 5 API calls in an API Call event.
For a complete list of API commands, see RESTful API Guide.
You can organize related events into a group so they can be scheduled and managed together.
You can create standalone and recurrent events, skip event or group instances in recurrent schedules, or restore skipped instances.
Note
You can schedule and manage events in two ways:
Using the device’s web interface
Using API calls.
For more information on how to use API calls to schedule and manage events or groups, see RESTful API Guide.
Feature Overview
.png)
Item | Description |
|---|---|
1 | The Data tab allows you to:
|
2 | The Groups tab allows you to:
|
3 | The Events tab allows you to:
|
4 | The Calendar tab allows you to:
|
Setting Your Device Time Zone
The Scheduler uses the device’s time zone to determine event times.
Set the correct time zone to ensure events run at the expected scheduled time.
To configure your device’s time zone:
Go to Advanced Settings → Time Zone.
Select your desired time zone.
Select Save.
Event Timeline
Events in the timeline follow these rules:
Play Tone and SIP Call with Tone events are queued based on their creation time.
Stream Audio events are not queued. Instead, a newer stream pauses an existing stream. When the newer stream completes, the paused stream resumes if it still has time remaining.
A Stream Audio event has a lower priority than a Play Tone or SIP Call event. Either of these events can pause an active stream.
API Call events are dispatched immediately when triggered. They do not wait behind audio events or consume queue slots.
Note
The queue depth for simultaneous Play Tone and SIP Call with Tone events is 16 entries. If more than 16 events occur at the same time, additional events are dropped.
Simultaneous Play Tone Events
To prevent audio overlap, simultaneous Play Tone events are queued by creation time and processed sequentially.
For example, in the following case:
Event A is created first to play a tone (15 seconds) at 08:30:00 on January 1st, 2026.
Event B is created later to play a tone (10 seconds) at 08:30:00 on January 1st, 2026.
The events are processed as follows:
08:30:00: Event A starts
08:30:15: Event A ends
08:30:15: Event B starts
08:30:25: Event B ends
Creating and Managing Standalone Events
You can create, duplicate, edit, or delete standalone events. Standalone events may be one-time or recurring.
You can schedule the device to play a pre-configured tone or alert, stream audio from an external source, place a SIP call to a pre-configured SIP extension to play audio, or send API requests to other endpoints to trigger actions.
Event Types
You can schedule various types of events.
Event Type | Description |
|---|---|
Play Tone | Play a pre-configured tone or alert on the device. The selected audio file is played locally or multicast to Algo endpoints or RTP multicast-compatible third-party equipment configured as Receivers in the selected zone. |
Stream Audio | Stream audio from a radio URL or a local audio file. The audio can be played locally or multicast to Algo endpoints or RTP multicast-compatible third-party equipment configured as receivers in the selected zone. |
SIP Call with Tone | Place a SIP call to a specified device’s Page Extension to play a pre-configured tone or alert. The selected audio file is played on the target device locally, or multicast to a specified zone (if the target device is configured as a multicast Transmitter). |
API Call | Send API requests to other endpoints to trigger actions. For example:
You can include up to 5 API calls in an API Call event. For a full list of API calls, refer to the RESTful API Guide. |
Scheduling Tone Playing
You can schedule the device to play a pre-configured tone or alert locally, or to multicast it to a specific zone.
To schedule a Play Tone event:
Go to Scheduler → Events.
Select Create New Event.
Configure the event settings:
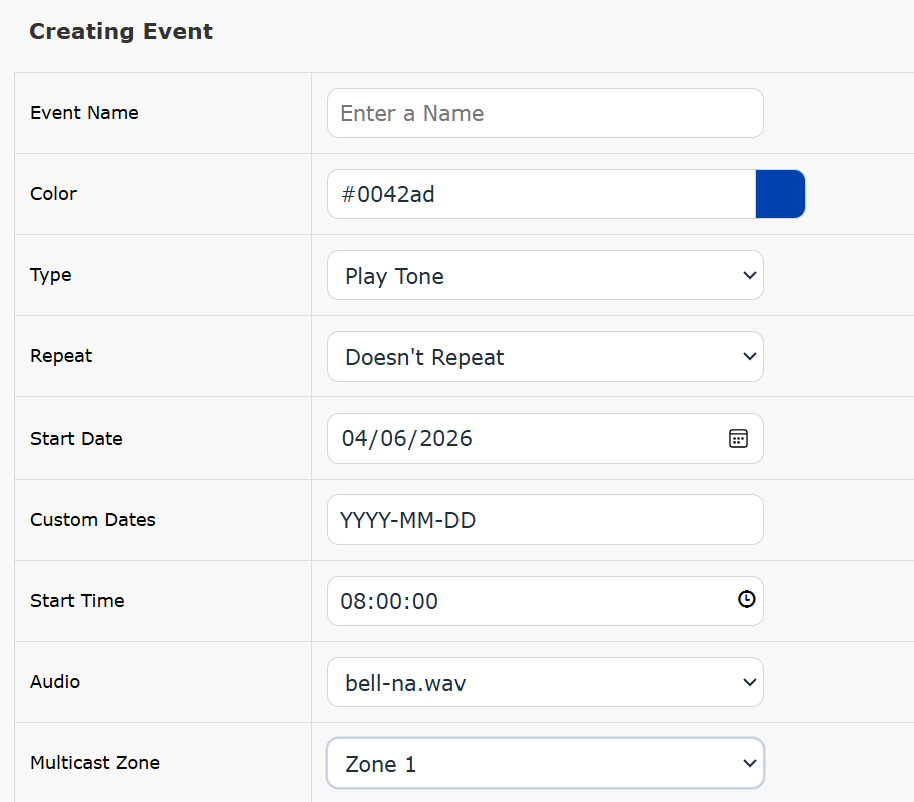
Event Name: Enter a name for your event.
Color: Accept the default color or specify a new one.
The Scheduler selects a different color for each new event by default.
Type: Set as Play Tone.
Repeat: Set a repeat frequency, if desired.
Start Date: Enter the start date.
Custom Dates: Additional dates on which you want the event to occur. If a custom date duplicates a date generated by Repeat, only one event instance is scheduled.
Start Time: Enter the start time.
Audio: Select an audio file to play.
Page Zone: If your device is set as a Multicast Transmitter, set the target zone.
Select Save Event.
The event is now added to your Calendar.
Scheduling Audio Streaming
You can schedule live audio streaming at a specified time.
This feature can be used for facility-wide announcements, background music, or emergency notifications that need to play simultaneously across all subscribed devices.
You can stream audio from one of the following options:
The device’s LINE IN input
An online radio URL
An offline audio file
To stream audio from the device’s LINE IN ports, do so:
Connect the audio source to the device’s LINE IN input.
Set Stream Audio from Analog Input Port to Scheduled and configure the audio input settings as required.
To configure audio streaming settings for LINE IN ports:
Go to the Additional Features → Input/Output → Audio Streaming section.

Set Stream Audio from Analog Input Port as Scheduled.
Set a VOX Mode:
Enabled: Automatically activates audio streaming when the device detects sound at the specified sensitivity, and stops it when the sound disappears.
Disabled: Always activates audio streaming, regardless of whether sound is detected.
Configure Audio Input Settings:
.png)
Audio Input Port: Set the audio input source.
Audio Input Volume: Specify how the device adjusts the gain of the incoming audio.
Select Save.
To schedule audio streaming:
Go to Scheduler → Events.
Select Create New Event.
Configure the event settings:
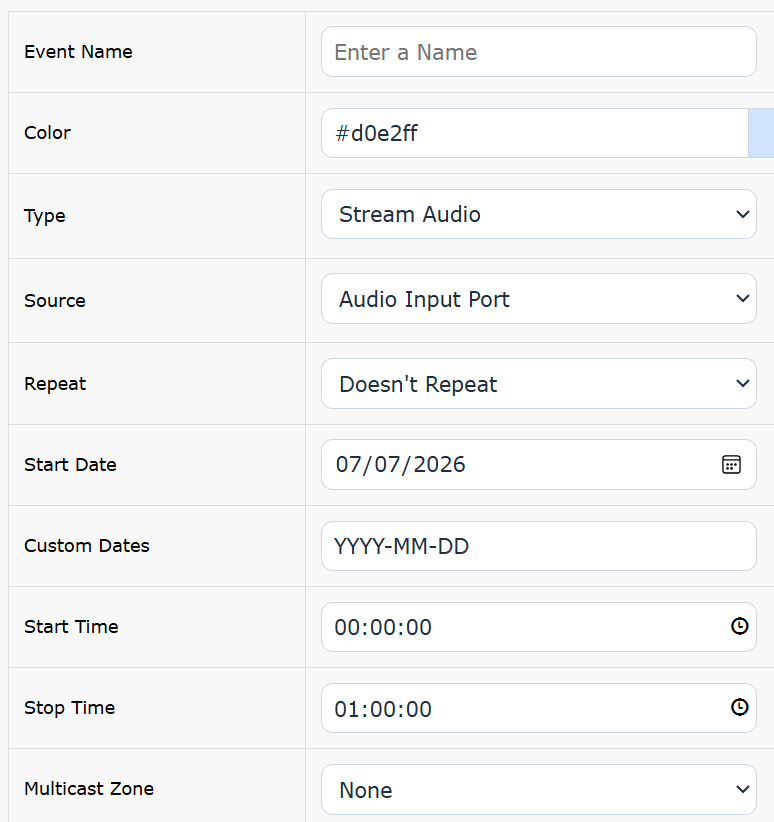
Event Name: Enter a name for your event.
Color: Accept the default color or specify a new one.
The Scheduler selects a different color for each new event by default.
Type: Set as Stream Audio.
Source:
Audio Input Port: Streams the audio from the LINE IN ports.
Audio URL: Streams the audio from an online live audio URL. Configure also the following:
Radio URL: Specify the Internet audio URL.
Volume: Set the streaming volume.
Offline Music File: Select an audio file to stream.
This option is available when you select Audio URL as the Source.
Note
When both the Offline Music File and Radio URL are specified, the Radio URL takes precedence if an Internet connection is available.
Repeat: Set a repeat frequency, if desired.
Start Date: Enter the start date.
Custom Dates: Additional dates on which you want the event to occur. If a custom date duplicates a date generated by Repeat, only one event instance is scheduled.
Start Time: Enter the start time.
Stop Time: Enter the stop time.
Multicast Zone: If your device is set as a Multicast Transmitter, set the target zone.
Select Save Event.
The event is now added to your Calendar.
Placing a SIP Call with Tone
You can call a SIP extension to play a pre-configured tone or alert on a selected endpoint through the PBX.
Note
Both your device and the target device must be registered to the same SIP server, and both must have a configured Page Extension.
If both your device and the target device are registered to Microsoft Teams extensions (account type: Page Extension), you can also call the Teams extension of the target device to trigger the tone playing.
To place a SIP call with tone:
Go to Scheduler → Events.
Select Create New Event.
Configure the event settings:
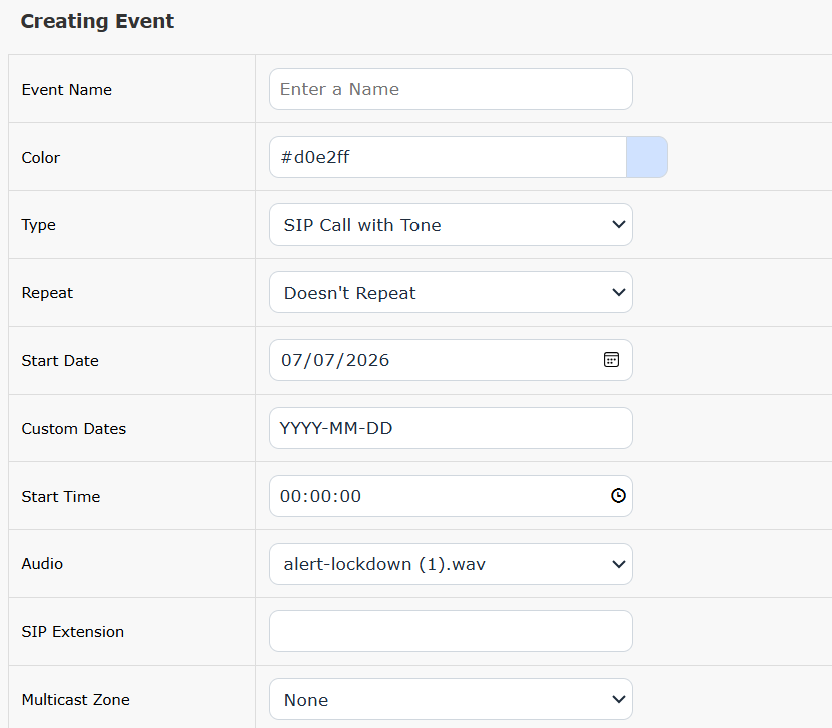
Event Name: Enter a name for your event.
Color: Accept the default color or specify a new one.
The Scheduler selects a different color for each new event by default.
Type: Set as SIP Call with Tone.
Repeat: Set a repeat frequency, if desired.
Start Date: Enter the start date.
Custom Dates: Additional dates on which you want the event to occur. If a custom date duplicates a date generated by Repeat, only one event instance is scheduled.
Start Time: Enter the start time.
Audio: Select an audio file to play.
SIP Extension: Enter the Page Extension of your target device.
Multicast Zone: If your device is set as a Multicast Transmitter, set the target zone.
Select Save Event.
The event is now added to your Calendar.
Placing API Calls
You can initiate API calls to trigger actions on other devices.
Note
Make sure your target IP endpoint has enabled Restful API in Advanced Settings → Admin → API Support.
The following API examples use no authentication. To include authentication, see Including Authentication Headers in API Calls.
.png)
API Command | Description |
|---|---|
Start Tone | Play a tone on one or multiple target devices. |
Stop Tone | Stop the tone. |
Start Strobe | Turn on the strobe light on one or multiple target devices. |
Stop Strobe | Turn off the strobe light. |
Start Screen | Display a screen on one or multiple target devices with text, an image, or both. |
Stop Screen | Hide the screen. |
Other | Initiate other API calls. For a full list of API calls, refer to the RESTful API Guide. |
To send an API call:
Go to Scheduler → Events.
Select Create New Event.
Configure the event settings:
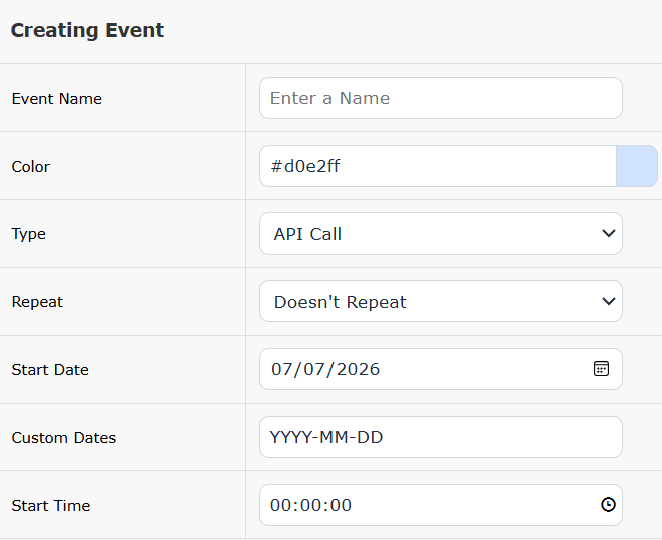
Event Name: Enter a name for your event.
Color: Accept the default color or specify a new one.
The Scheduler selects a different color for each new event by default.
Type: Set as API Call.
Repeat: Set a repeat frequency, if desired.
Start Date: Enter the start date.
Custom Dates: Additional dates on which you want the event to occur. If a custom date duplicates a date generated by Repeat, only one event instance is scheduled.
Start Time: Enter the start time.
Select Save Event.
Select Add API Call.
.png)
Configure the API command:
Select a command type.
Enter the API request Payload.
Enter the IP addresses of the target devices.
Use a comma to separate multiple IP addresses.
For Other commands, specify the API Method, Path, and Header as well.
Example 1: Configuring a Preset API (No Authentication)
Example 2: Configuring Other API (No Authentication)
.png)
.png)
Select OK.
Repeat steps 5-7 to add more API commands.
Select Save Event.
The event is now added to your Calendar.
Related Links:
Groups
You can organize related events into a group so they can be scheduled together.
This streamlines event management within the same time frame, allows you to reuse schedule settings by duplicating groups, and keeps your workspace organized by deleting groups you no longer need.
.png)
Creating Groups
You can create groups as containers for events that occur or repeat within the same time frame, such as a daily schedule.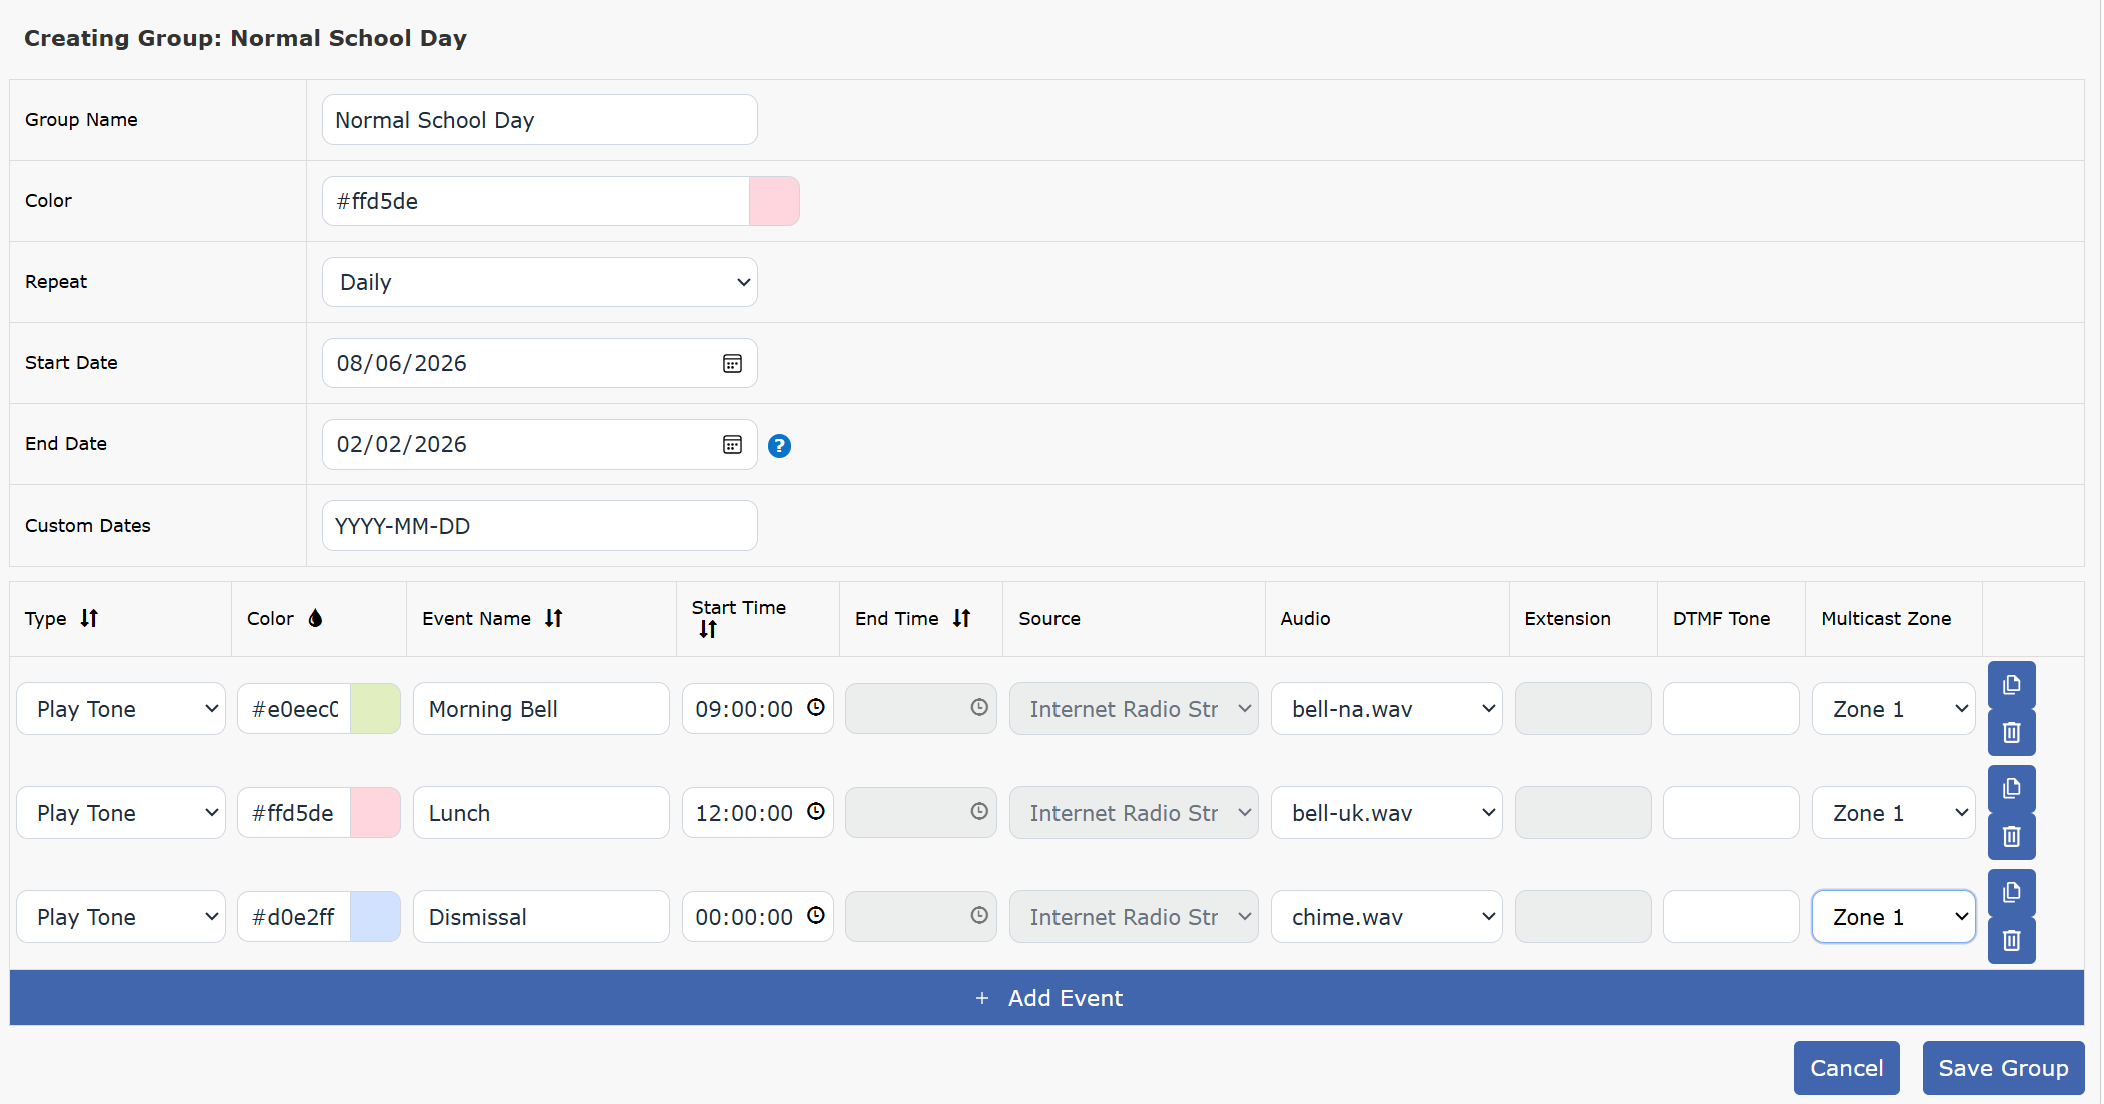
To create a group:
Go to Scheduler → Groups.
Select Create New Group.
Configure the group settings:
Group Name: Enter a name for your event.
Color: Accept the default color or specify a new one.
The Scheduler selects a different color for each new event by default.
Repeat: Set a repeat frequency, if desired.
Start Date: Enter the start date.
Custom Dates: Additional dates on which you want the event to occur. If a custom date duplicates a date generated by Repeat, only one event instance is scheduled.
End Date: Enter the stop date.
Select + Add Event.
Configure the event.
To add multiple events, repeat steps 4-5.
To apply the group color to all events, select the Apply Color
.png) icon in the Color column.PuLL
icon in the Color column.PuLL.png)
Select Save Group.
The group is now added to your Calendar.
Related Links:
Calendar
The Calendar displays scheduled events and groups by month, week, or day.
You can skip or restore events, whether they are standalone or part of a group, and whether they are one-time or recurring.
Calendar View | |
|---|---|
Month View |
|
Week View |
|
Day View |
|
.png)
.png)
.png)
Icons in the Calendar View
The following icons are used in the Calendar view.
Icon | Description |
|---|---|
* | Some event instances of the group are skipped. |
☰ | Group event, containing multiple schedules. |
| Skipped event. |
| Skipped group. |
| Partially skipped group. |
.png)
.png)
.png)
Managing Events or Groups
You can edit, duplicate, or delete events or groups from the Scheduler → Events or Scheduler → Groups tab, respectively.
Managing Events from Scheduler → Events tab | Managing Groups from Scheduler → Groups tab |
|---|---|
|
|
.png)
.png)
You can also skip events or groups, or some events in a group, from the Calendar view.
Note
You cannot delete events that belong to a group from the Calendar view. To prevent these event instances from running, use Skip instead.
Skipping Events
You can skip individual events, entire groups, or specific event instances within a group.
Skipped events or groups are indicated by a truncated rectangle in the upper-right corner. Partially skipped groups are marked with an asterisk (*).
Icon | Description |
|---|---|
| Skipped event |
| Skipped group |
| Partially skipped group |
To skip event instances:
Go to Scheduler → Calendar.
Left-click the desired event or group instance, then select Skip.
For group instances, do one of the following, then select Save.
To skip the entire group of events, use the toggle next to the group name.
To skip certain events in the group, use the toggle next to each event name.
.png)
Restoring Skipped Events
You can restore skipped events.
To restore event instances:
Go to Scheduler → Calendar.
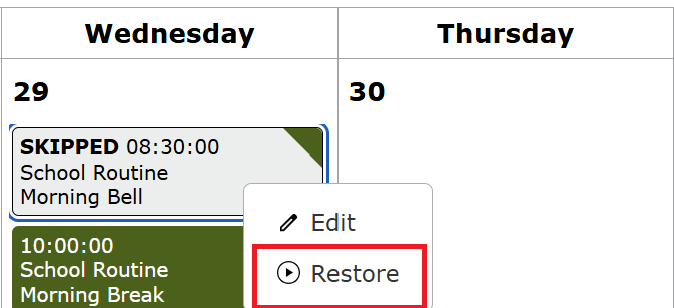
Left-click the skipped event or group instance, then select Restore.
Backing Up and Restoring Scheduler Data
You can back up Scheduler data and restore it later. The backup file can also be used to quickly deploy another device of the same product model.
You can also select Clear All Data to reset the Scheduler to default settings before redeployment, reconfiguration, or troubleshooting unexpected scheduled behavior.
.png)
Downloading Scheduler Data
You can download a backup database file of schedules with events, times, and calendar dates.
Note
This backup is independent from the rest of the configuration backup on the device.
To download Scheduler data:
Go to Scheduler → Data.
Select Download.
The data file is downloaded to your local disk, with the file format: scheduler-[device model]-[mac address].db.
Restoring Scheduler Data
You can upload and restore a saved Scheduler data file.
To restore the Scheduler data:
Go to Scheduler → Data.
Select Choose File and select your data file.
Select Restore.
Clearing Scheduler Data
You can Clear All Data to reset the Scheduler to default settings before redeployment, reconfiguration, or troubleshooting unexpected scheduled behavior.
Note
It’s recommended to download your scheduler data file before clearing it.
To clear all Scheduler data:
Go to Scheduler → Data.
Select Clear.
Viewing and Managing Events from 8450
You can also use the 8450 to view, skip, or restore events scheduled on an 8301 or 8305 for the next 7 days (including today).
For more information, see the 8450 User Guide.
Scheduler Database File and Firmware Versions
Starting with firmware version 5.7, the Scheduler uses a new database file named scheduler2.db. Firmware versions earlier than 5.7 use scheduler.db.
To access the Scheduler database file:
Go to System → File Manager.
Select Files.
Upgrade to v5.7 or later
When upgrading to v5.7 or later, the system checks for an existing scheduler2.db file:
If it does not exist, the system creates scheduler2.db and migrates all data from scheduler.db.
If it already exists, the scheduler2.db is used.
After upgrading, all new Scheduler data is stored in scheduler2.db, and scheduler.db becomes obsolete.
Downgrade to v5.6 or earlier
When downgrading to v5.6 or earlier, the system checks for an existing scheduler.db file:
If it does not exist, the system creates a blank scheduler.db.
If it exists, the scheduler.db is used.
After downgrading, all new Scheduler data is stored in scheduler.db, and scheduler2.db becomes obsolete.
FAQ
Why do my schedules not appear at the expected time on my calendar
The Scheduler uses the device’s time zone to determine event times.
Set the device time zone in Advanced Settings → Time Zone to ensure events run at the expected scheduled time.
Why do I see the error message “Stream Audio Events need Audio Always On to be set to ‘Scheduled’ while scheduling a Stream Audio event?”
If you see the following error while scheduling a Stream Audio event, go to Additional Features → Input/Output → Audio Streaming and set Audio Always On as Scheduled.
This ensures that the audio stream starts at the scheduled time in the Scheduler.
.png)