Introduction
Algo SIP Endpoints can register to Cisco Webex Calling as a third-party SIP endpoint for voice paging, loud ringing, and emergency alerting. This document provides instructions to set up the Algo IP Endpoints on the Cisco Webex Calling Control Hub (CH) administration portal.
All tests were conducted with the Algo 8301 SIP Paging Adapter & Scheduler, 8186 SIP Horn, 8180 SIP Audio Alerter (G2), 8128 (G2) SIP Strobe Light, and 8201 SIP PoE Intercom. These represent all Algo IP speakers, paging adapters, visual alerters, and door phones, and similar registration steps would apply.
The following Algo devices are supported with Webex Calling.
Note
All the devices mentioned below support DNS SRV records required for Webex Calling.
IP SPEAKERS & HORNS
8180 (G2)
8186
8188
8189
8190 & 8190S
8196
8198
8197
8199
8507
IP PAGING ADAPTER
8301
8305
8373
IP STROBE LIGHTS/IP DISPLAYS
8128 (G2)
8138
8410 & 8420
IP DOORPHONES/INTERCOMS
8028 (G2)
8063
8201
IP CONTROLLERS
8300
IP CONSOLES
8450
Note
Please see certain exceptions regarding unsupported devices below:
The following endpoints are exceptions and cannot be registered to Cisco Webex Calling, as TLS/SRTP support is not available:
8180 SIP Audio Alerter(G1)
8028 SIP Doorphone(G1)
8128 Strobe Light(G1)
8061 SIP Relay Controller.
These devices do not support DNS SRV records. For more information, please contact Algo support.
The 8039 and 8036 video intercoms do not support SDP SRTP encryption. Accordingly, they cannot register to Cisco Webex Calling.
Algo Firmware Requirements
All Algo devices must be running firmware version 3.4.4 or later. You can verify the current firmware on the device, as well as update the firmware in the System → Firmware tab.
The latest firmware available can be checked on the website: www.algosolutions.com.
Firewall Recommendations
Before proceeding, confirm that your network has been configured as specified in the Webex Calling services documentation. Proper configuration allows Webex Calling to establish secure and reliable communication channels for voice, media, and signaling, preventing potential issues such as one-way audio or call failures.
Registering One Extension
Webex Control Hub Configuration
Note
Refer to the article Add Your Customer Managed Device on Cisco’s Webex Help Center for additional information.
To configure Webex Control Hub:
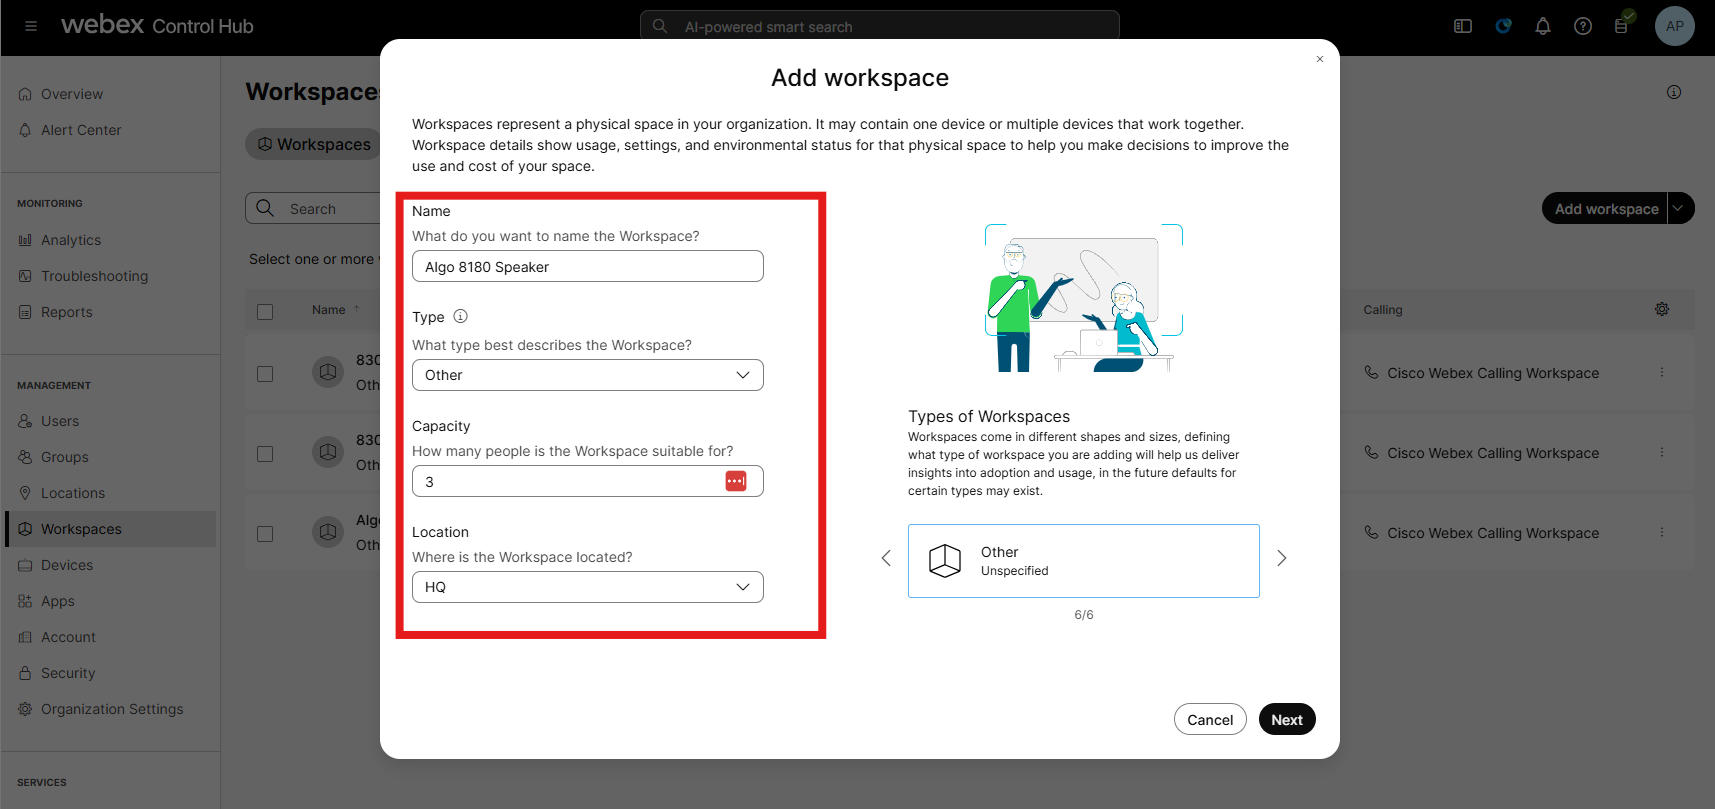
Log in to the Webex Control Hub as the Organization's Administrator and select Workspaces. Add the details, such as Workspace Name, Type, Capacity, and Location.
Click Next.
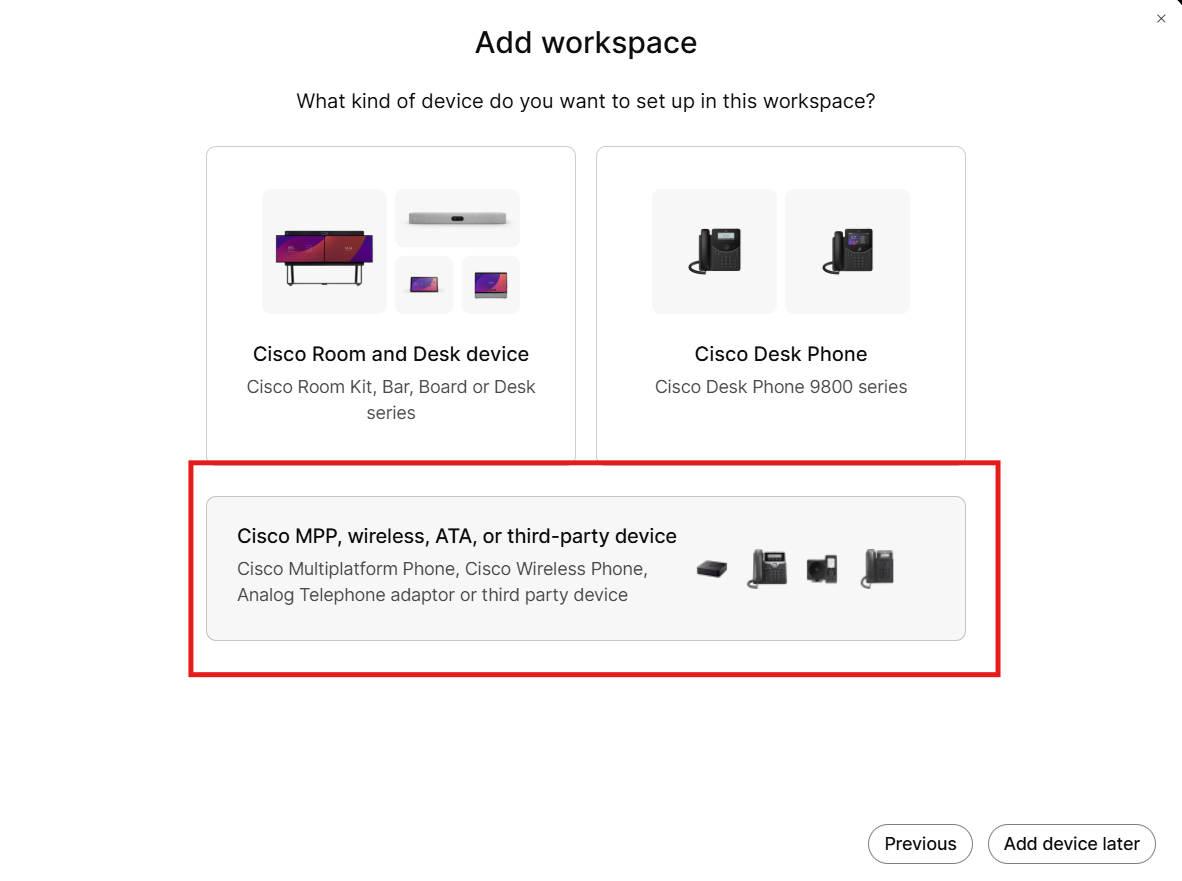
Select Cisco MPP, wireless, ATA, or third-party device.
Configure your workspace
Select device: Select Customer Managed Devices.
Device Vendor: Select Algo Customer Managed.
Enter MAC address: Enter your device's MAC address.
.png)
Select Cisco Webex Calling as the service needed.
.png)
Select the workspace as Professional or Common, depending on your requirements.
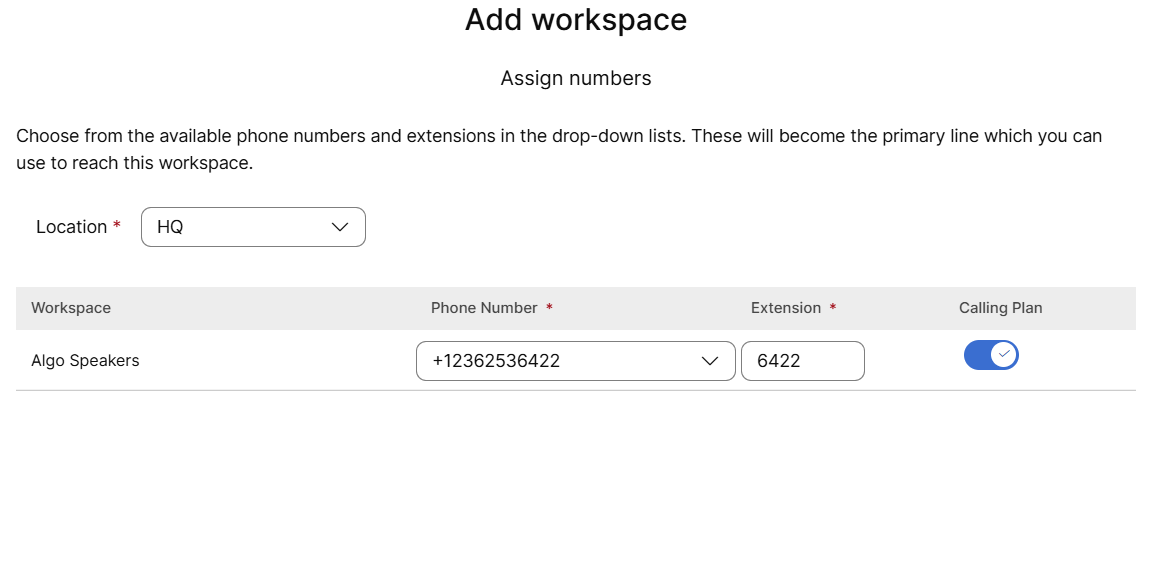
Choose the Phone Number (optional) and enter the extension you want to assign.
The Webex Control Hub will then generate the SIP credentials for the Algo endpoint.
Select Download Credentials as .csv.
You will need these credentials to configure your Algo device later.
 (2).png)
Note
If you do not save these SIP credentials, you may need to reset the password to get a new one.
To reset the SIP password:
Go to Devices, select your workspace.
Click the Reset icon next to the SIP Password.
Algo Device Configuration
To configure Algo devices:
Log in to your Algo device’s web interface.
The device's IP address can be found by using an IP scanner tool such as Angry IP Scanner which is free and open-source.
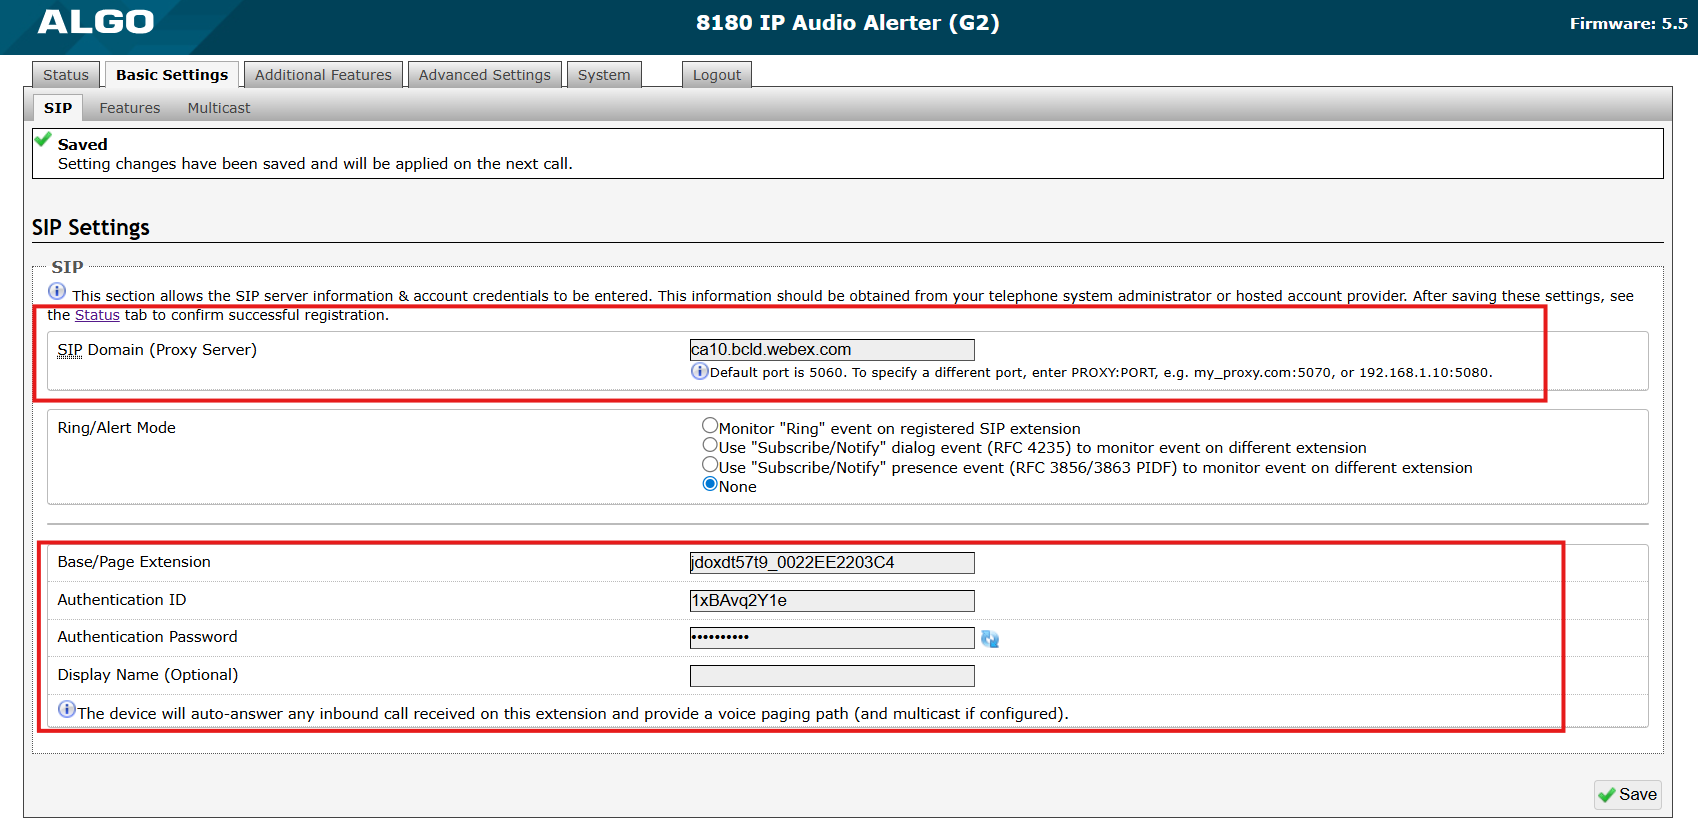
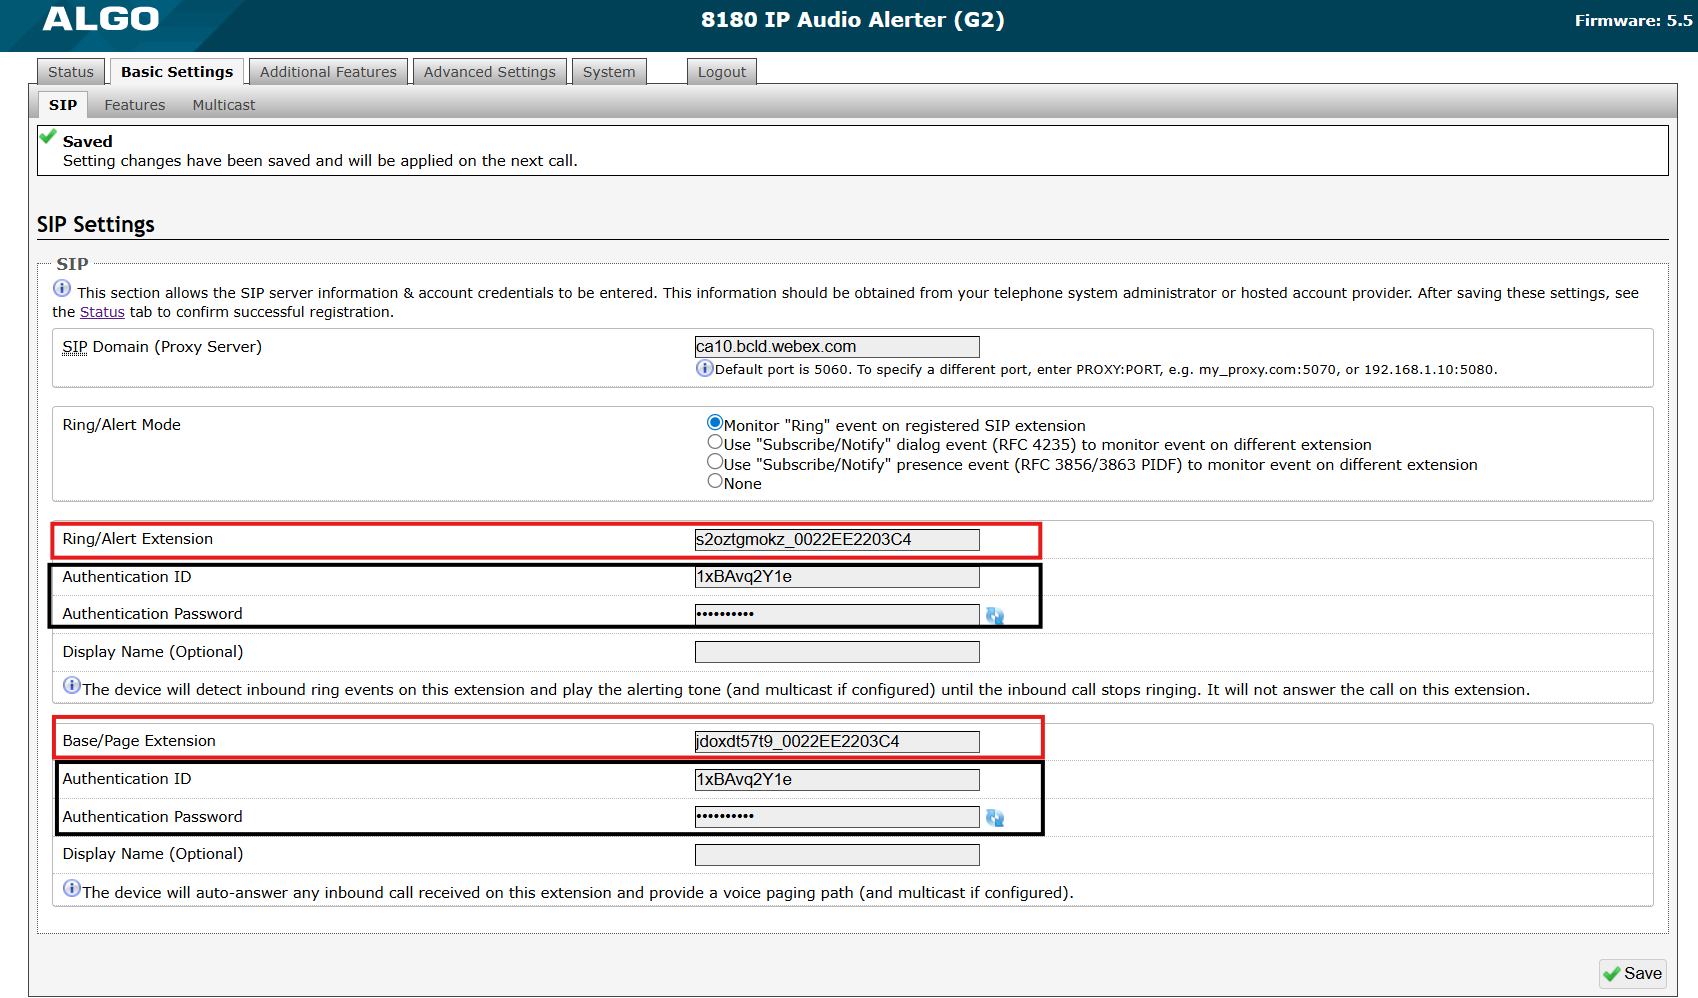
Go to the Basic Settings → SIP tab. Enter the SIP credentials under Base/Page, as provided from Webex, following the guidelines in the table below.
SIP Settings
Value from Webex Control Hub
SIP Domain (Proxy Server)
Enter the portion after the "@" of your Webex Line ID.
For example, if your Line ID is jdoxdt57t9_0022EE2203C4@ca10.bcld.webex.com,
enter ca10.bcld.webex.com.
SIP Extension
Enter the portion before the "@" of your Webex Line ID.
For example, if your Line ID is jdoxdt57t9_0022EE2203C4@ca10.bcld.webex.com,enter jdoxdt57t9_0022EE2203C4.
Authentication ID
SIP Username from Webex.
Authentication Password
SIP Password from Webex.
Note
The Extension in this example is configured as a Base/Page extension. The device will auto-answer the call on this number.
Most Algo IP endpoints also support Ring extensions for loud ringing and alert extensions for emergency alerting. These extensions and their configurations are explained in detail in the Generic SIP Registration Guide.
Select Save.
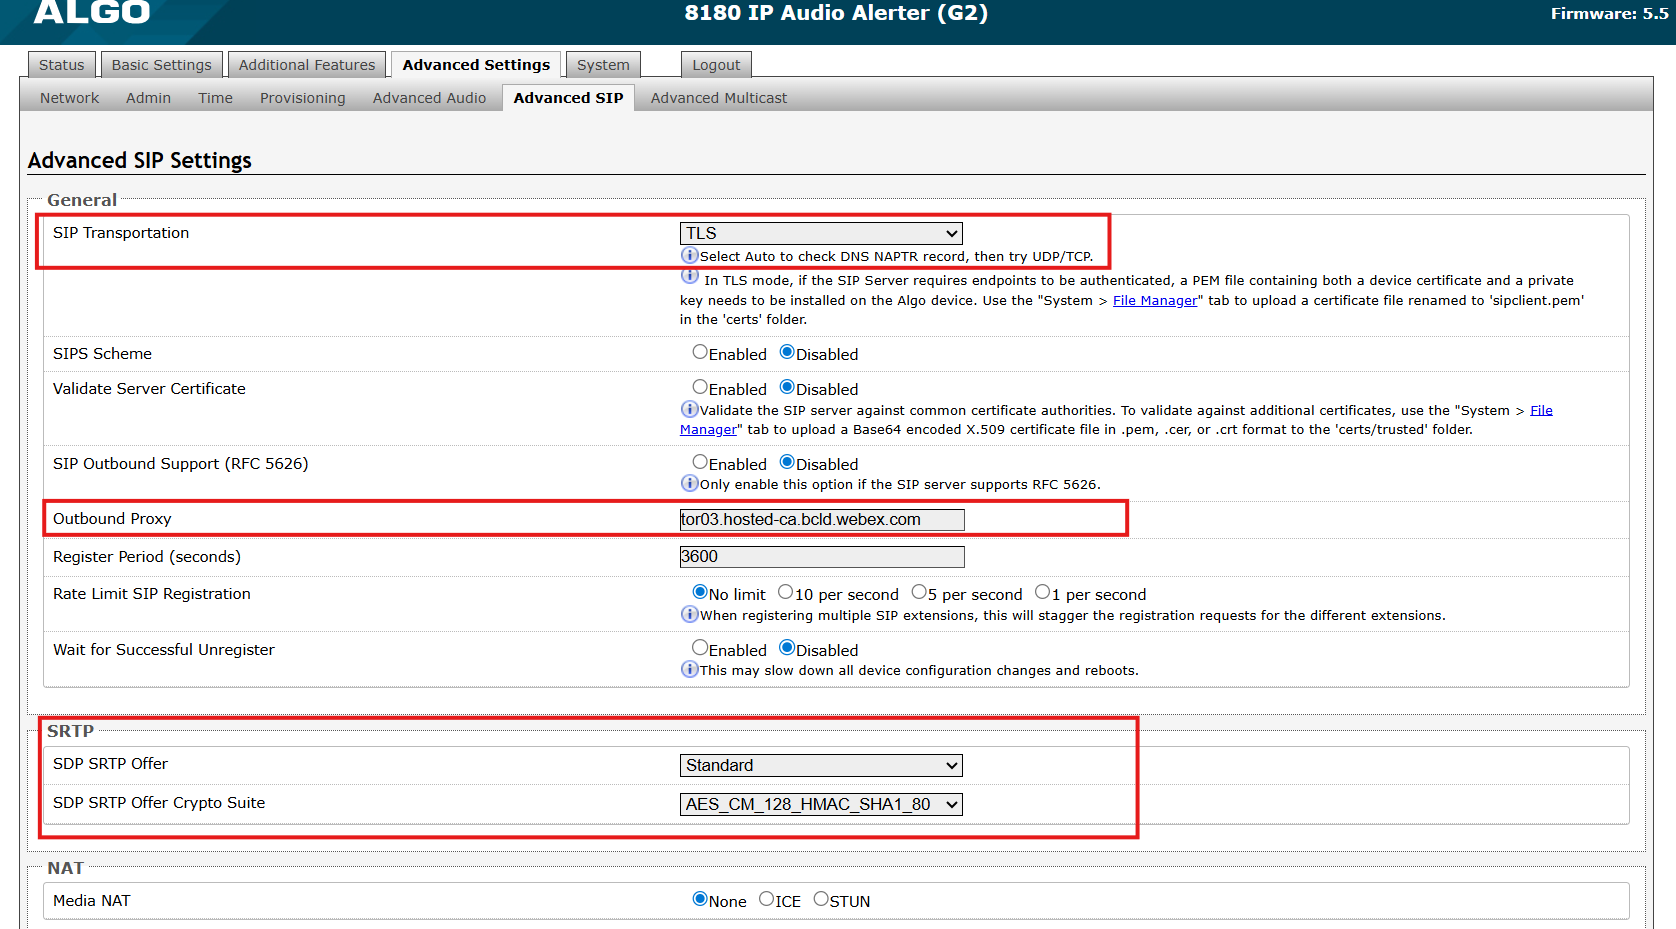
Go to Advanced Settings → Advanced SIP tab.
Enter the Outbound Proxy address provided by the Webex Control Hub.
Set the SDP SRTP Offer to Standard.
Set SDP SRTP Offer Crypto Suite to AES_CM_128_HMAC_SHA1_80.
Select Save.
Confirm the device is registered successfully in the Status tab.
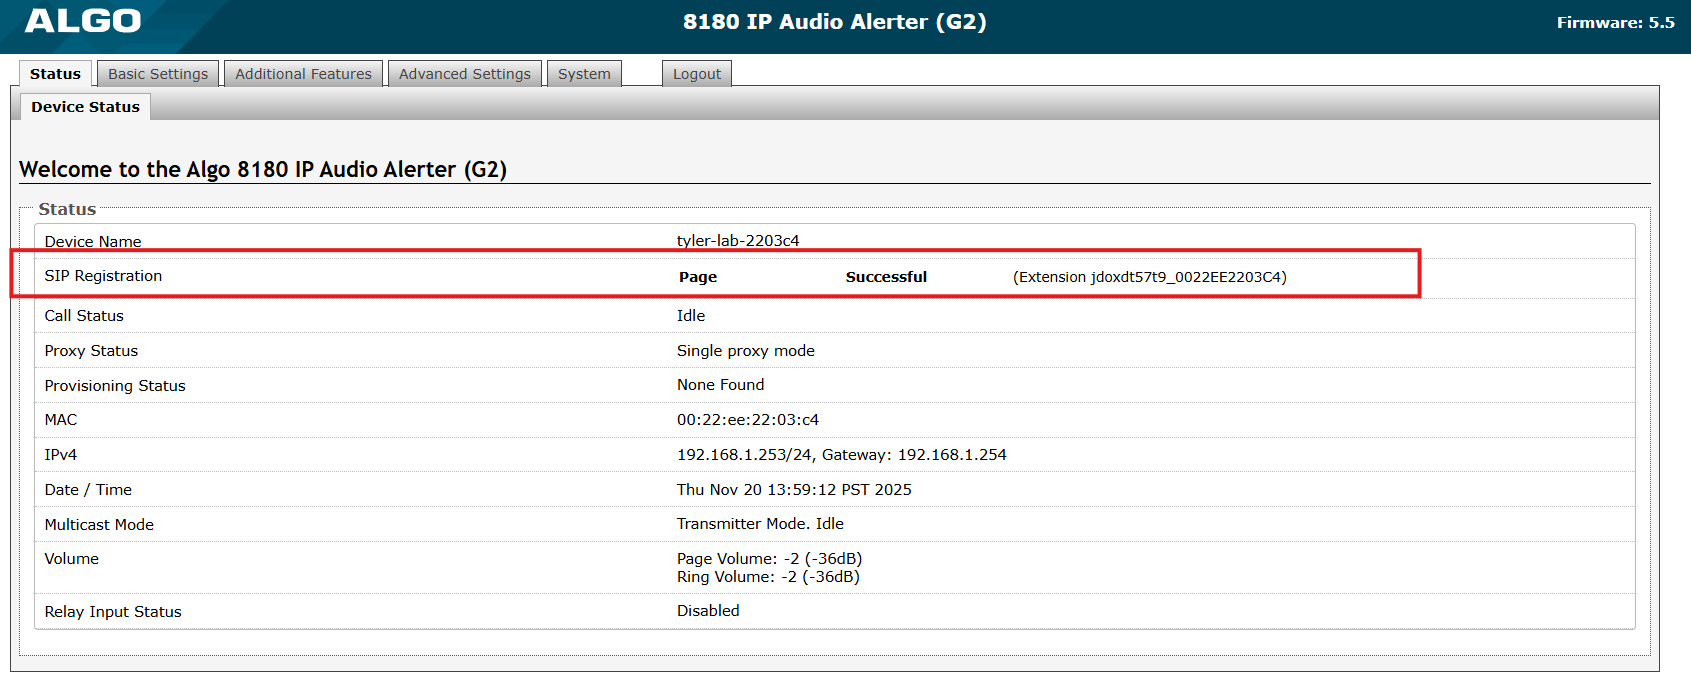
Call it by dialing the extension.
Registering Multiple Extensions
Webex Control Hub Configuration
Algo devices can be registered with multiple extensions for different requirements, such as extension-based zoning or combinations of paging and alerting needs.
Note
You should register a SIP extension before proceeding with creating multiple ones.
To configure Webex Control Hub:
Log in to Webex Control Hub.
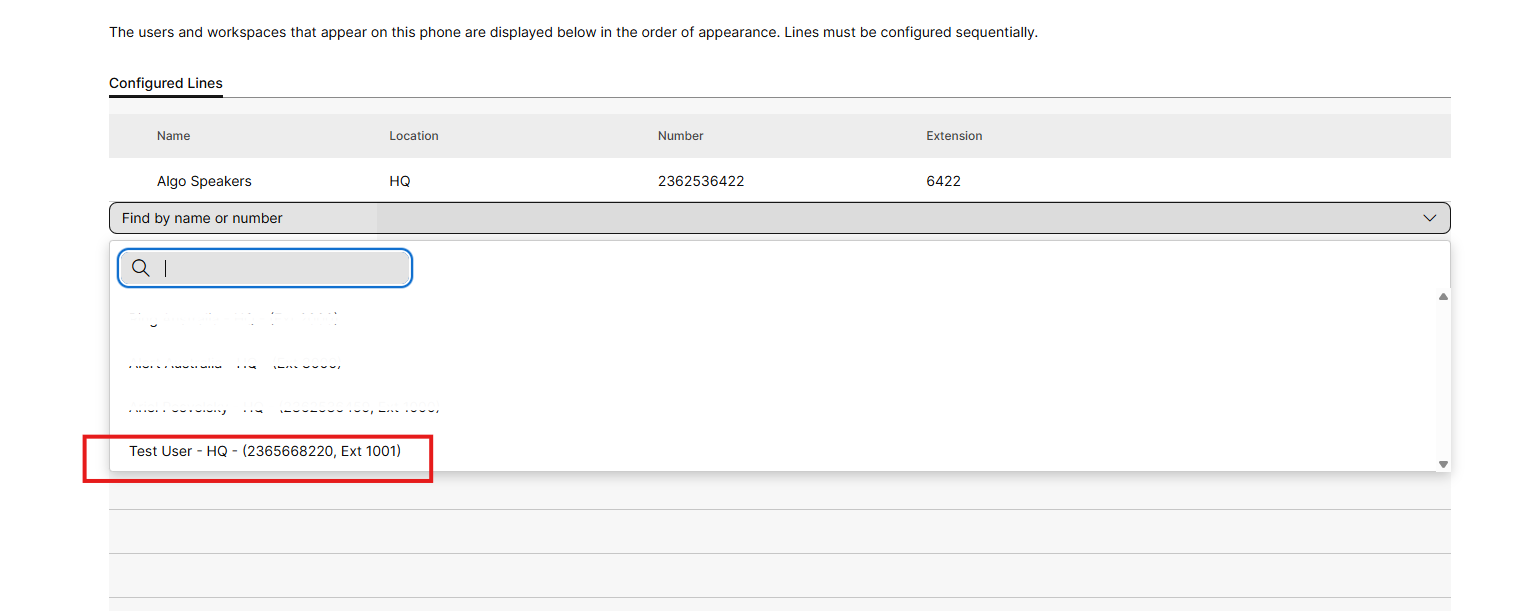
In the Management → Devices menu, find the recently created device and navigate to Configure Lines.
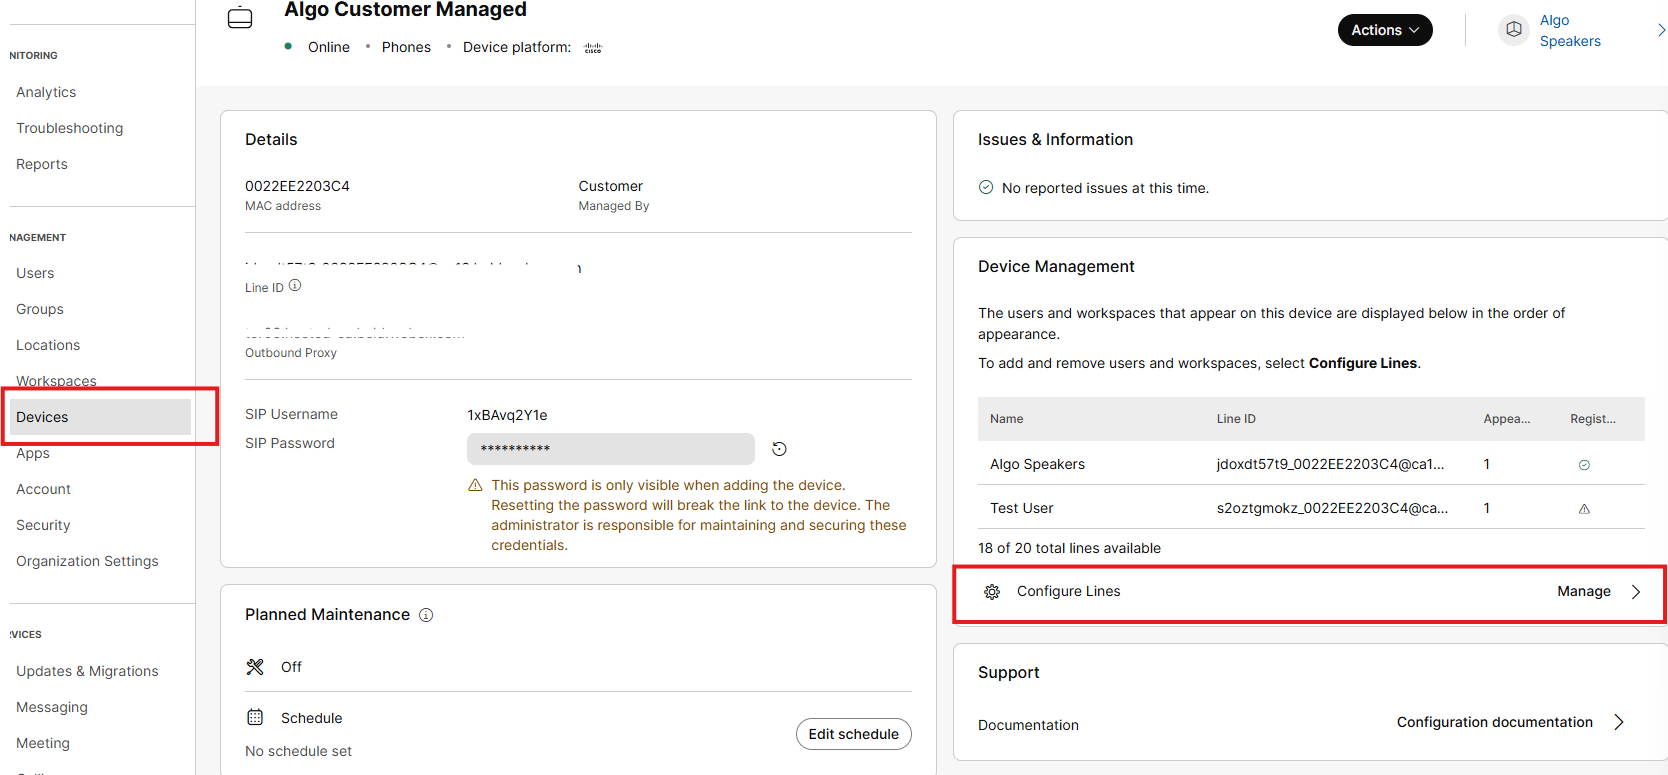
Choose another user and assign the line to it. You may have to create additional users as needed.
Click Save.
You will get a new LineID for this newly configured line.
Algo Device Configuration
To configure Algo Devices:
Enter the LineID as a new Page, Ring or Alert extension on the Algo device. Use the same Authentication ID and Authentication Password that were created earlier.
Verify that both extensions are successfully registered on the Status tab.
.png)
Troubleshooting
SIP Registration Status = "Rejected by Server" (in the Status tab)
Meaning: The Webex server received SIP Register packets from the endpoint and responded with an unauthorized message.
Ensure the credentials (Extension, Authentication ID, Password) on the device match the server.
Under Basic Settings → SIP, select the View icon
.png) on the right of the Password field. If the password is not what it should be, the web browser is probably auto-filling the password field. If so, any change on a page containing a password could be filled in with an undesired string.
on the right of the Password field. If the password is not what it should be, the web browser is probably auto-filling the password field. If so, any change on a page containing a password could be filled in with an undesired string.
SIP Registration Status = "No reply from server" (in the Status tab)
Meaning: the device cannot communicate across the network to the phone server.
Double-check the SIP Domain (Proxy Server) field under Basic Settings → SIP tab is filled out correctly with the address of your server and port number.
Check if the Outbound Proxy is correct under Advanced Settings → Advanced SIP.
Try changing the SIP Transportation Method (Advanced Settings → Advanced SIP) from Auto to TLS.
Ensure the firewall (if present) is not blocking the incoming packets from the server. Confirm that your network has been configured as specified in the Webex Calling services documentation.
Registration Drops Constantly
Enable the Keep-alive method. Navigate to Advanced Settings → Advanced SIP, set Keep-alive to Double CRLF, and set the period to 30 seconds.