Algo Paging Adapter & Amplifier Integration Guide

Algo IP Paging Adapters provide balanced line outputs and connect directly with legacy amplifiers. Acting as a bridge between the VoIP system and legacy PA infrastructure, paging adapters enable organizations to broadcast voice paging across establishments of any size.
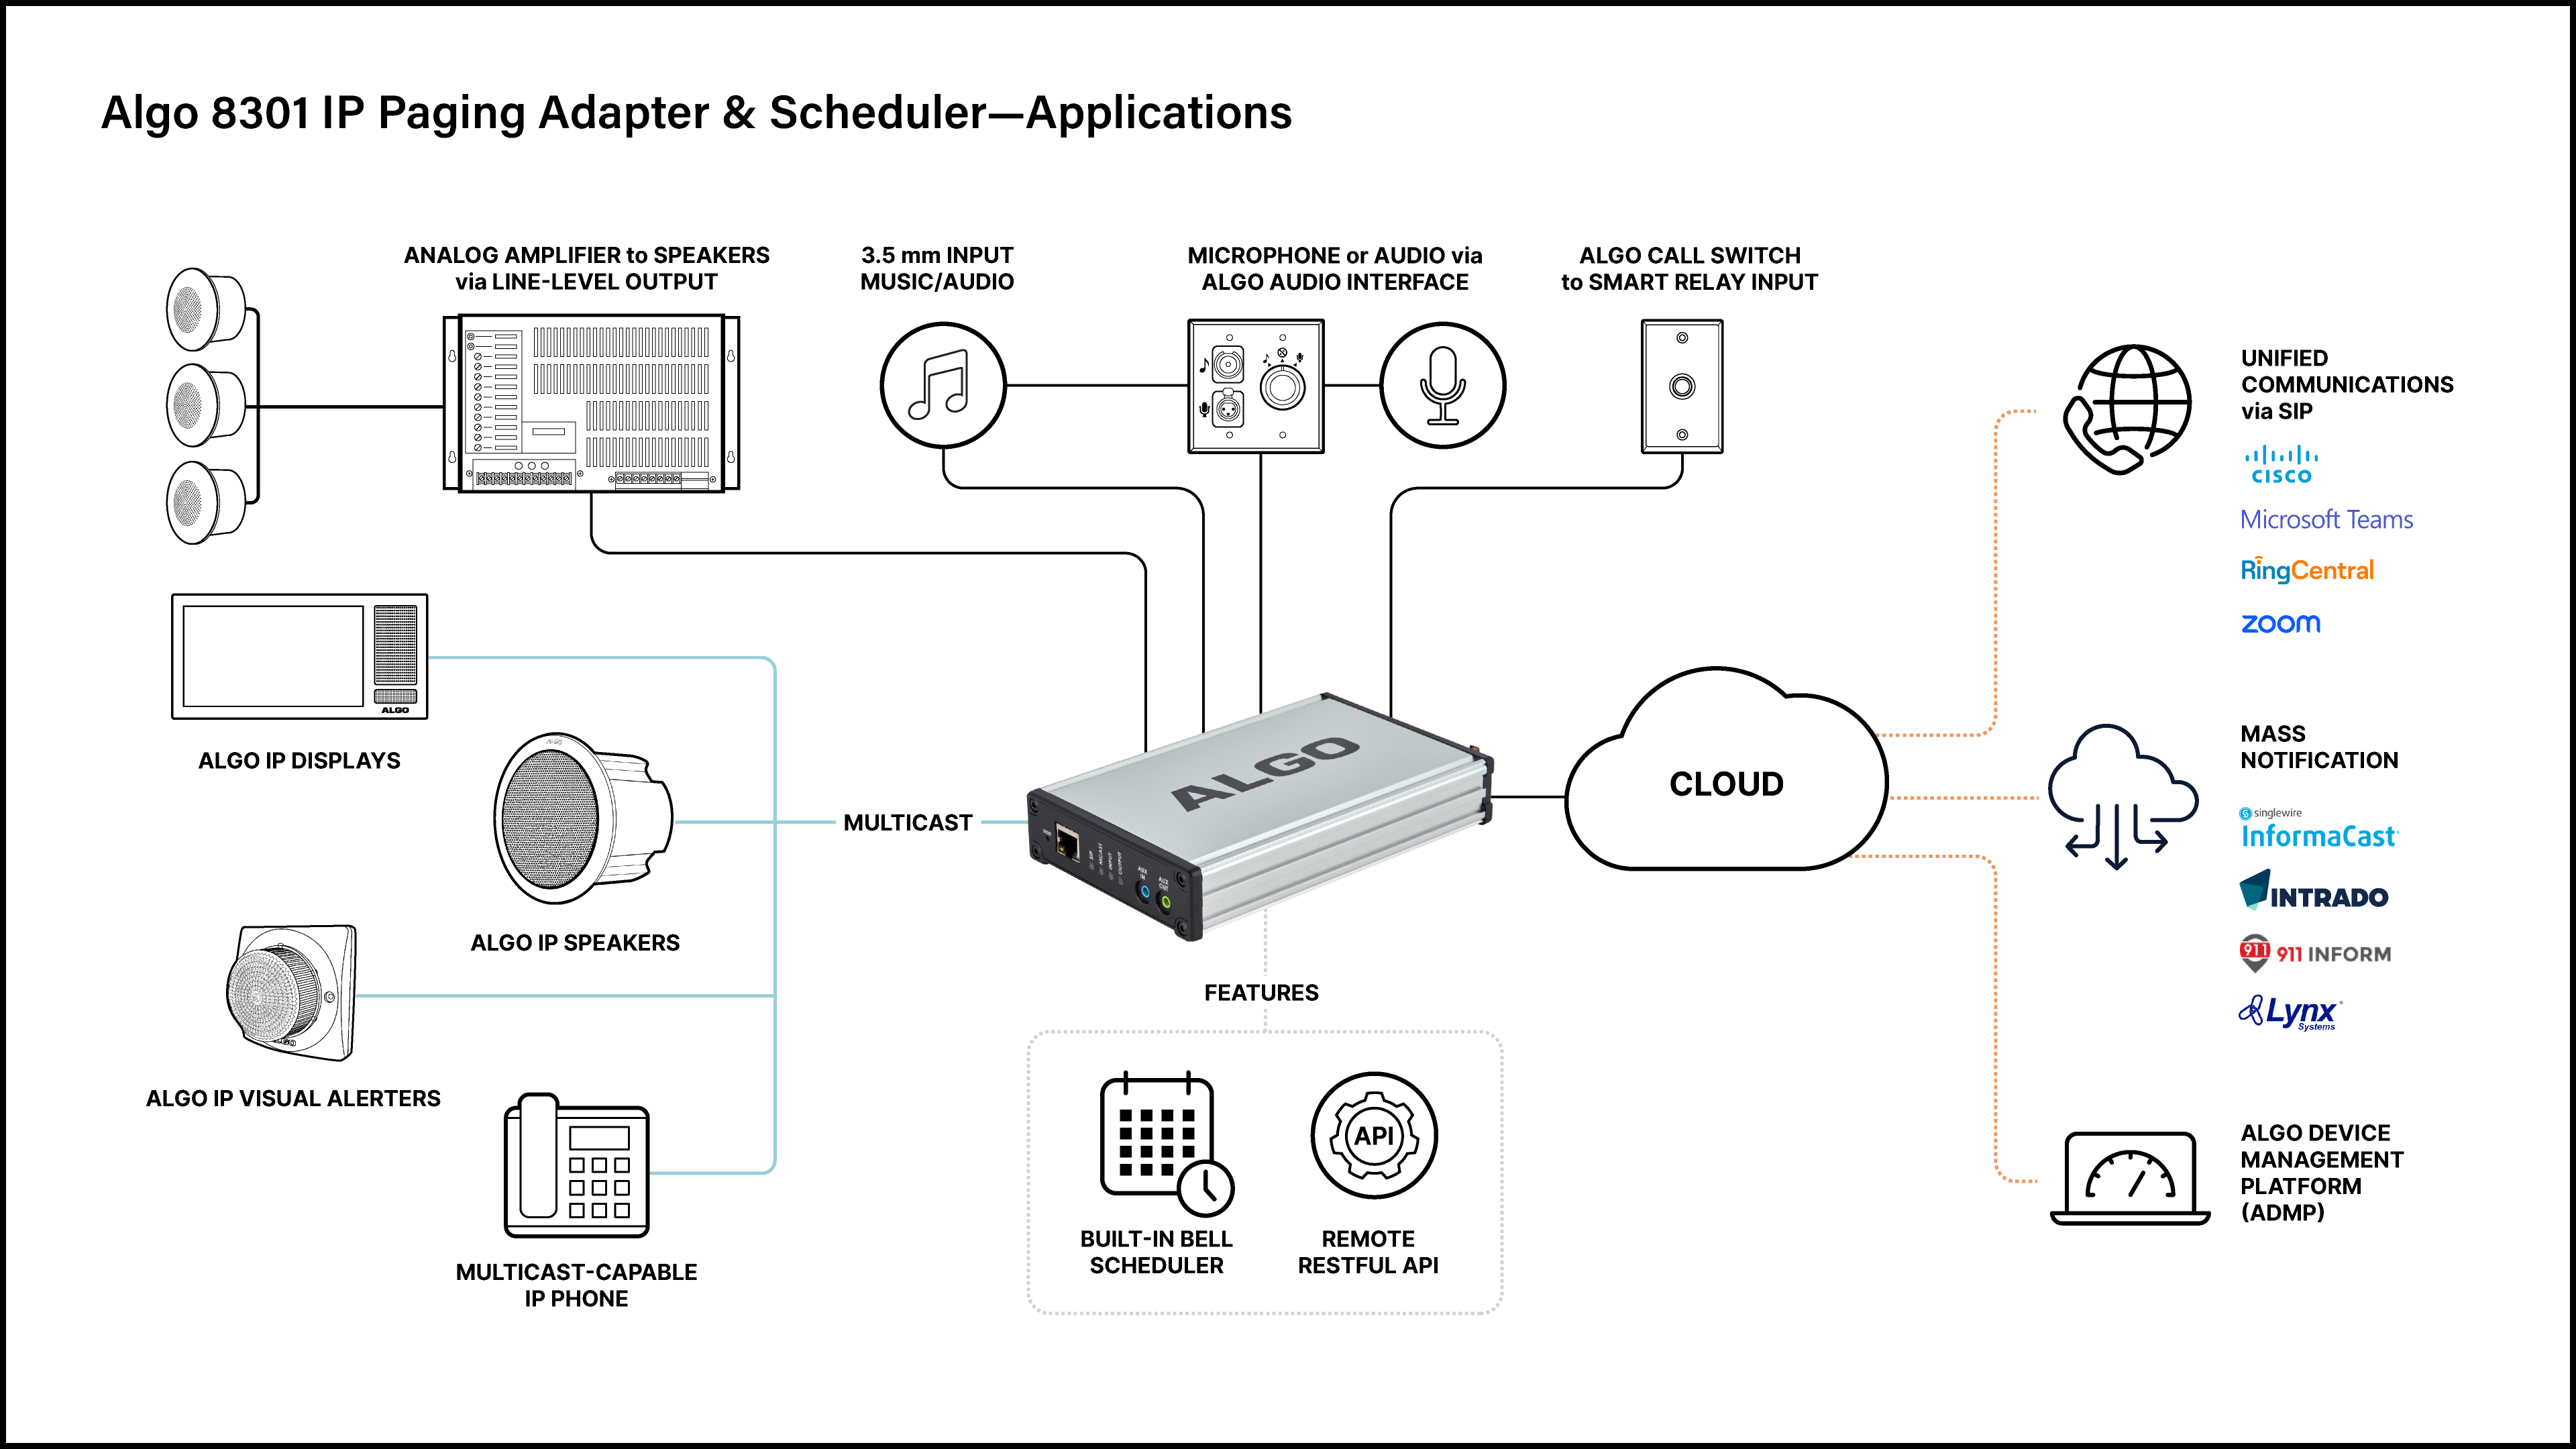
Algo IP paging adapters are designed to drive a traditional amplifier and maintain the integrity of the zoning used with your legacy infrastructure while replacing your legacy zone controller and other equipment to simplify your overall deployment.

This guide outlines how to connect Algo paging adapters to various legacy amplifiers and communication systems. Please note that models not explicitly mentioned in this guide are not necessarily incompatible with Algo paging adapters. If the model you are working with is not documented here, please contact support@algosolutions.com.

Algo Paging Adapters

All Algo IP Paging adapters have an audio output designed to emulate a page port on a legacy PBX. They also isolate and balance audio output and prevent additional humming or noise. There are currently three Algo IP paging adapters available:

8301

8305

8373

When to Choose

When working to integrate legacy paging amplifiers to an IP based systems. This is the go-to adapter for most set ups and needs.

When working to integrate legacy communication systems (specifically ones that have FXS and need to connect to a telephone) to an IP based system.

When working to integrate a legacy zoned paging amplifier (up to three groups of analog speakers to retain zoning infrastructure) to an IP based system.

Multicast

Yes

Yes

Yes

PoE

Yes

Yes

Yes

SIP Compliant

Yes

Yes

Yes

Scheduler

Yes

Yes

No

Ports

  • Aux In

  • Aux Out

  • XLR Line In

  • XLR Line Out

  • Terminal block Line In

  • Terminal block Line Out

  • Terminal block Relay In

  • Terminal block Relay Out

  • Aux Out

  • Telephone Port

  • Terminal block 8 Out

  • Terminal block Line Out

  • Terminal block Relay In

  • Terminal block Relay Out

  • XLR Line Out

  • Terminal block Line Out

  • Terminal block Relay Out

  • Terminal block Channel 3 (SHLD/-/+)

  • Terminal block Channel 2 (SHLD/-/+)

  • Terminal block Channel 1 (SHLD/-/+)

  • Terminal block Amp In (SHLD/-/+)

Emulates an analog telephone

No

Yes

No

Supports multiple analog speaker zones

No

Yes

No

SIP extensions

• 50 Page (Capable of talkback when appropriate speaker and microphone connected)
• 10 Emergency Alert
• 10 Ring

• 50 Page
• 10 Emergency Alert
• 10 Ring

50 page

8301 IP Paging Adapter & Scheduler

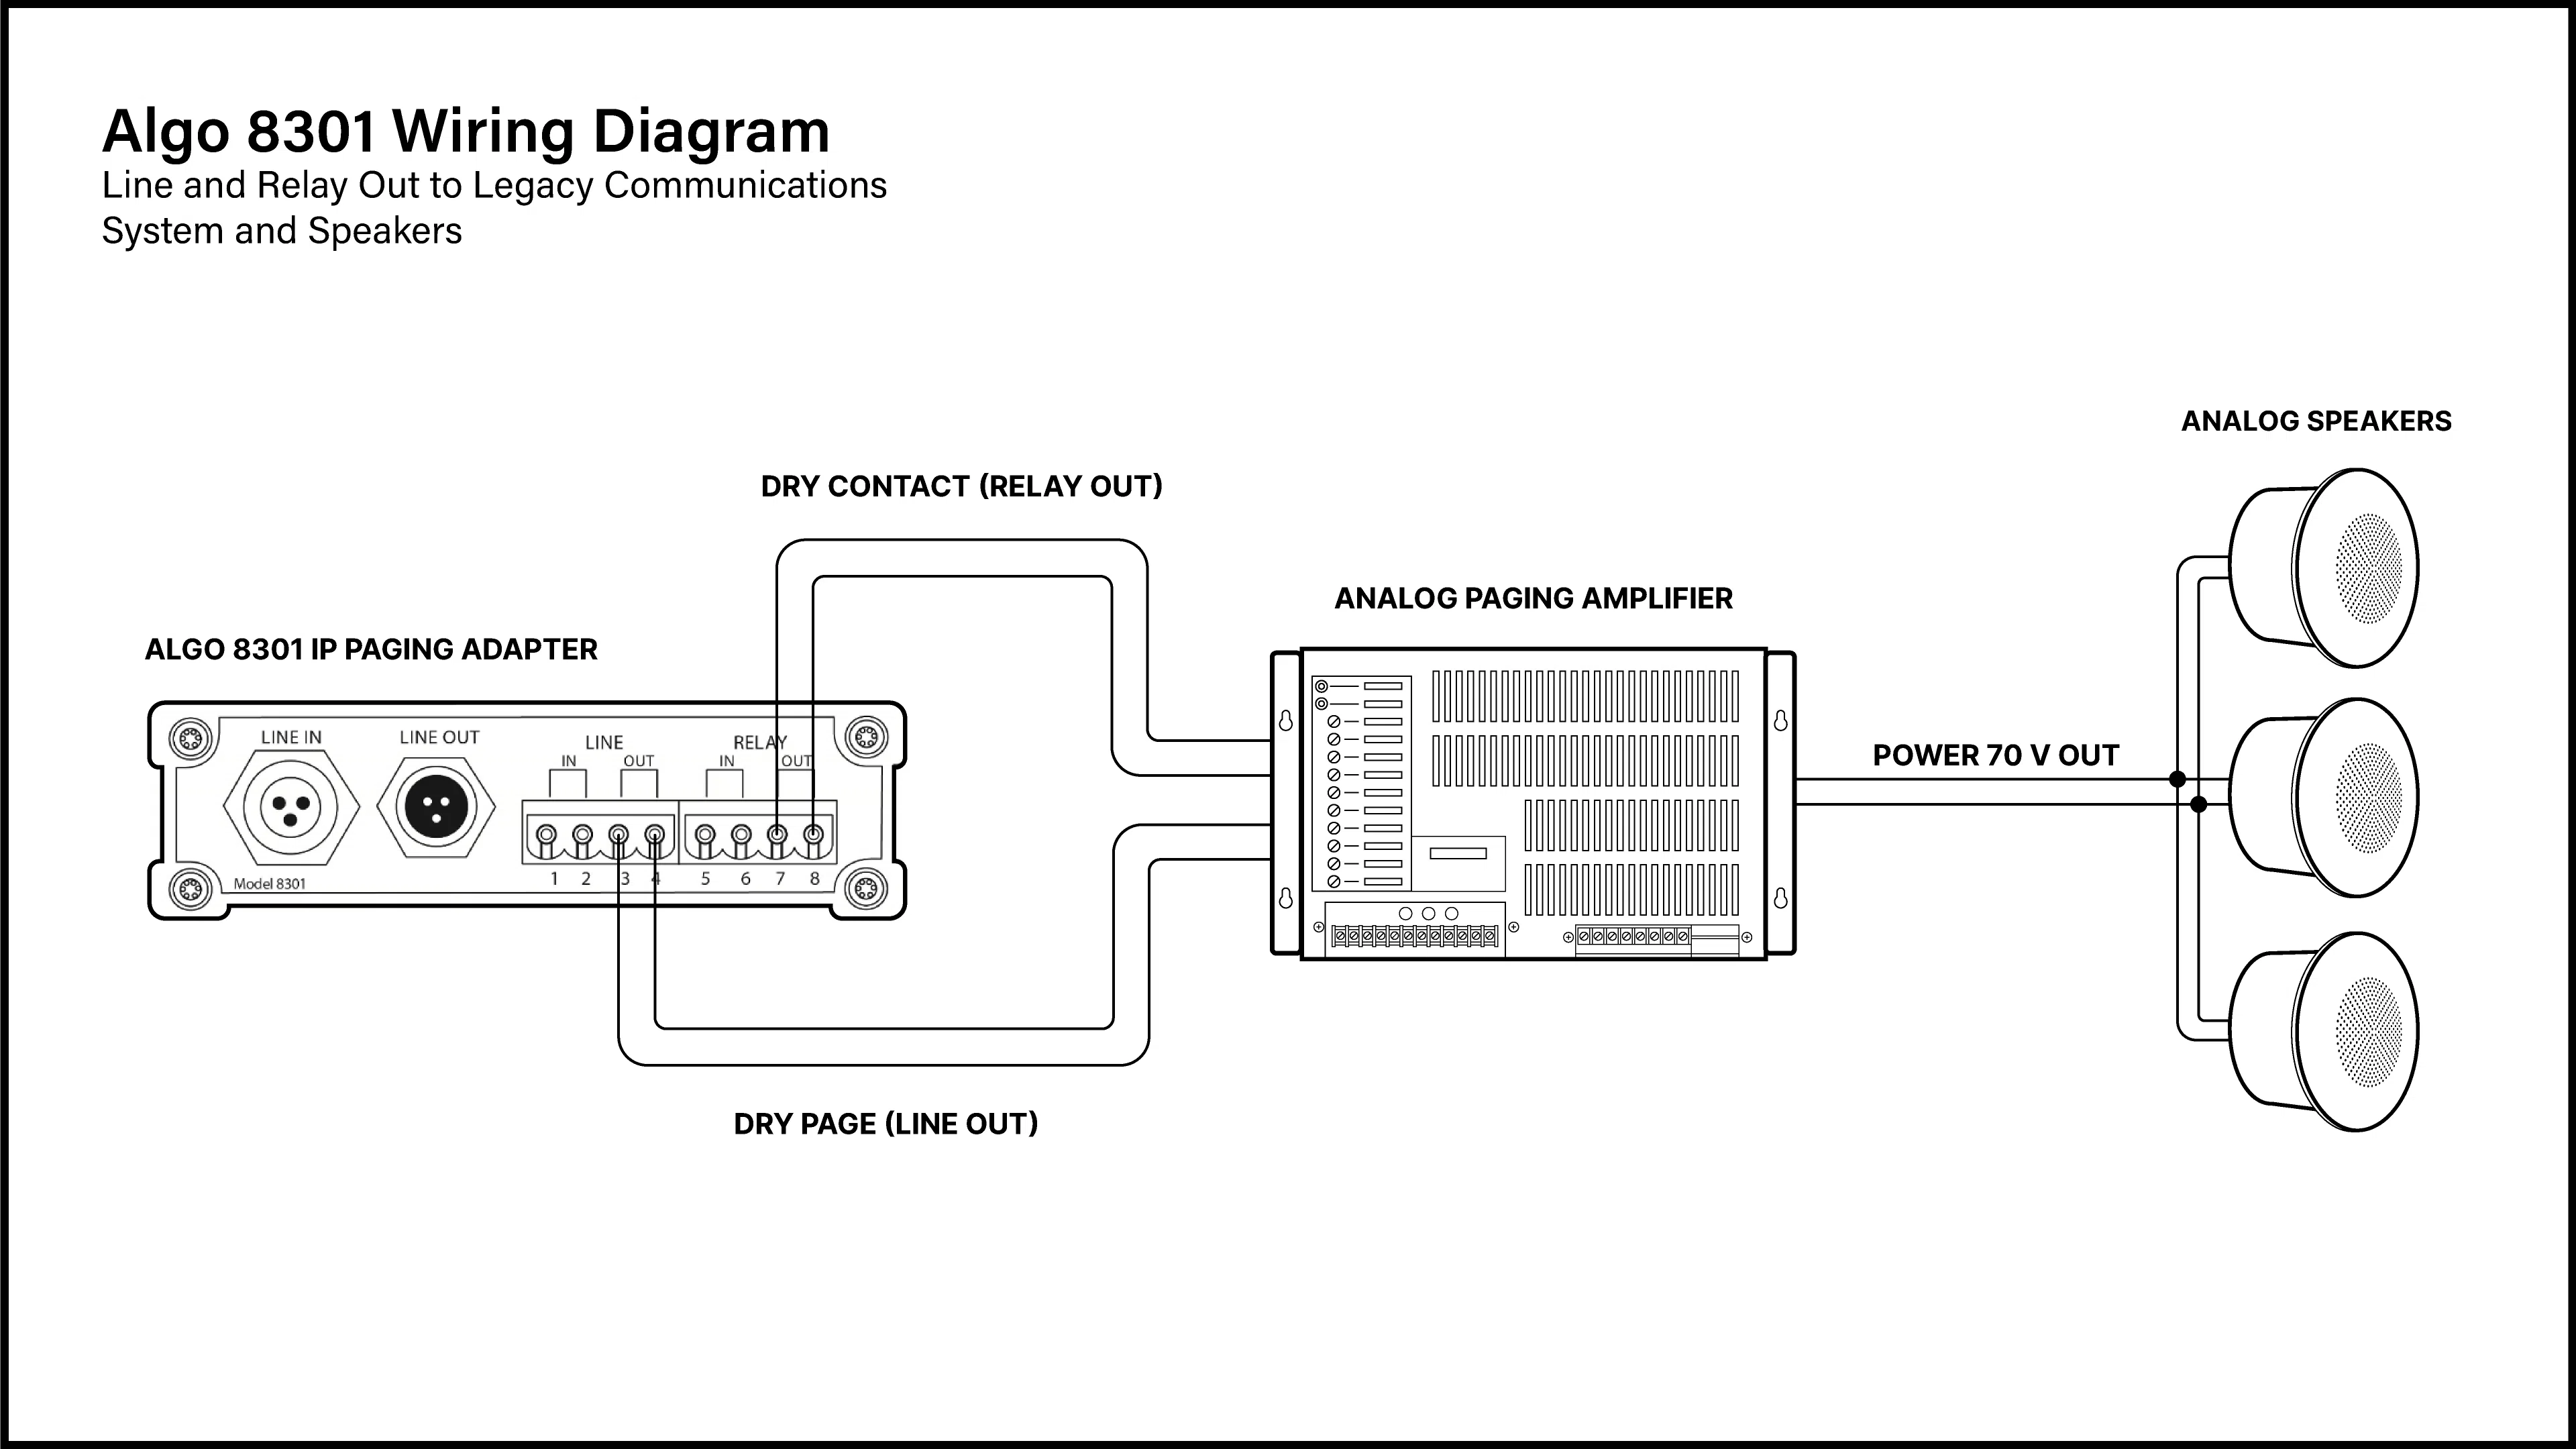
The 8301 is the ideal paging adapter for most applications. The 8301 is the most direct paging gateway to bridge VoIP to analog systems. It’s designed to be a balance line output to a single amplifier.

Algo-8301-Wiring-Diagram.webp

8305 Multi-Interface IP Paging Adapter

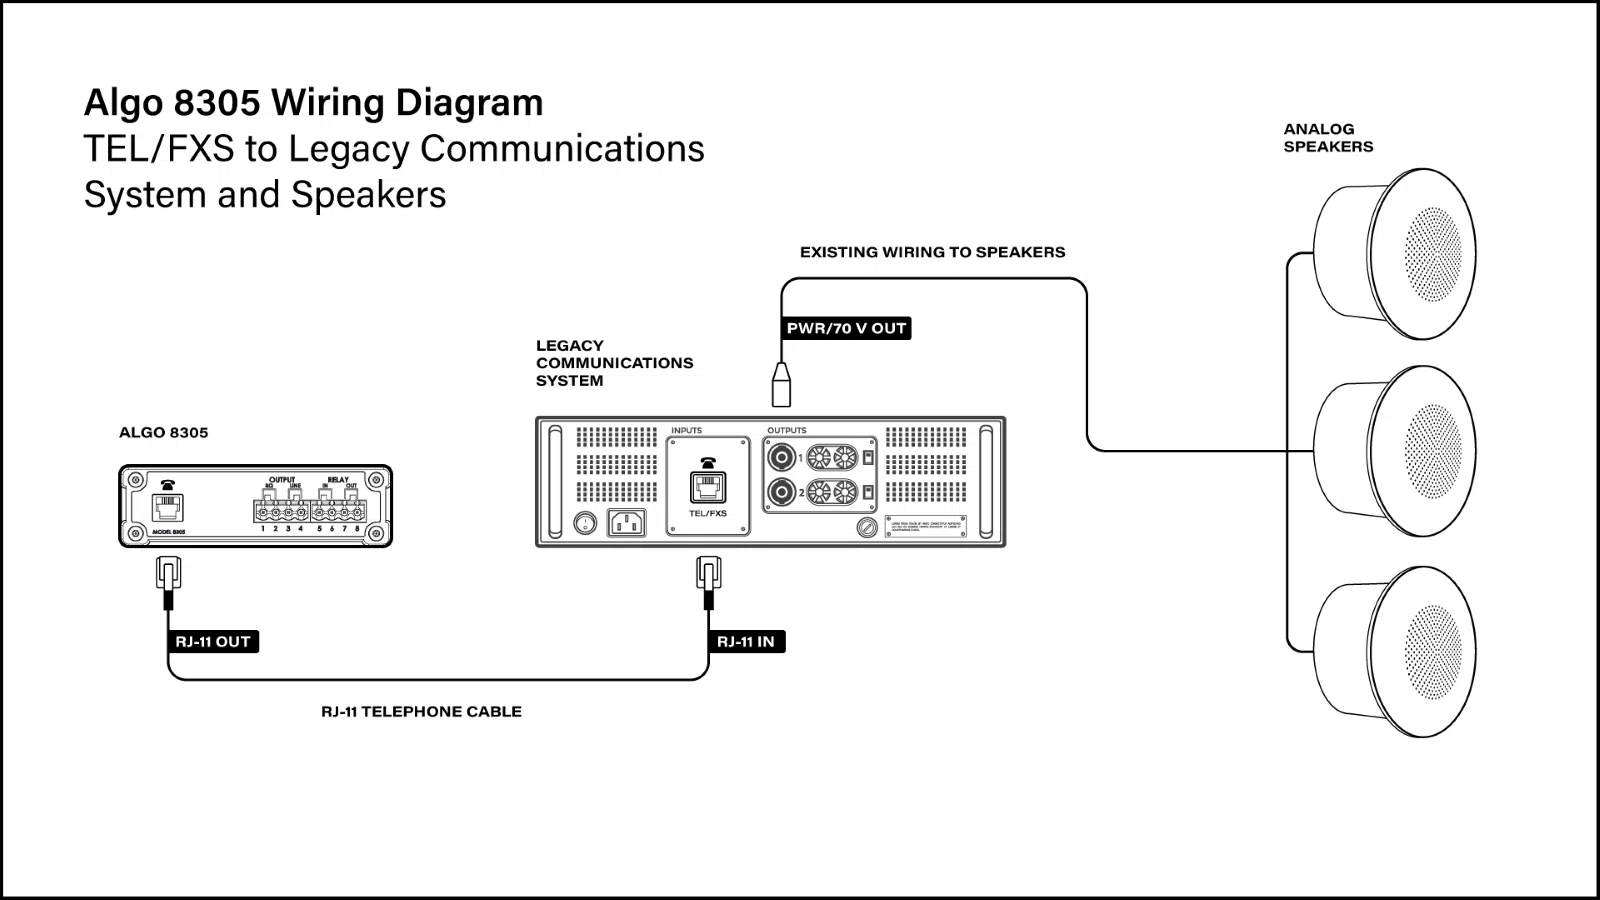
The 8305 is the ideal paging adapter for integrating legacy paging systems that provide a "talk battery pair". It is very similar to the 8301, however, it was explicitly designed to create a hybrid VoIP environment by emulating an analog telephone.
8305-wiring.webp

8373 IP Zone Paging Adapter

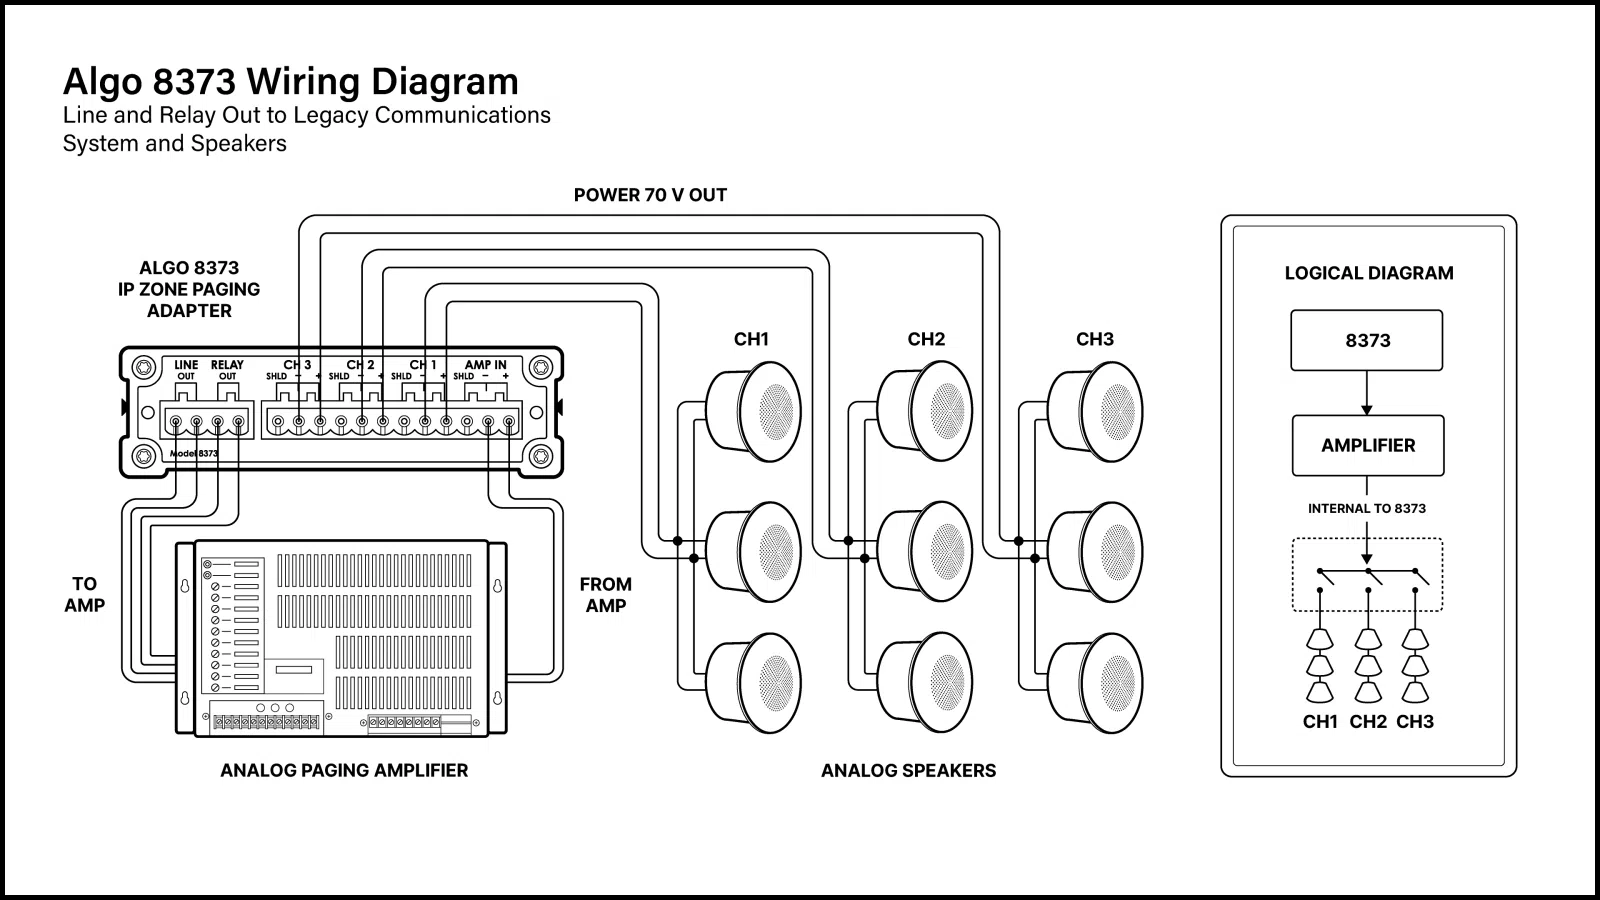
The 8373 IP Zone Paging Adapter is the ideal paging adapter to replace a legacy zone controller for up to three groups of analog speakers. This IP paging adapter is best if you want to retain zoning speakers as-is. The 8373 contains three high-powered relays that can be used to switch a single amplifier’s output signal.
Algo-8373-Wiring-Diagram-1600x900.webp


Algo Paging Adapter Integrations

Below are details on how to connect an Algo paging adapter with various legacy amplifiers.

Adastra RM60/120/240S with 8301
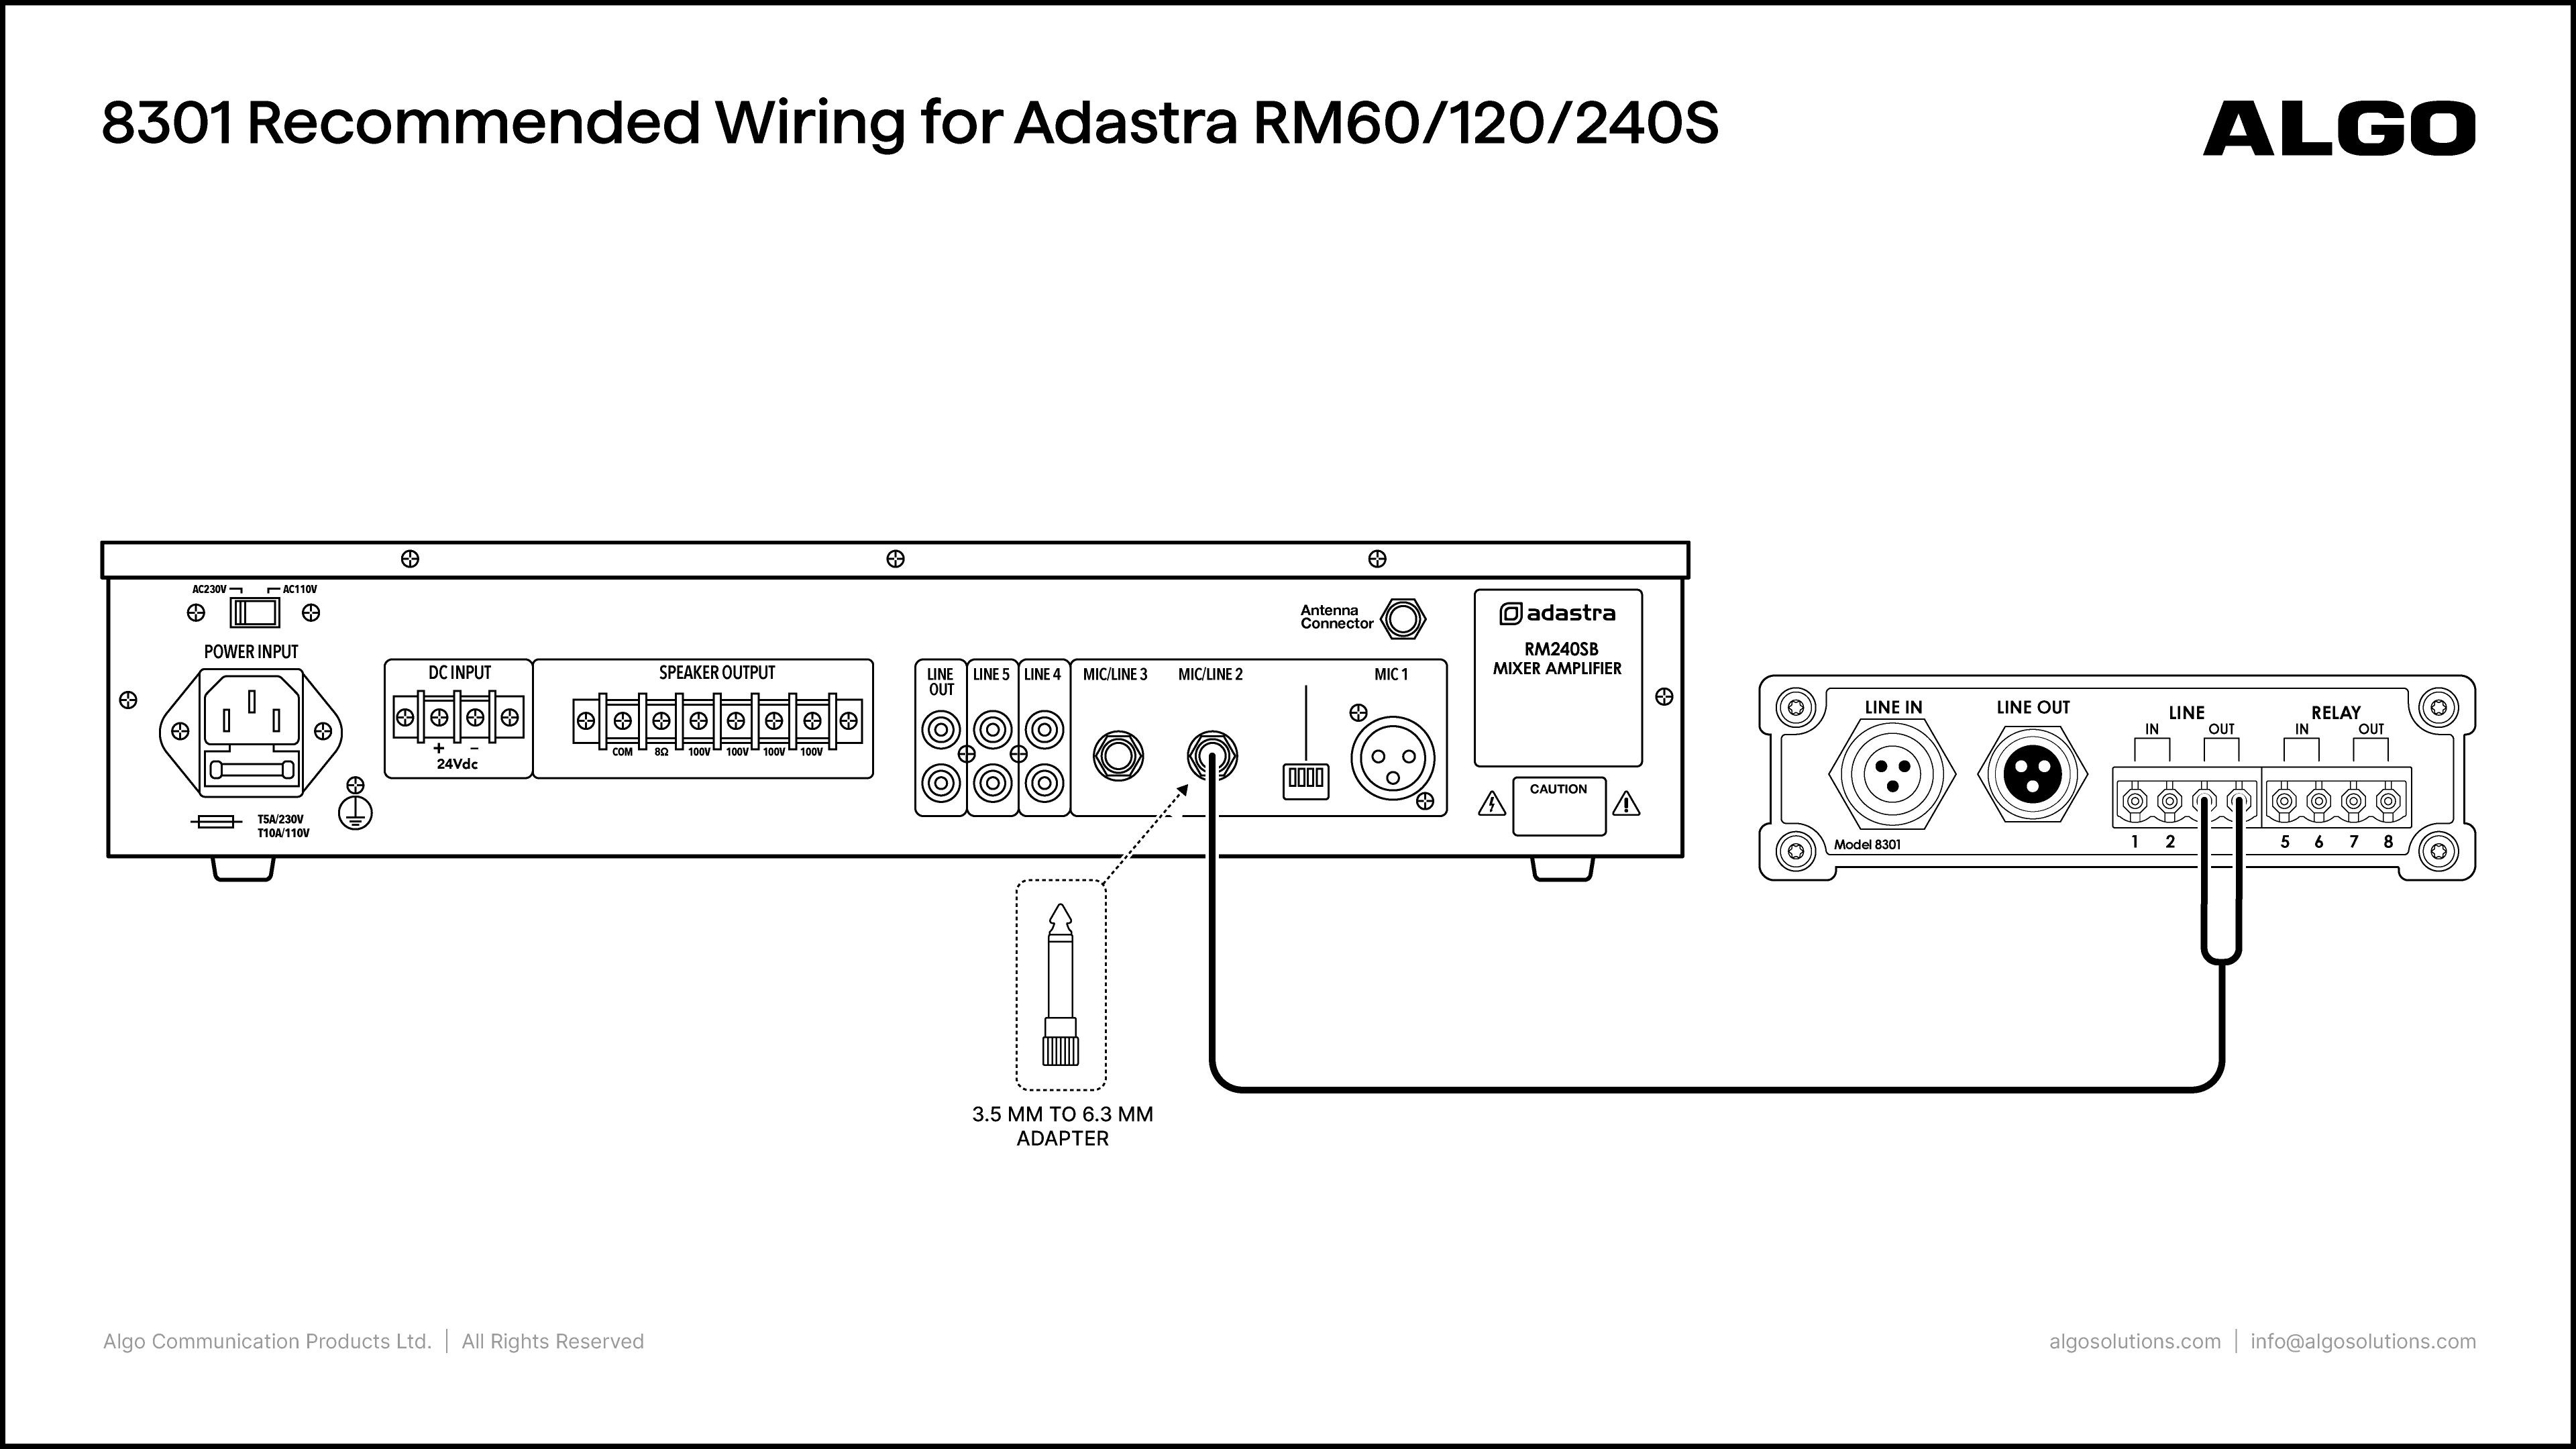
Algo Product:

8301 IP Paging Adapter & Scheduler

Amplifier Product:

Adastra RM60/120/240S

Port Connections:

Algo

Adastra

  • Line Out (3, 4)

  • Mic/Line 2

Recommended Equipment:

  • Aux Cable

  • 3.5 mm to 6.3 mm adapter

Notes:

  • Strip the leads on one end of the AUX cable. Connect the positive and negative (usually red and black) terminals to the Line Out

  • Use a 3.5 mm to 6.3 mm adapter to connect the other end to the amplifier input Mic/Line 2

  • On the 8301 web interface, go to Basic Settings → Features and set the Line Out Analog Output Level to 0dBm 600 ohm (0.775 Vrms)

Adastra RM60/120/240S with 8373

Algo Product:

8373 IP Zone Paging Adapter

Amplifier Product:

Adastra RM60/120/240S

Port Connections:

Algo

Adastra

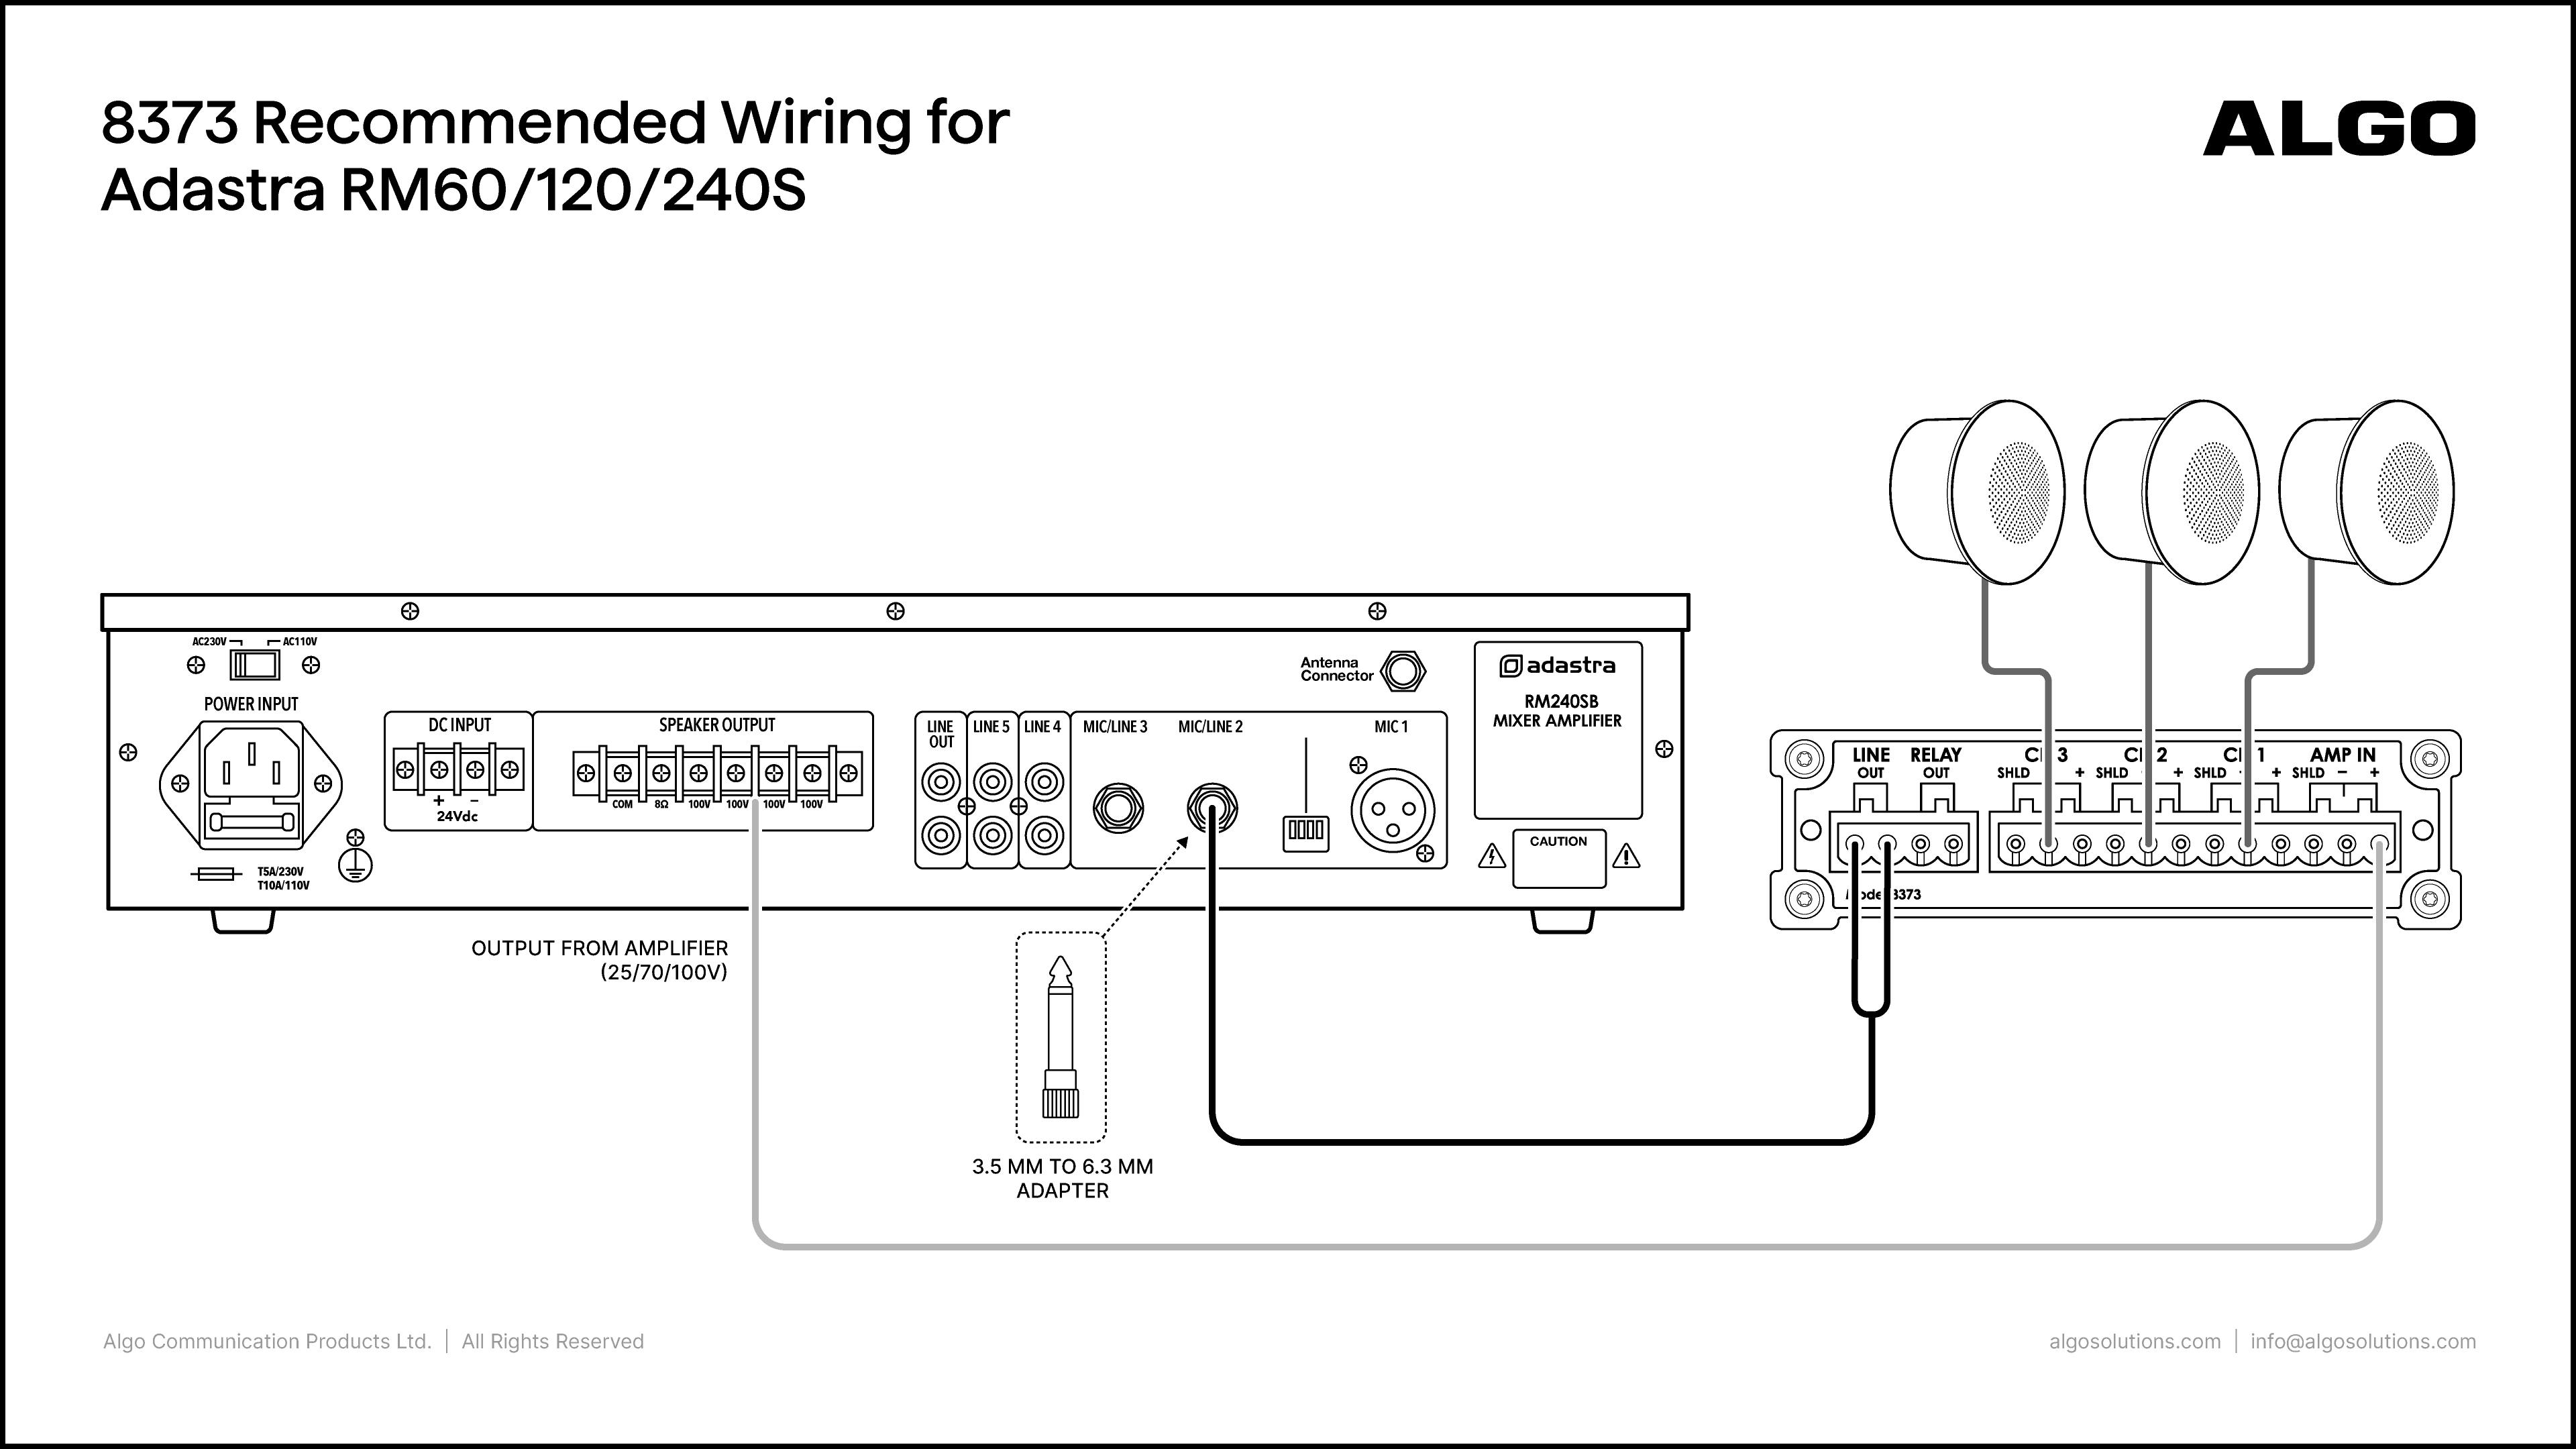
  • Line Out

  • Amp In

  • Mic/Line 2

  • Speaker output

Recommended Equipment:

  • Aux Cable

  • 3.5 mm to 6.3 mm adapter

Notes:

  • Use an AUX cable and strip the leads on one end. Connect the positive and negative (usually red and black) terminals to the Line Out

  • To connect the other end to the amplifier input Mic/Line 2, use a 3.5 mm to 6.3 mm adapter.

  • On the 8373 web interface, go to Basic Settings → Features and set the Line Out Analog Output Level to 0dBm 600 ohm (0.775 Vrms)

AT&T/Lucent PagePal with 8301

Algo Product:

8301 IP Paging Adapter & Scheduler

Amplifier Product:

AT&T/Lucent PagePal

Port Connections:

Algo

AT&T

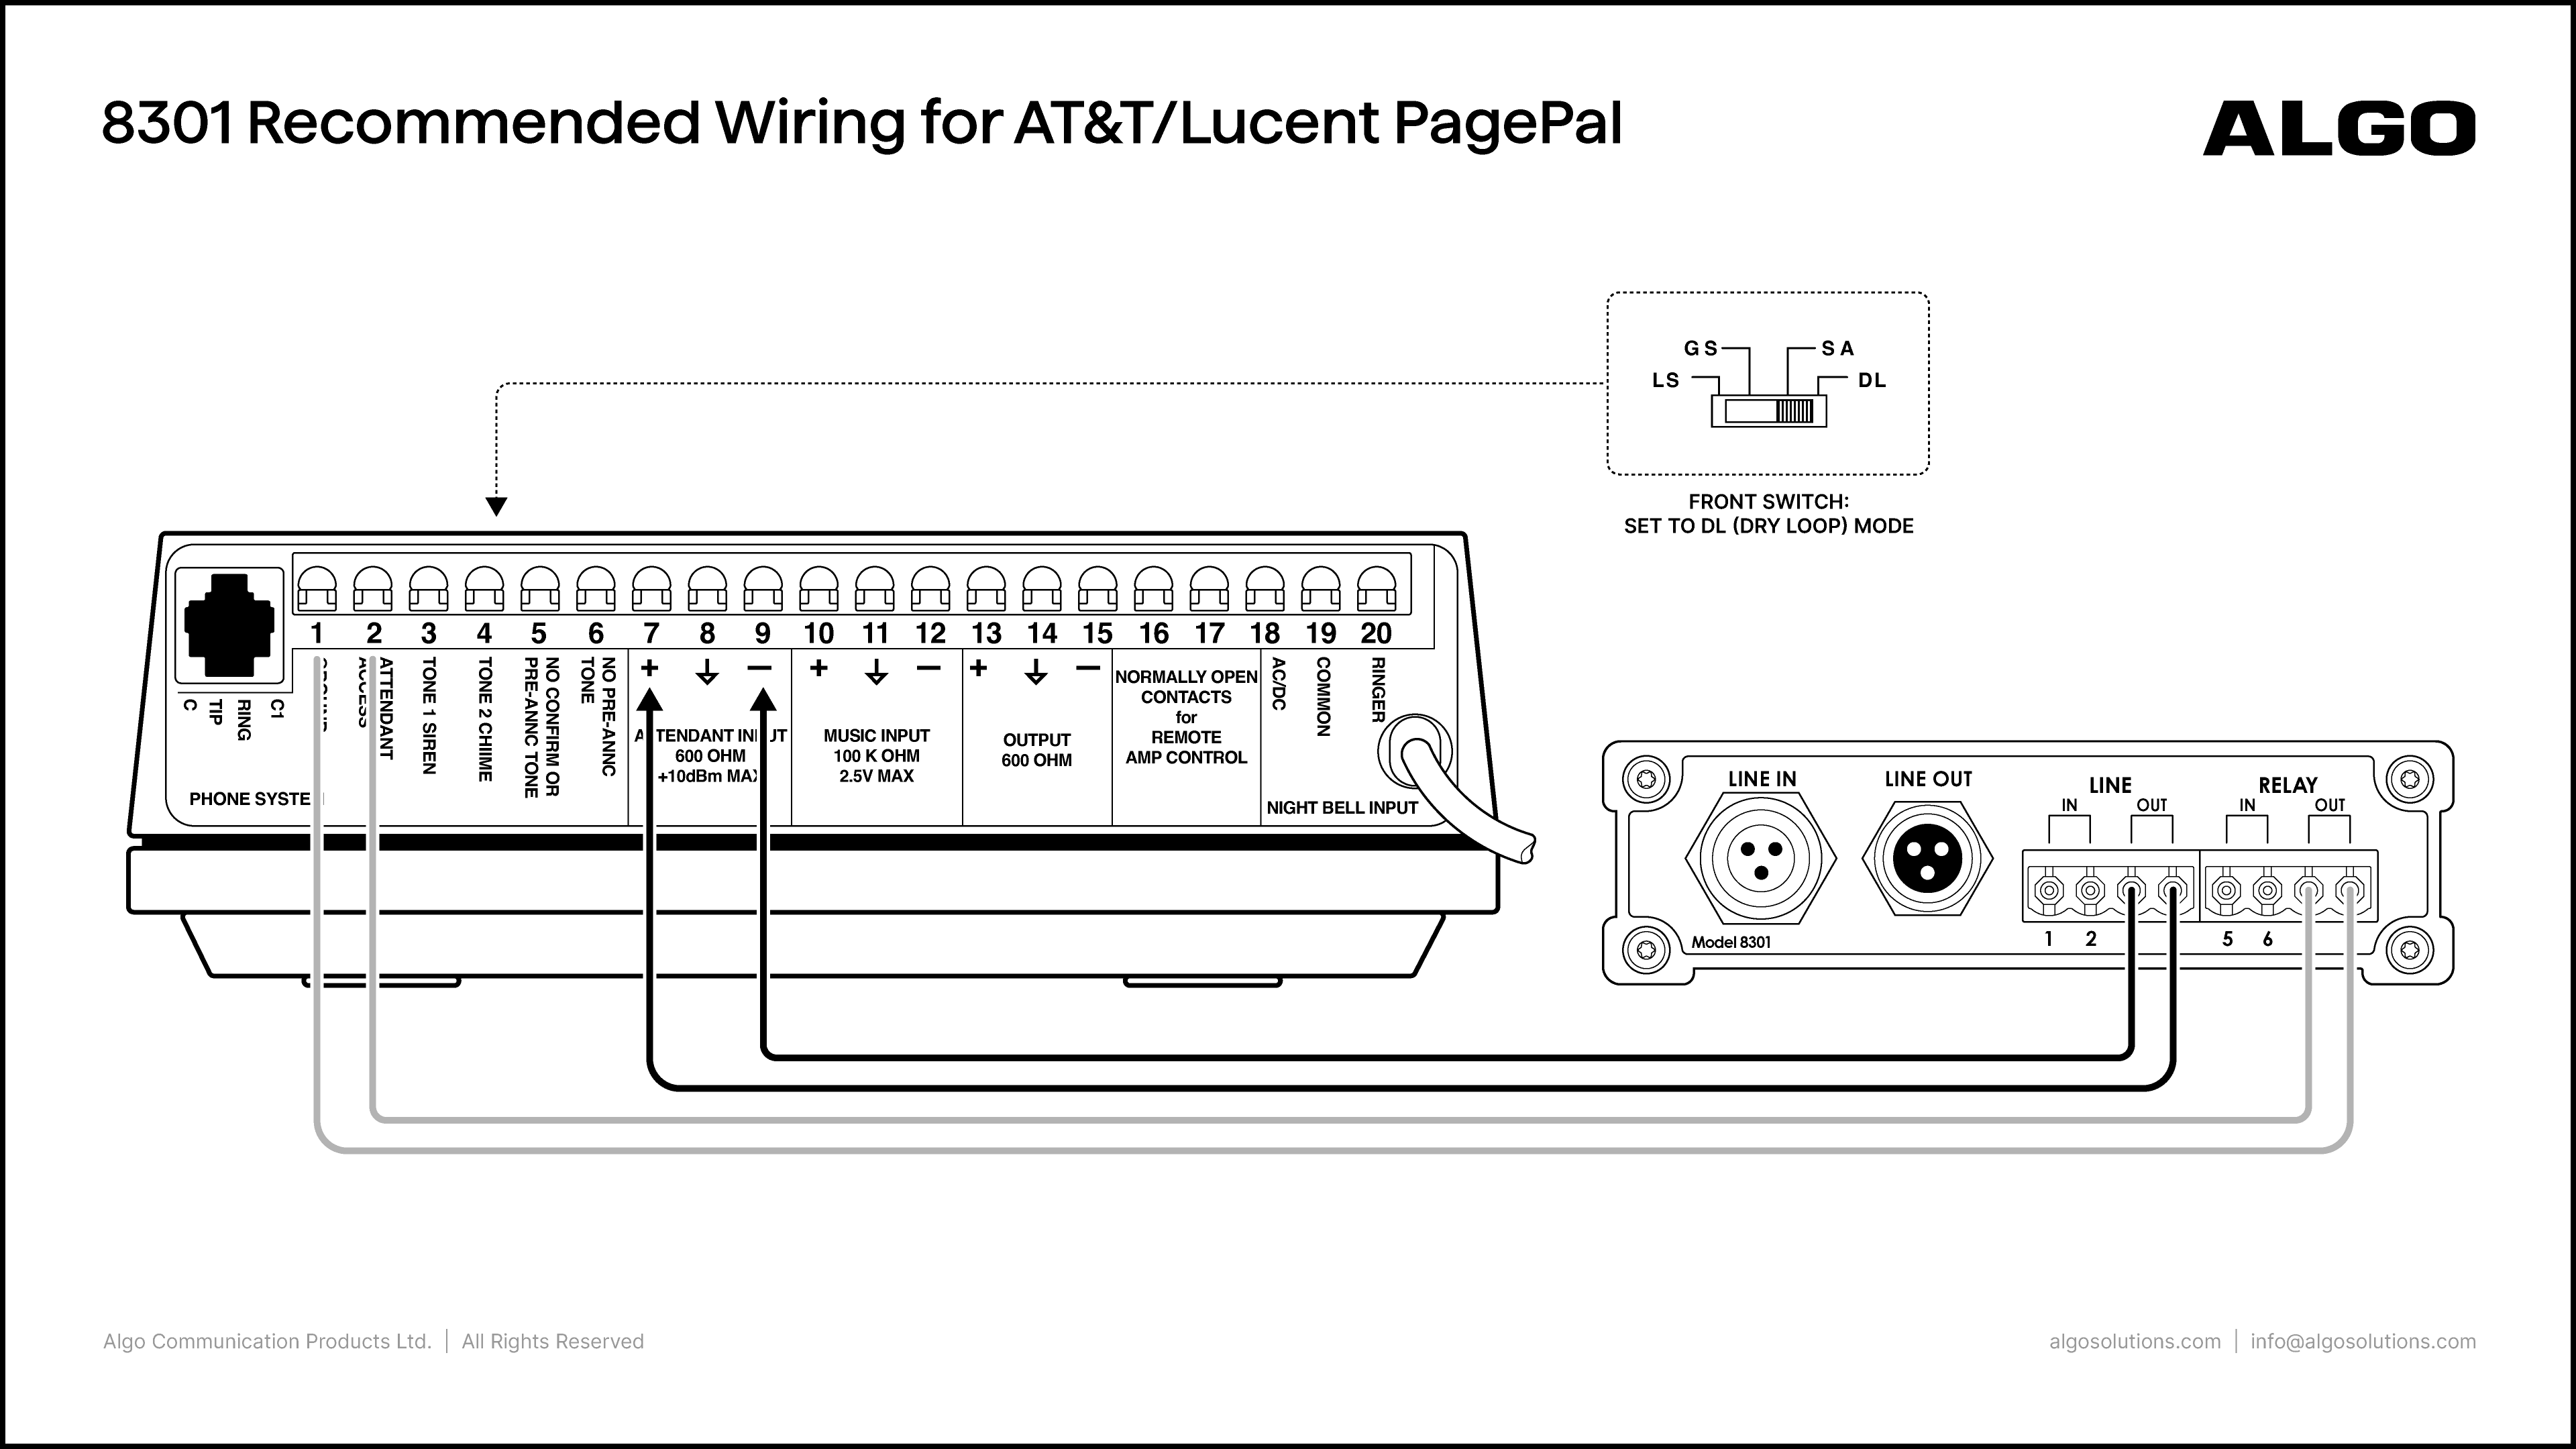
  • Line Out (3, 4)

  • Relay Out (7, 8)

  • Attendant Input (7, 9)

  • Ground (1) and Attendant Access (2)

Notes:

  • Set the PagePal to DL (Dry Loop) mode using the switch in the front

  • On the 8301 web interface, go to Basic Settings→ Features and set the Line Out Analog Output Level to 0dBm 600 ohm (0.775 Vrms)

AT&T PagePac 20 PowerMate with 8301

Algo Product:

8301 IP Paging Adapter & Scheduler

Amplifier Product:

AT&T PagePac 20 PowerMate

Port Connections:

Algo

AT&T

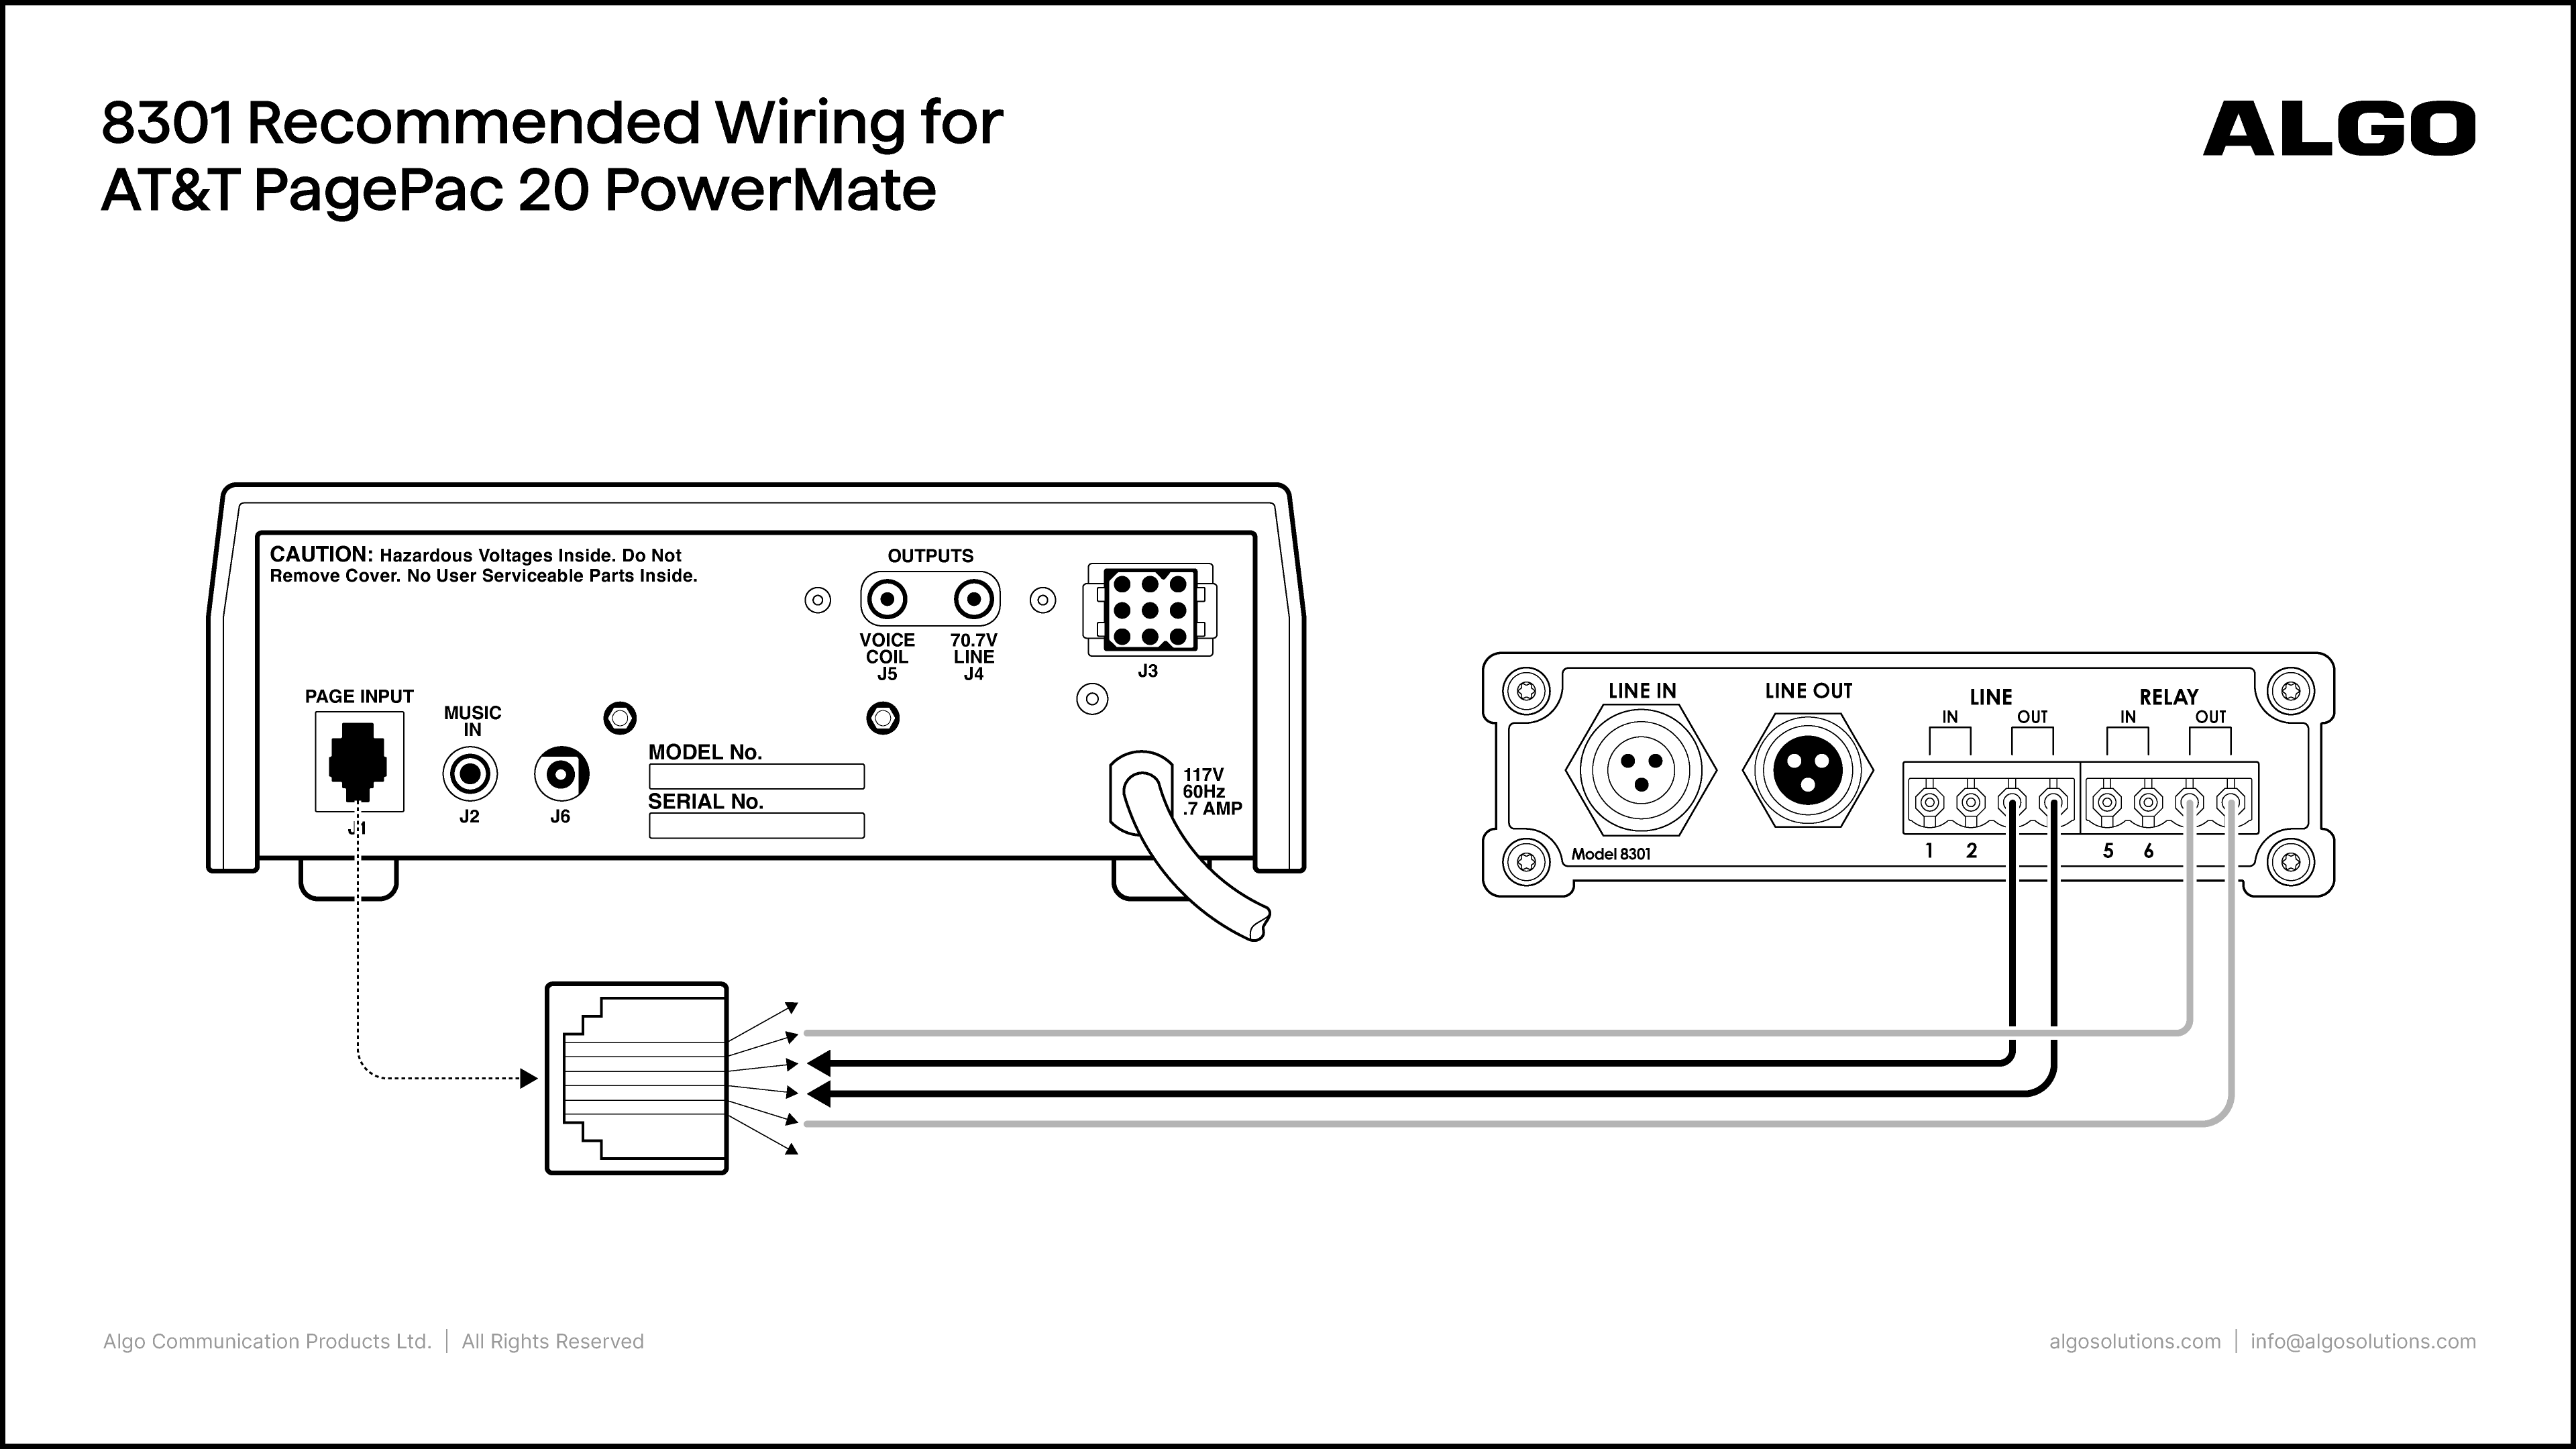
  • Line Out (3, 4)

  • Relay Out (7, 8)

  • Page Input

Notes:

  • On the 8301 web interface, go to Basic Settings→ Features and set the Line Out Analog Output Level to 0dBm 600 ohm (0.775 Vrms)

Bogen Black Max X300/X600/X450 with 8301
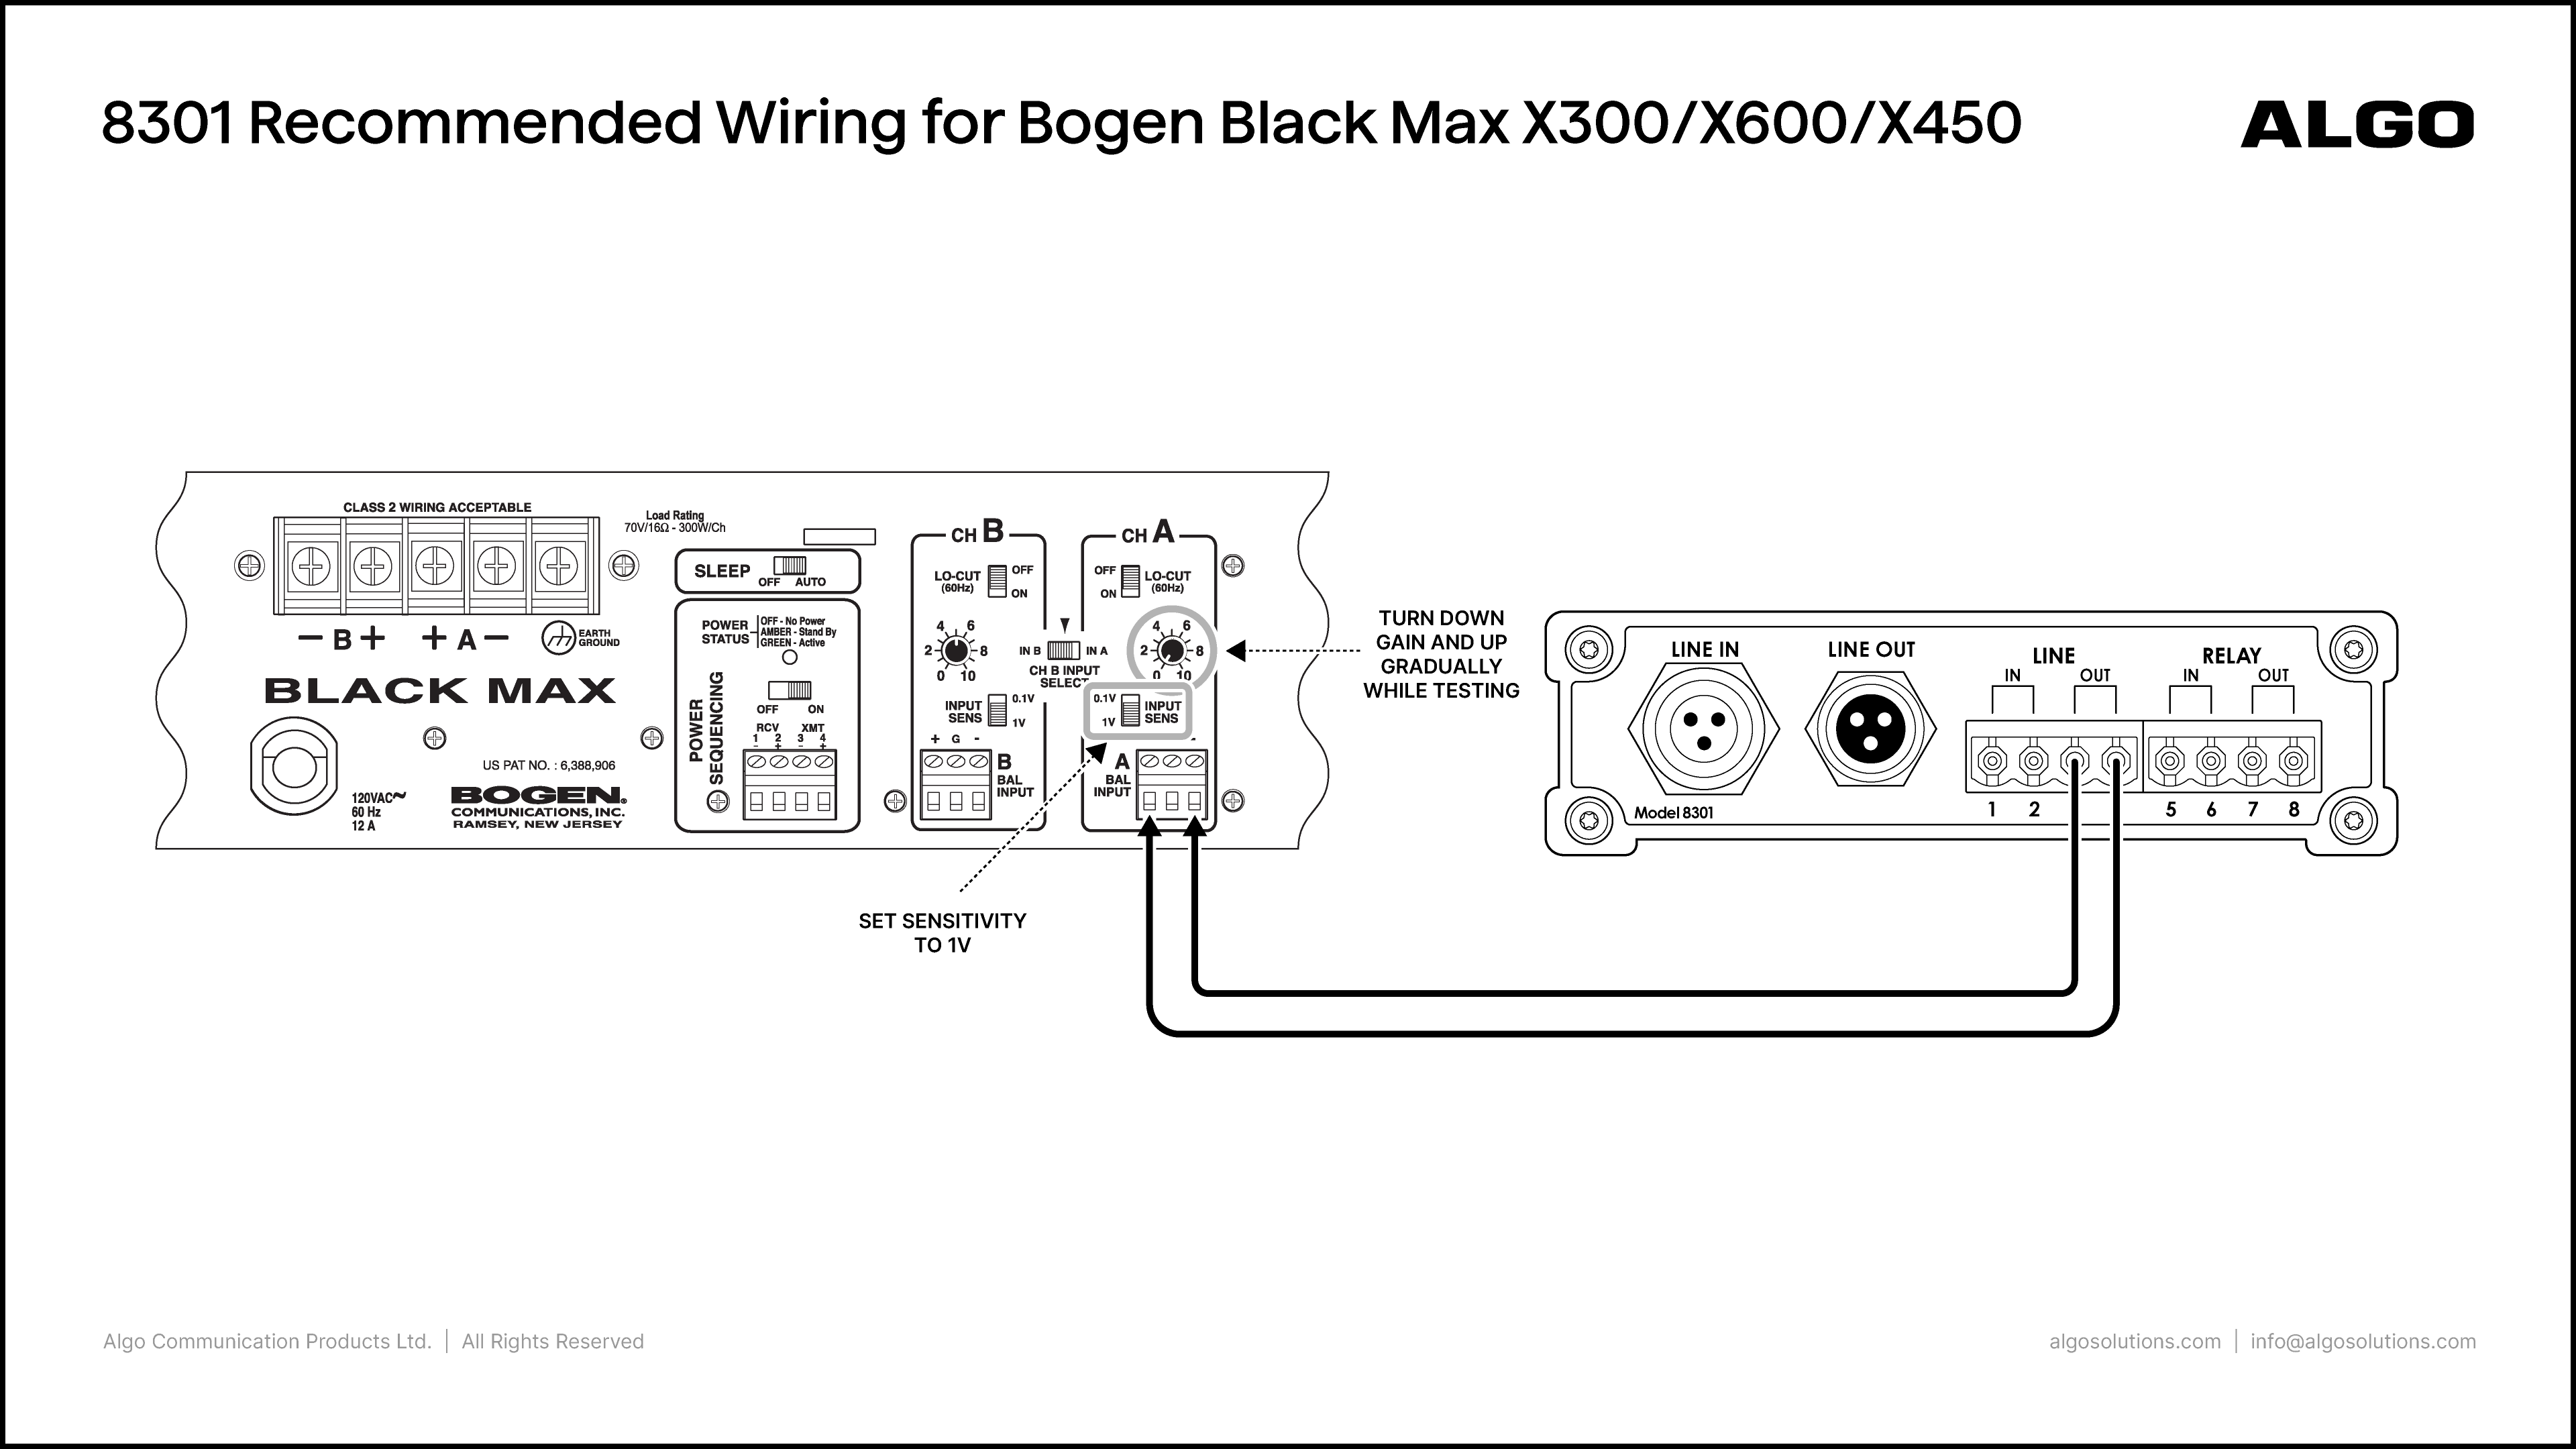
Algo Product:

8301 IP Paging Adapter & Scheduler

Amplifier Product:

Bogen Black Max X300/X600/X450

Port Connections:

Algo

Bogen

  • Line Out (3, 4)

  • Bal Input

Notes:

  • Can connect to channel A or channel B using the Input Select switch. Make sure the channel has the input sensitivity to 1V

  • On the 8301 web interface, go to Basic Settings → Features and set the Line Out Analog Output Level to +4dBu 10k (1.23 Vrms)

Bogen C35/C60/C100 with 8301

Algo Product:

8301 IP Paging Adapter & Scheduler

Amplifier Product:

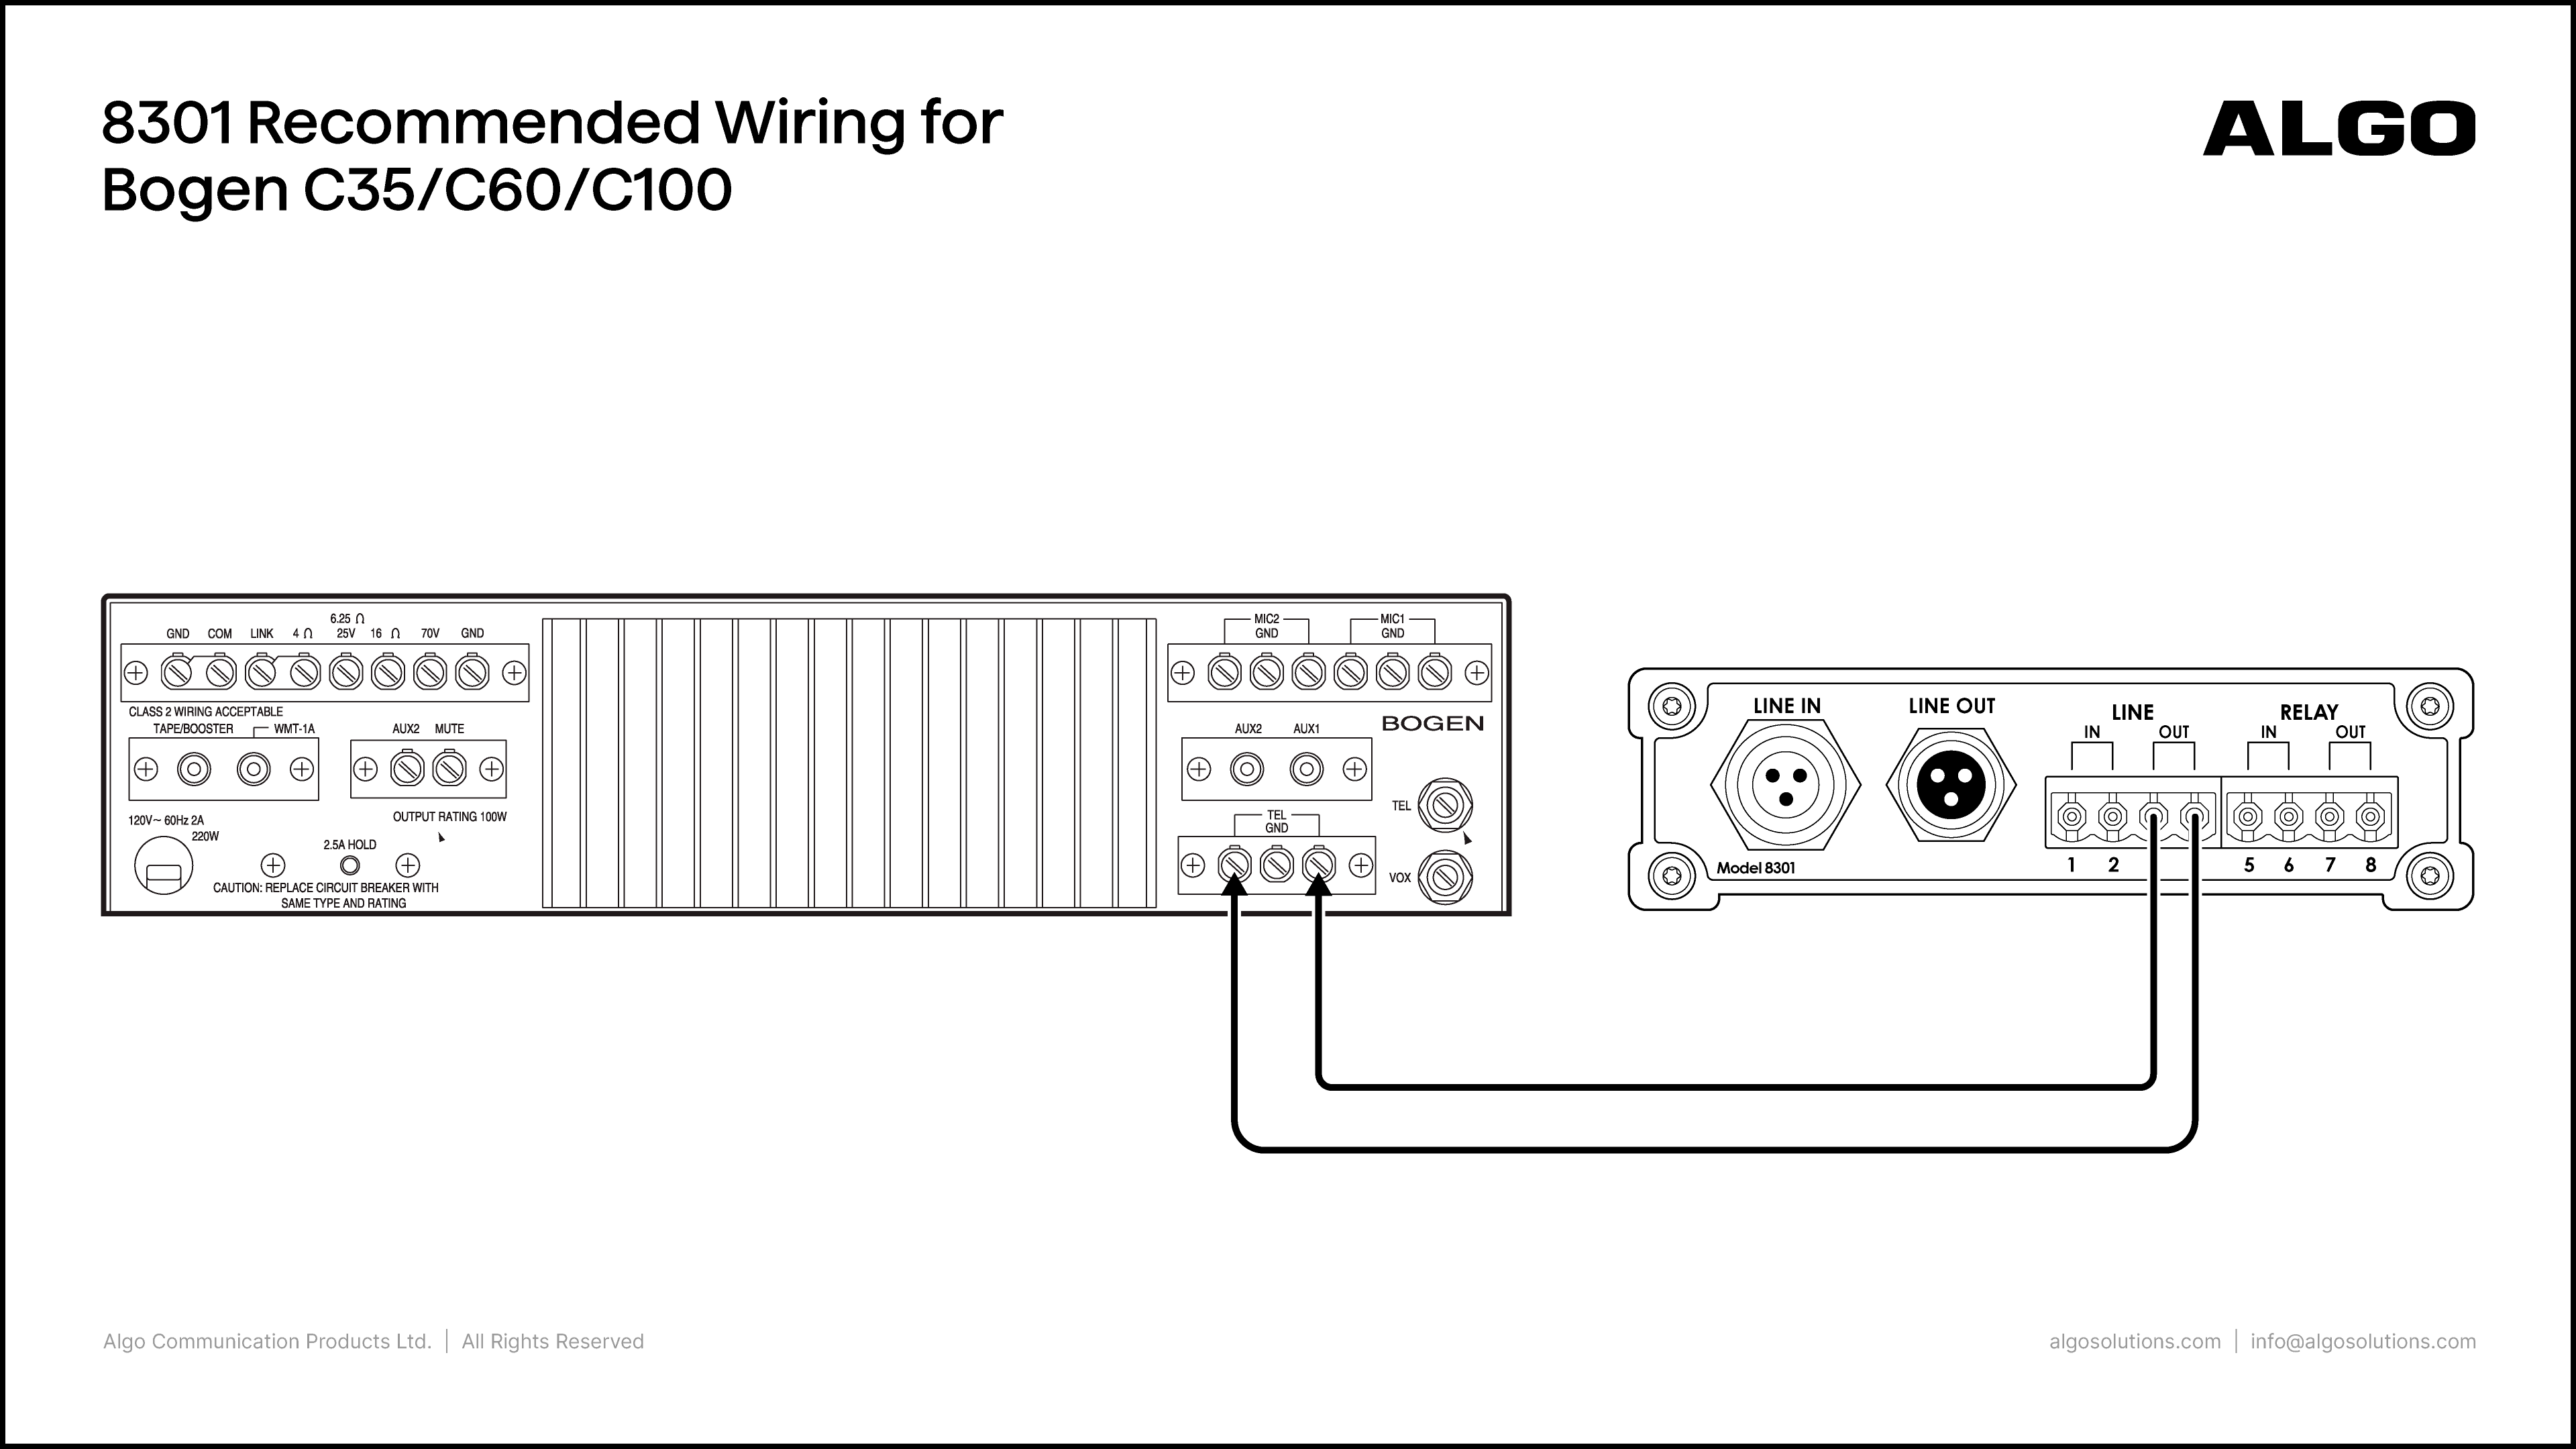
Bogen C35/C60/C100

Port Connections:

Algo

Bogen

  • Line Out (3, 4)

  • Telephone Ground (TEL GND)

Notes:

  • On the 8301 web interface, go to Basic Settings → Features and set the Line Out Analog Output Level to 0dBm 600 ohm (0.775 Vrms)

Bogen GS35/GS60/GS100 & GS150/GS250 with 8301
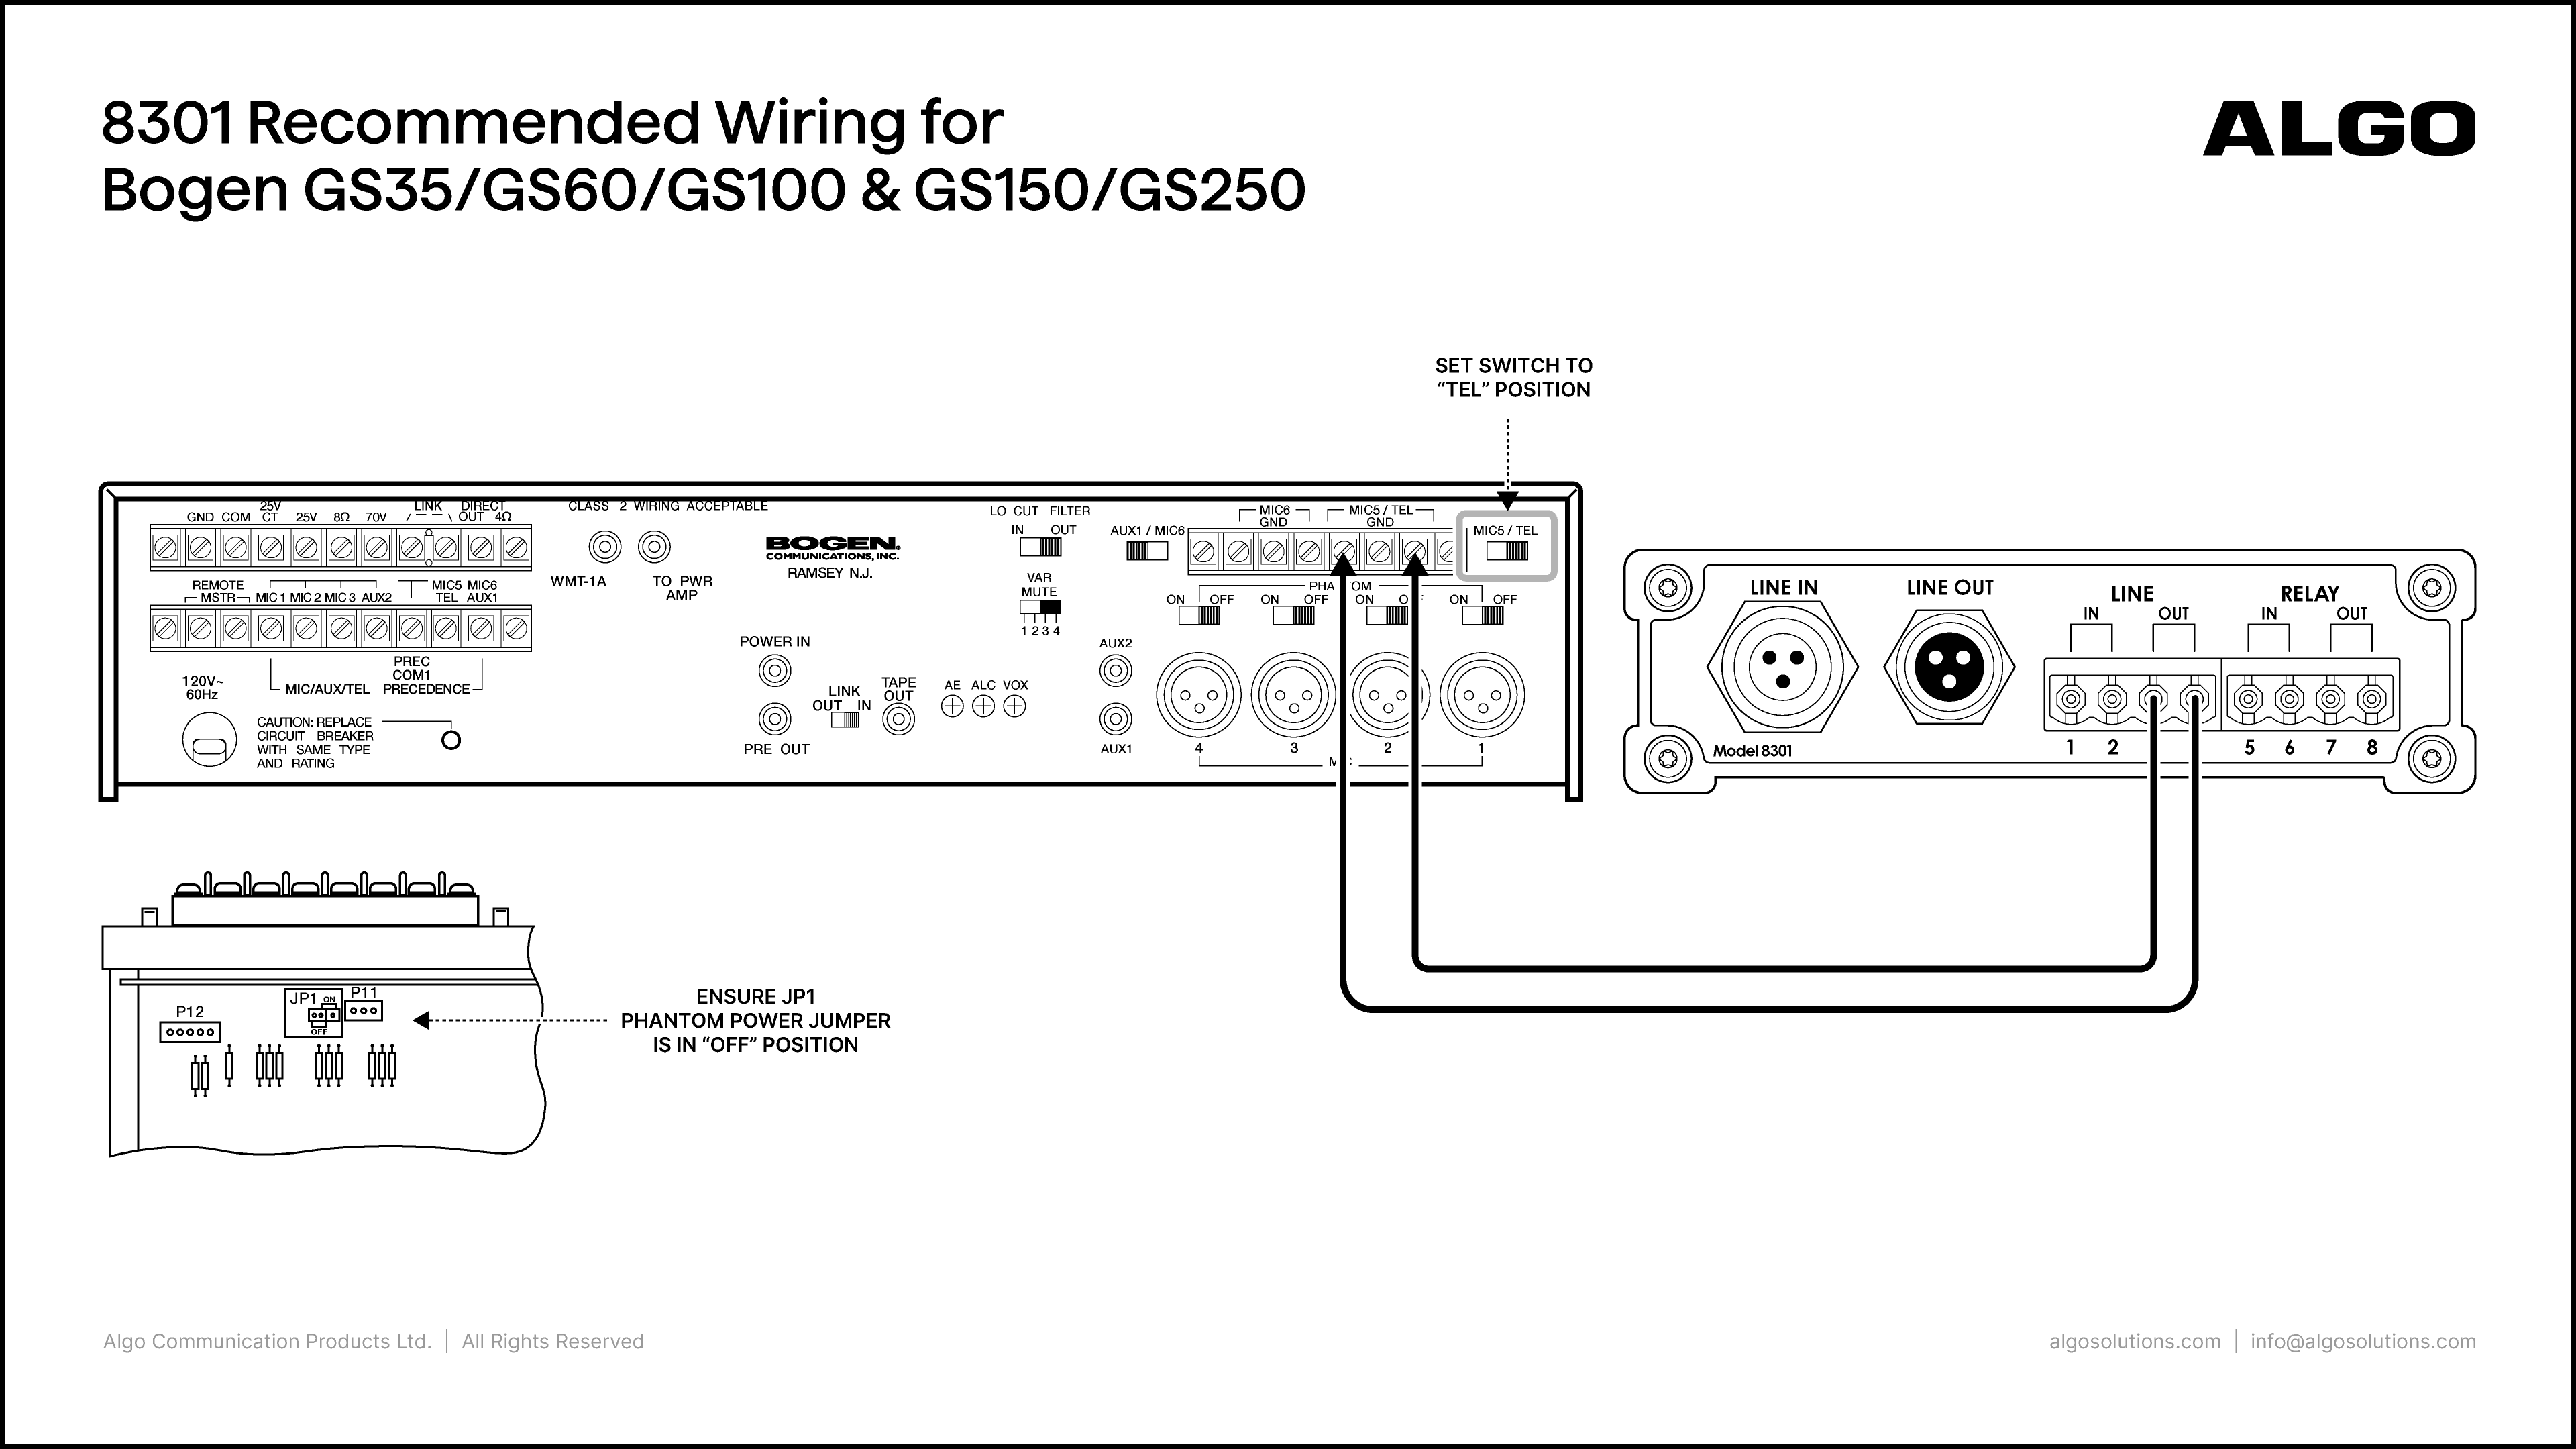
Algo Product:

8301 IP Paging Adapter & Scheduler

Amplifier Product:

Bogen GS35/GS60/GS100 & GS150/GS250

Port Connections:

Algo

Bogen

  • Line Out (3, 4)

  • Mic 5/ EL GND

Notes:

  • Set the MIC5/TEL switch to the “TEL” position

  • Ensure JP1 Phantom Power Jumper is in the OFF position

  • On the 8301 web interface, go to Basic Settings → Features and set the Line Out Analog Output Level to 0dBm 600 ohm (0.775 Vrms)

Bogen HTA250 with 8301

Algo Product:

8301 IP Paging Adapter & Scheduler

Amplifier Product:

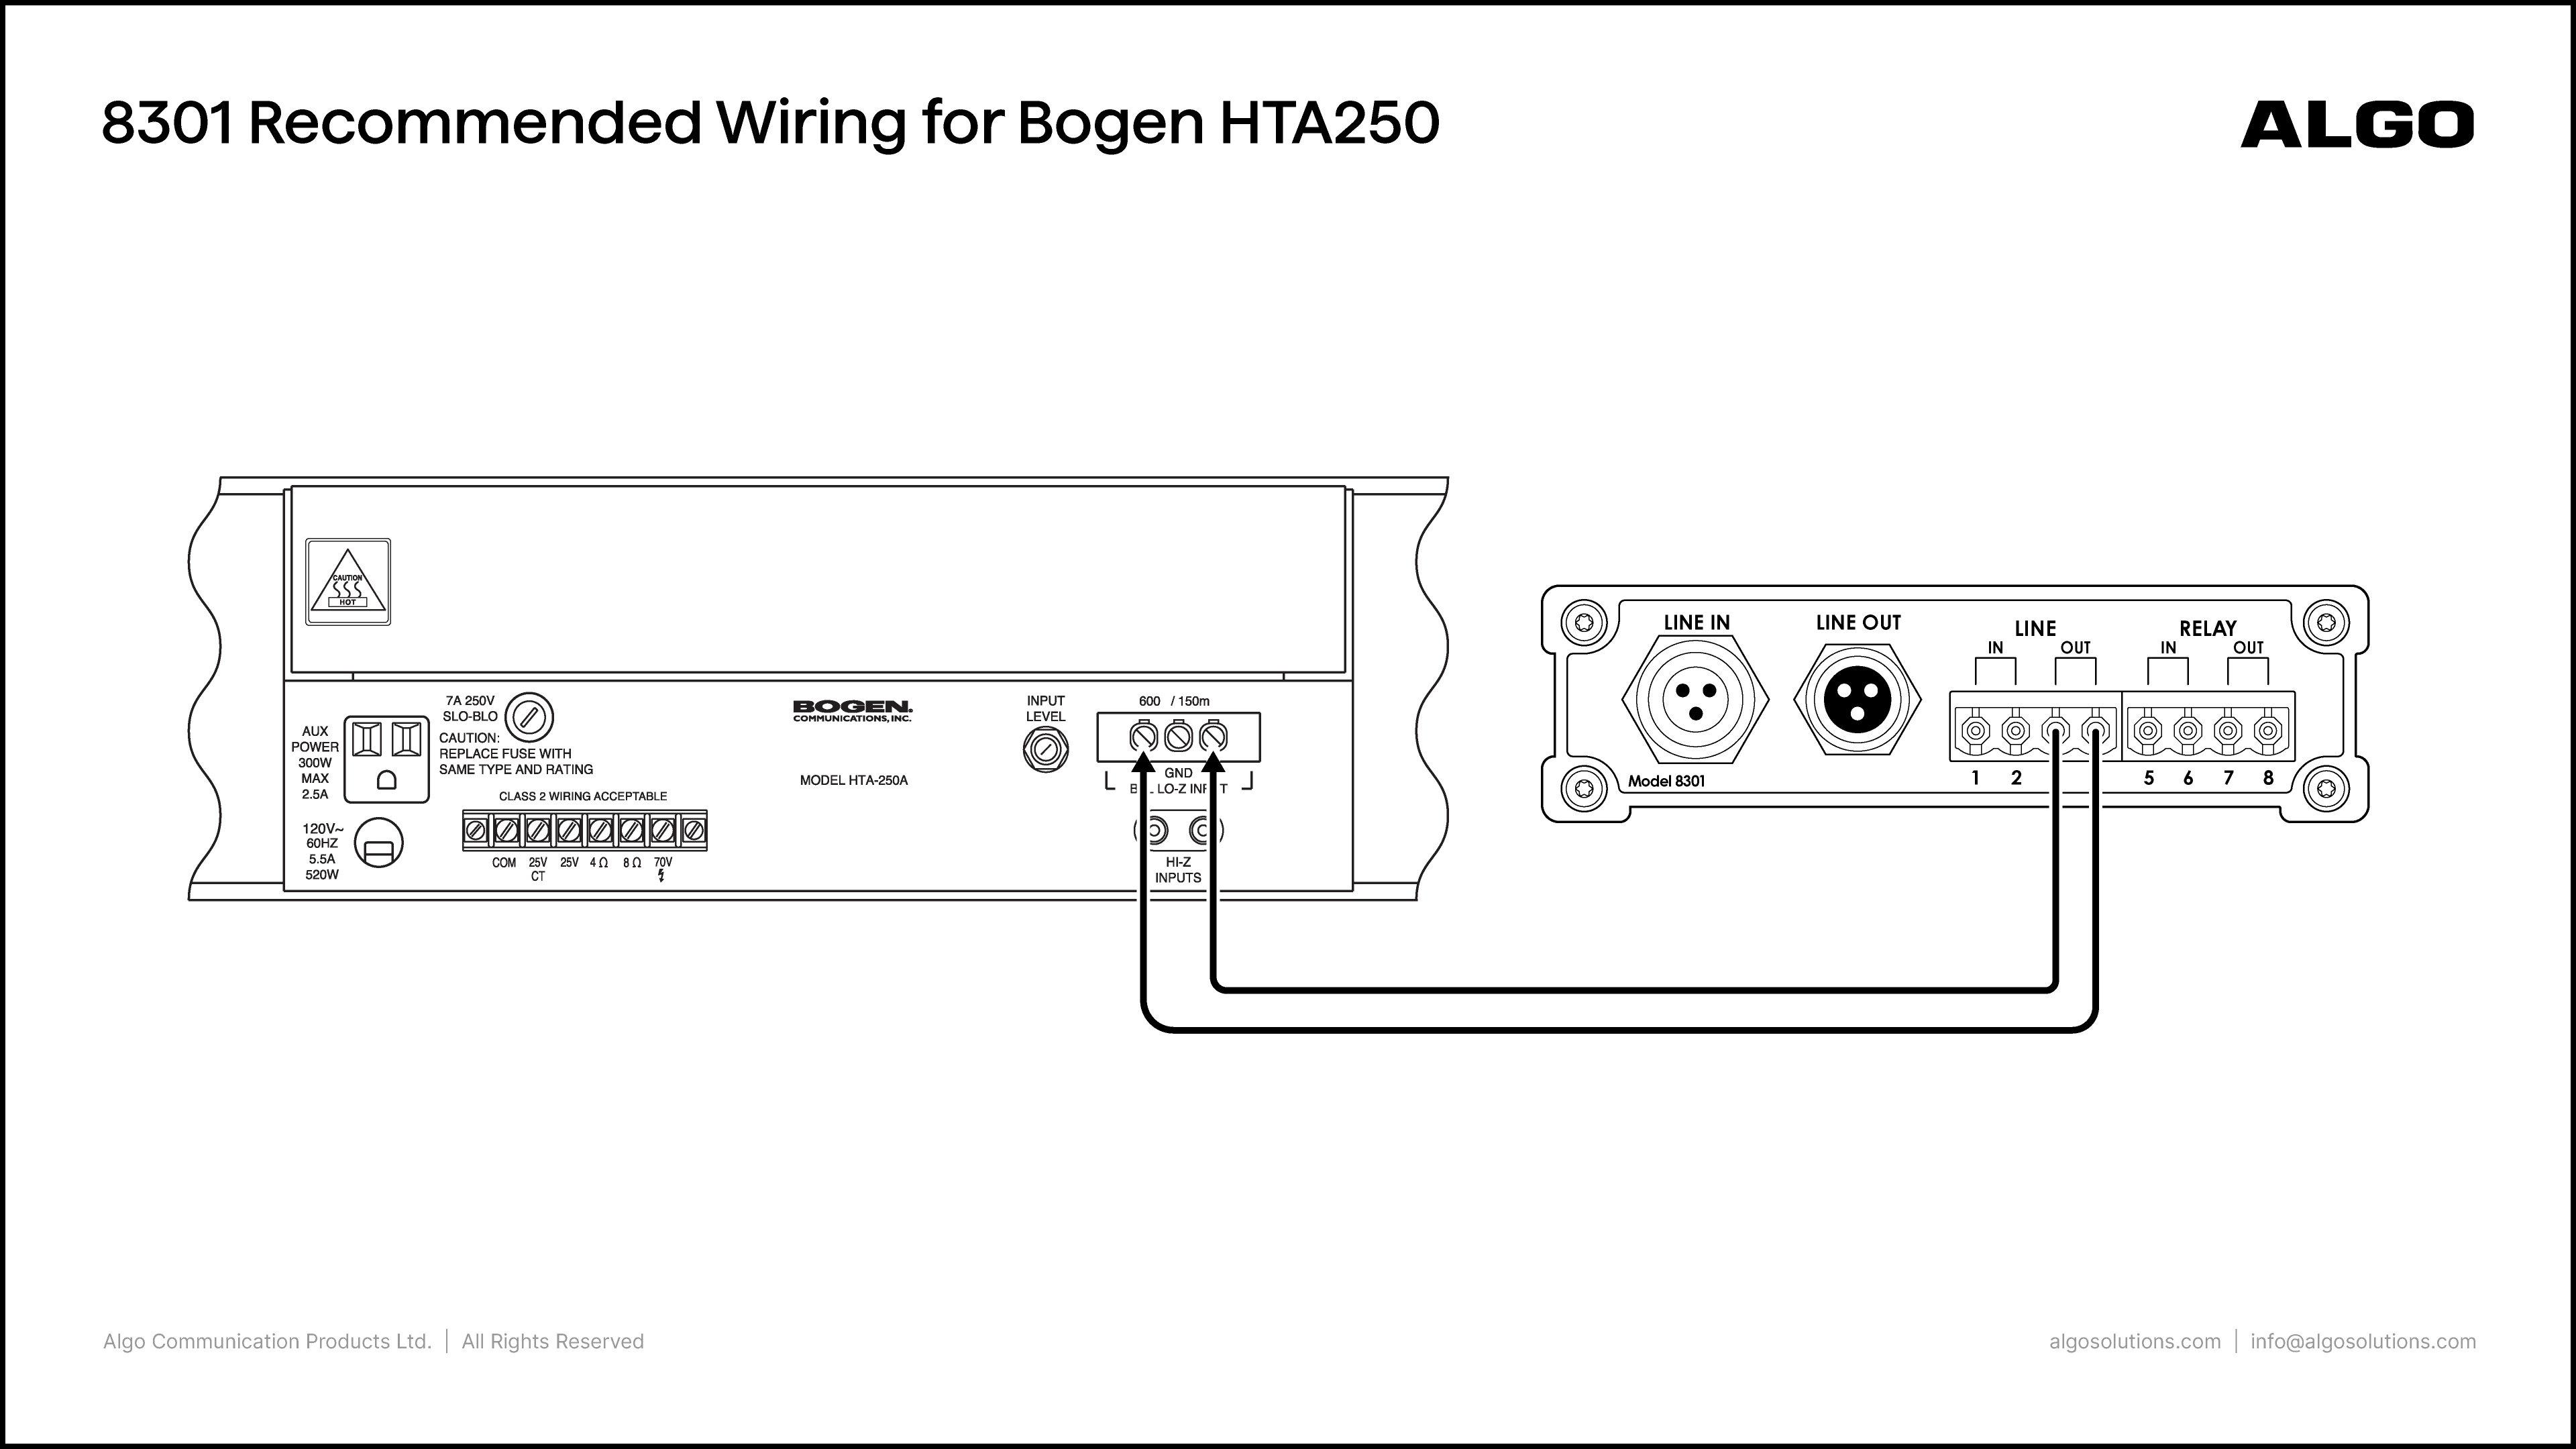
Bogen HTA250

Port Connections:

Algo

Bogen

  • Line Out (3, 4)

  • GND BAL LO-Z INPUT (left and right)

Notes:

  • On the 8301 web interface, go to Basic Settings → Features and set the Line Out Analog Output Level to 0dBm 600 ohm (0.775 Vrms)

Bogen PCM2000 with 8301

Algo Product:

8301 IP Paging Adapter & Scheduler

Amplifier Product:

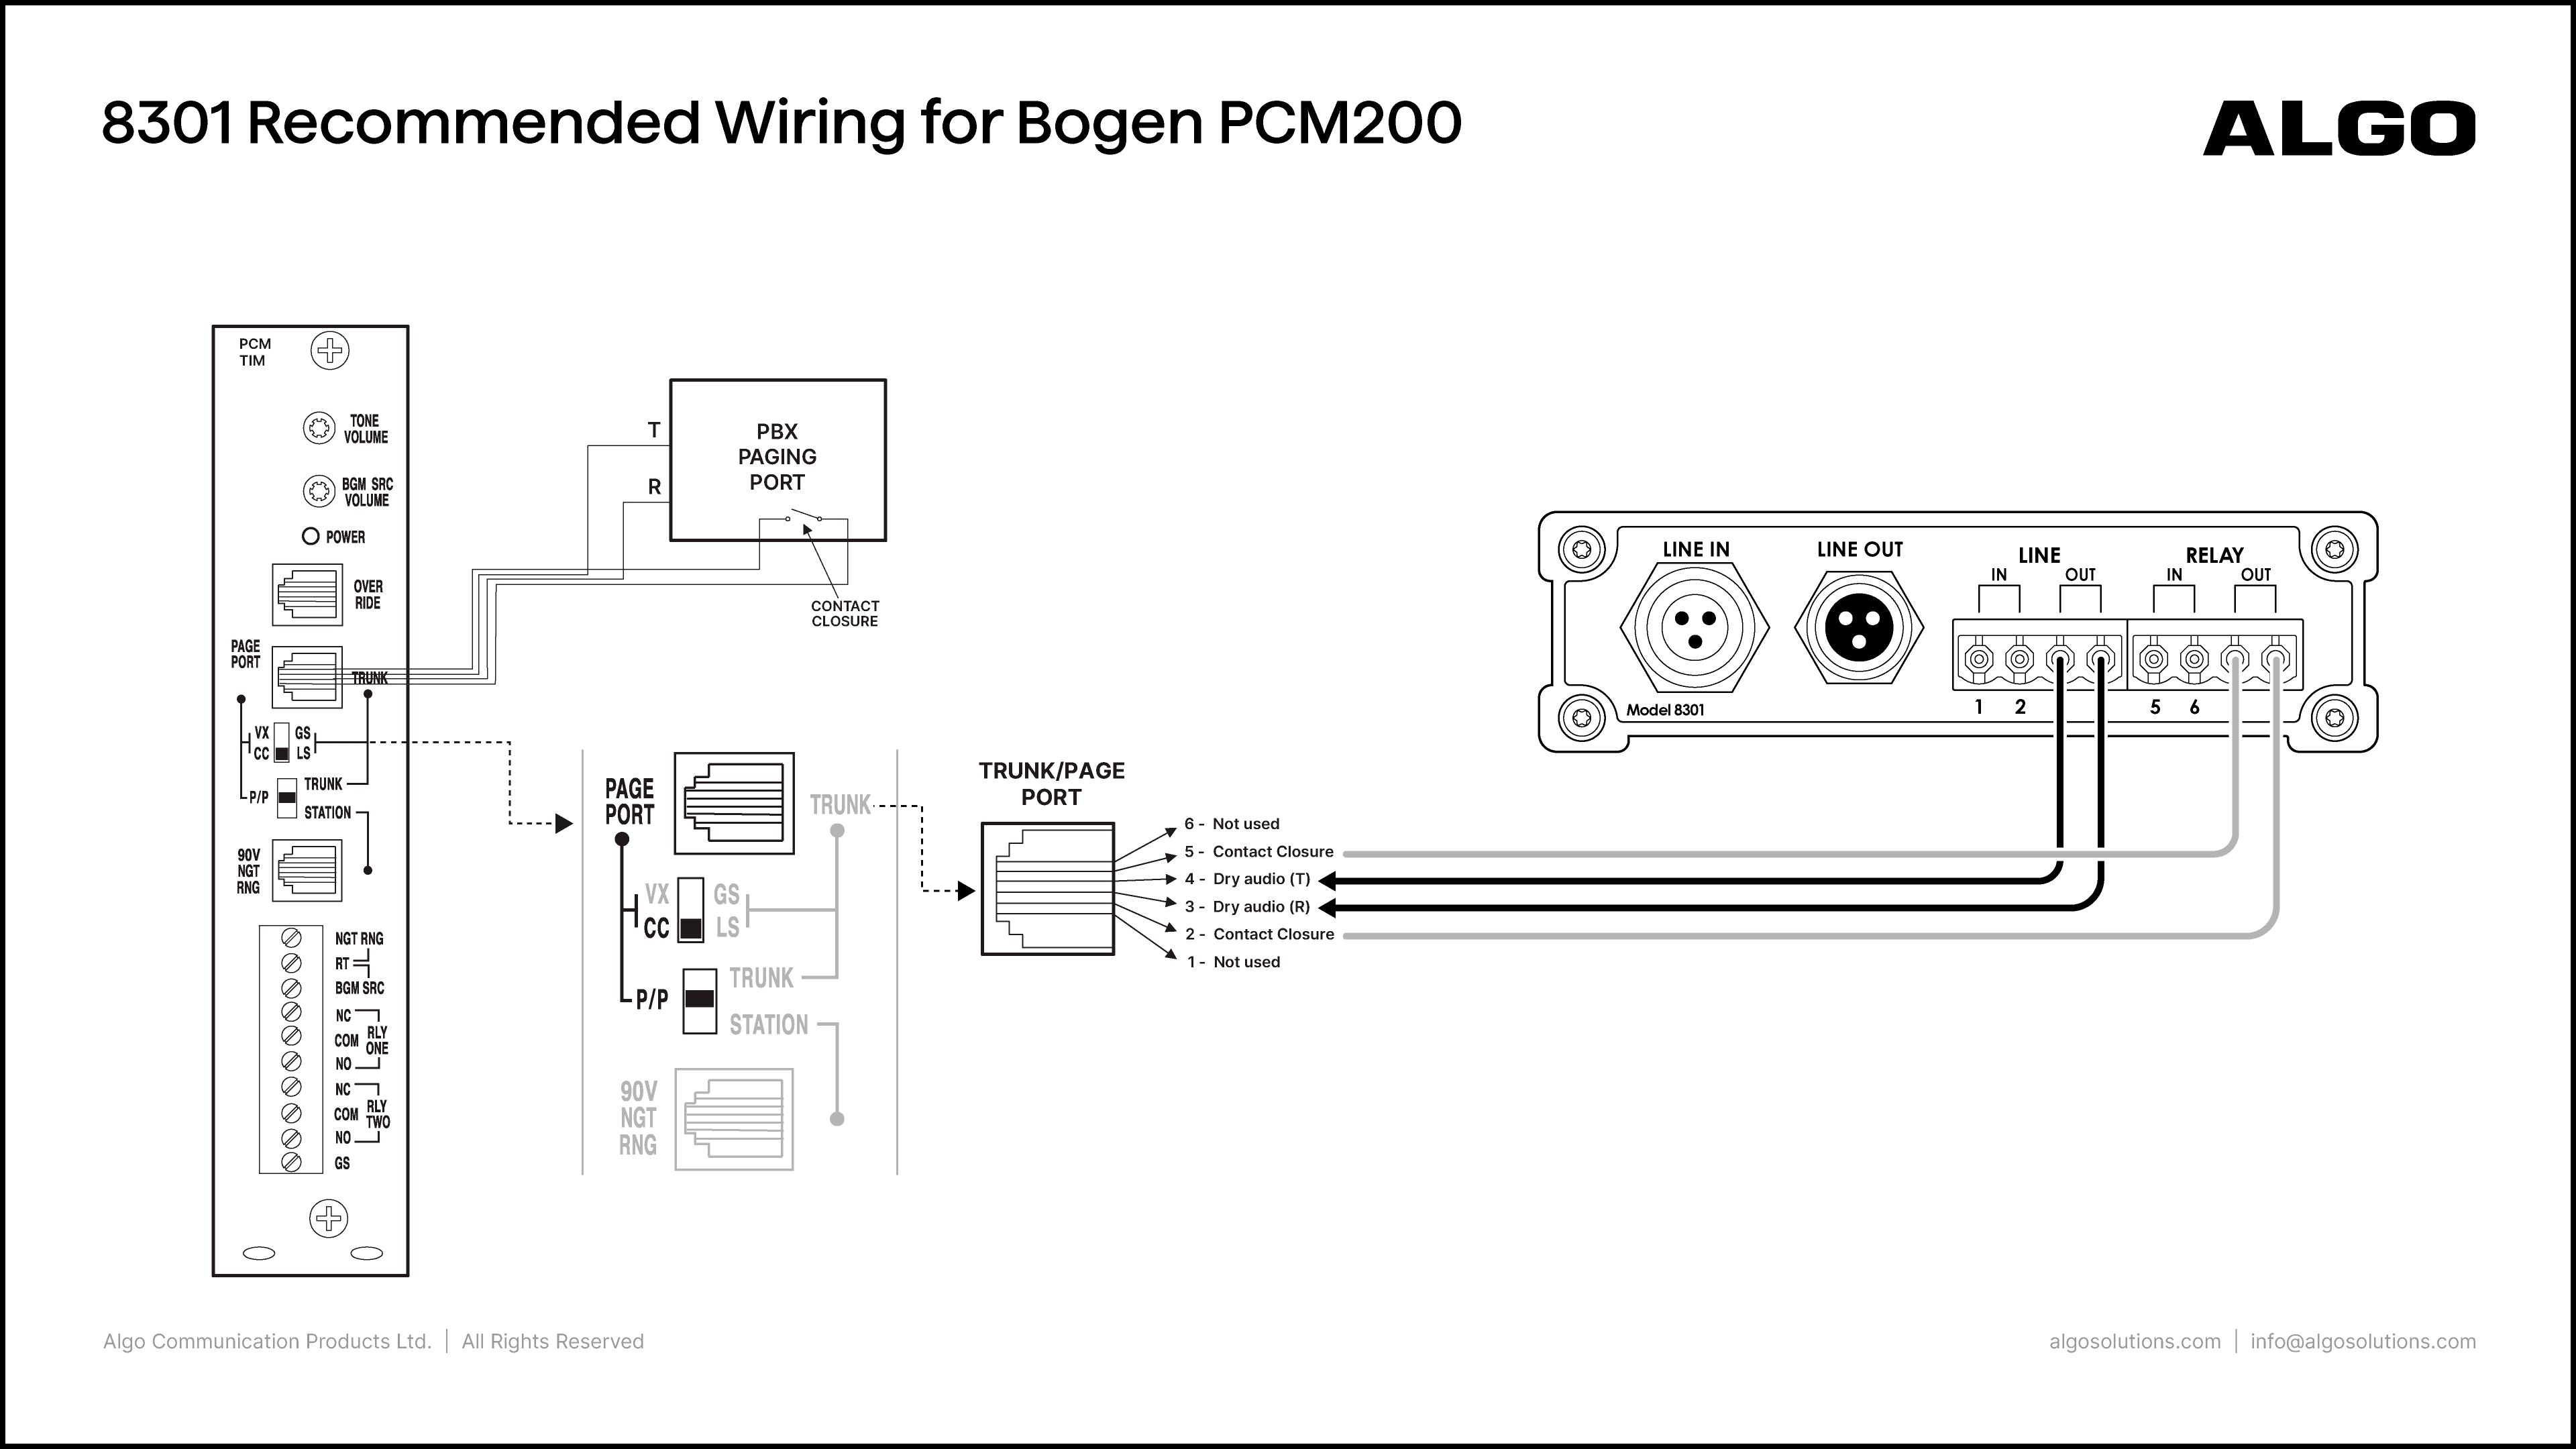
Bogen PCM2000

Port Connections:

Algo

Bogen

  • Line Out (3, 4)

  • Relay Out (7, 8)

  • Dry Audio (3, 4)

  • Contact Closure (5, 2)

Notes:

  • Before connecting, power off PCM2000 system. Set the dip switch as demonstrated above (CC switch down and P/P switch middle).​

  • On the 8301 web interface, go to Basic Settings → Features and set the Line Out Analog Output Level to 0dBm 600 ohm (0.775 Vrms)

  • To play DTMF tones and control the zones, make sure to enable Generate In-Band DTMF Tones (Advanced Settings → Advanced Audio).

Bogen PS600 with 8301

Algo Product:

8301 IP Paging Adapter & Scheduler

Amplifier Product:

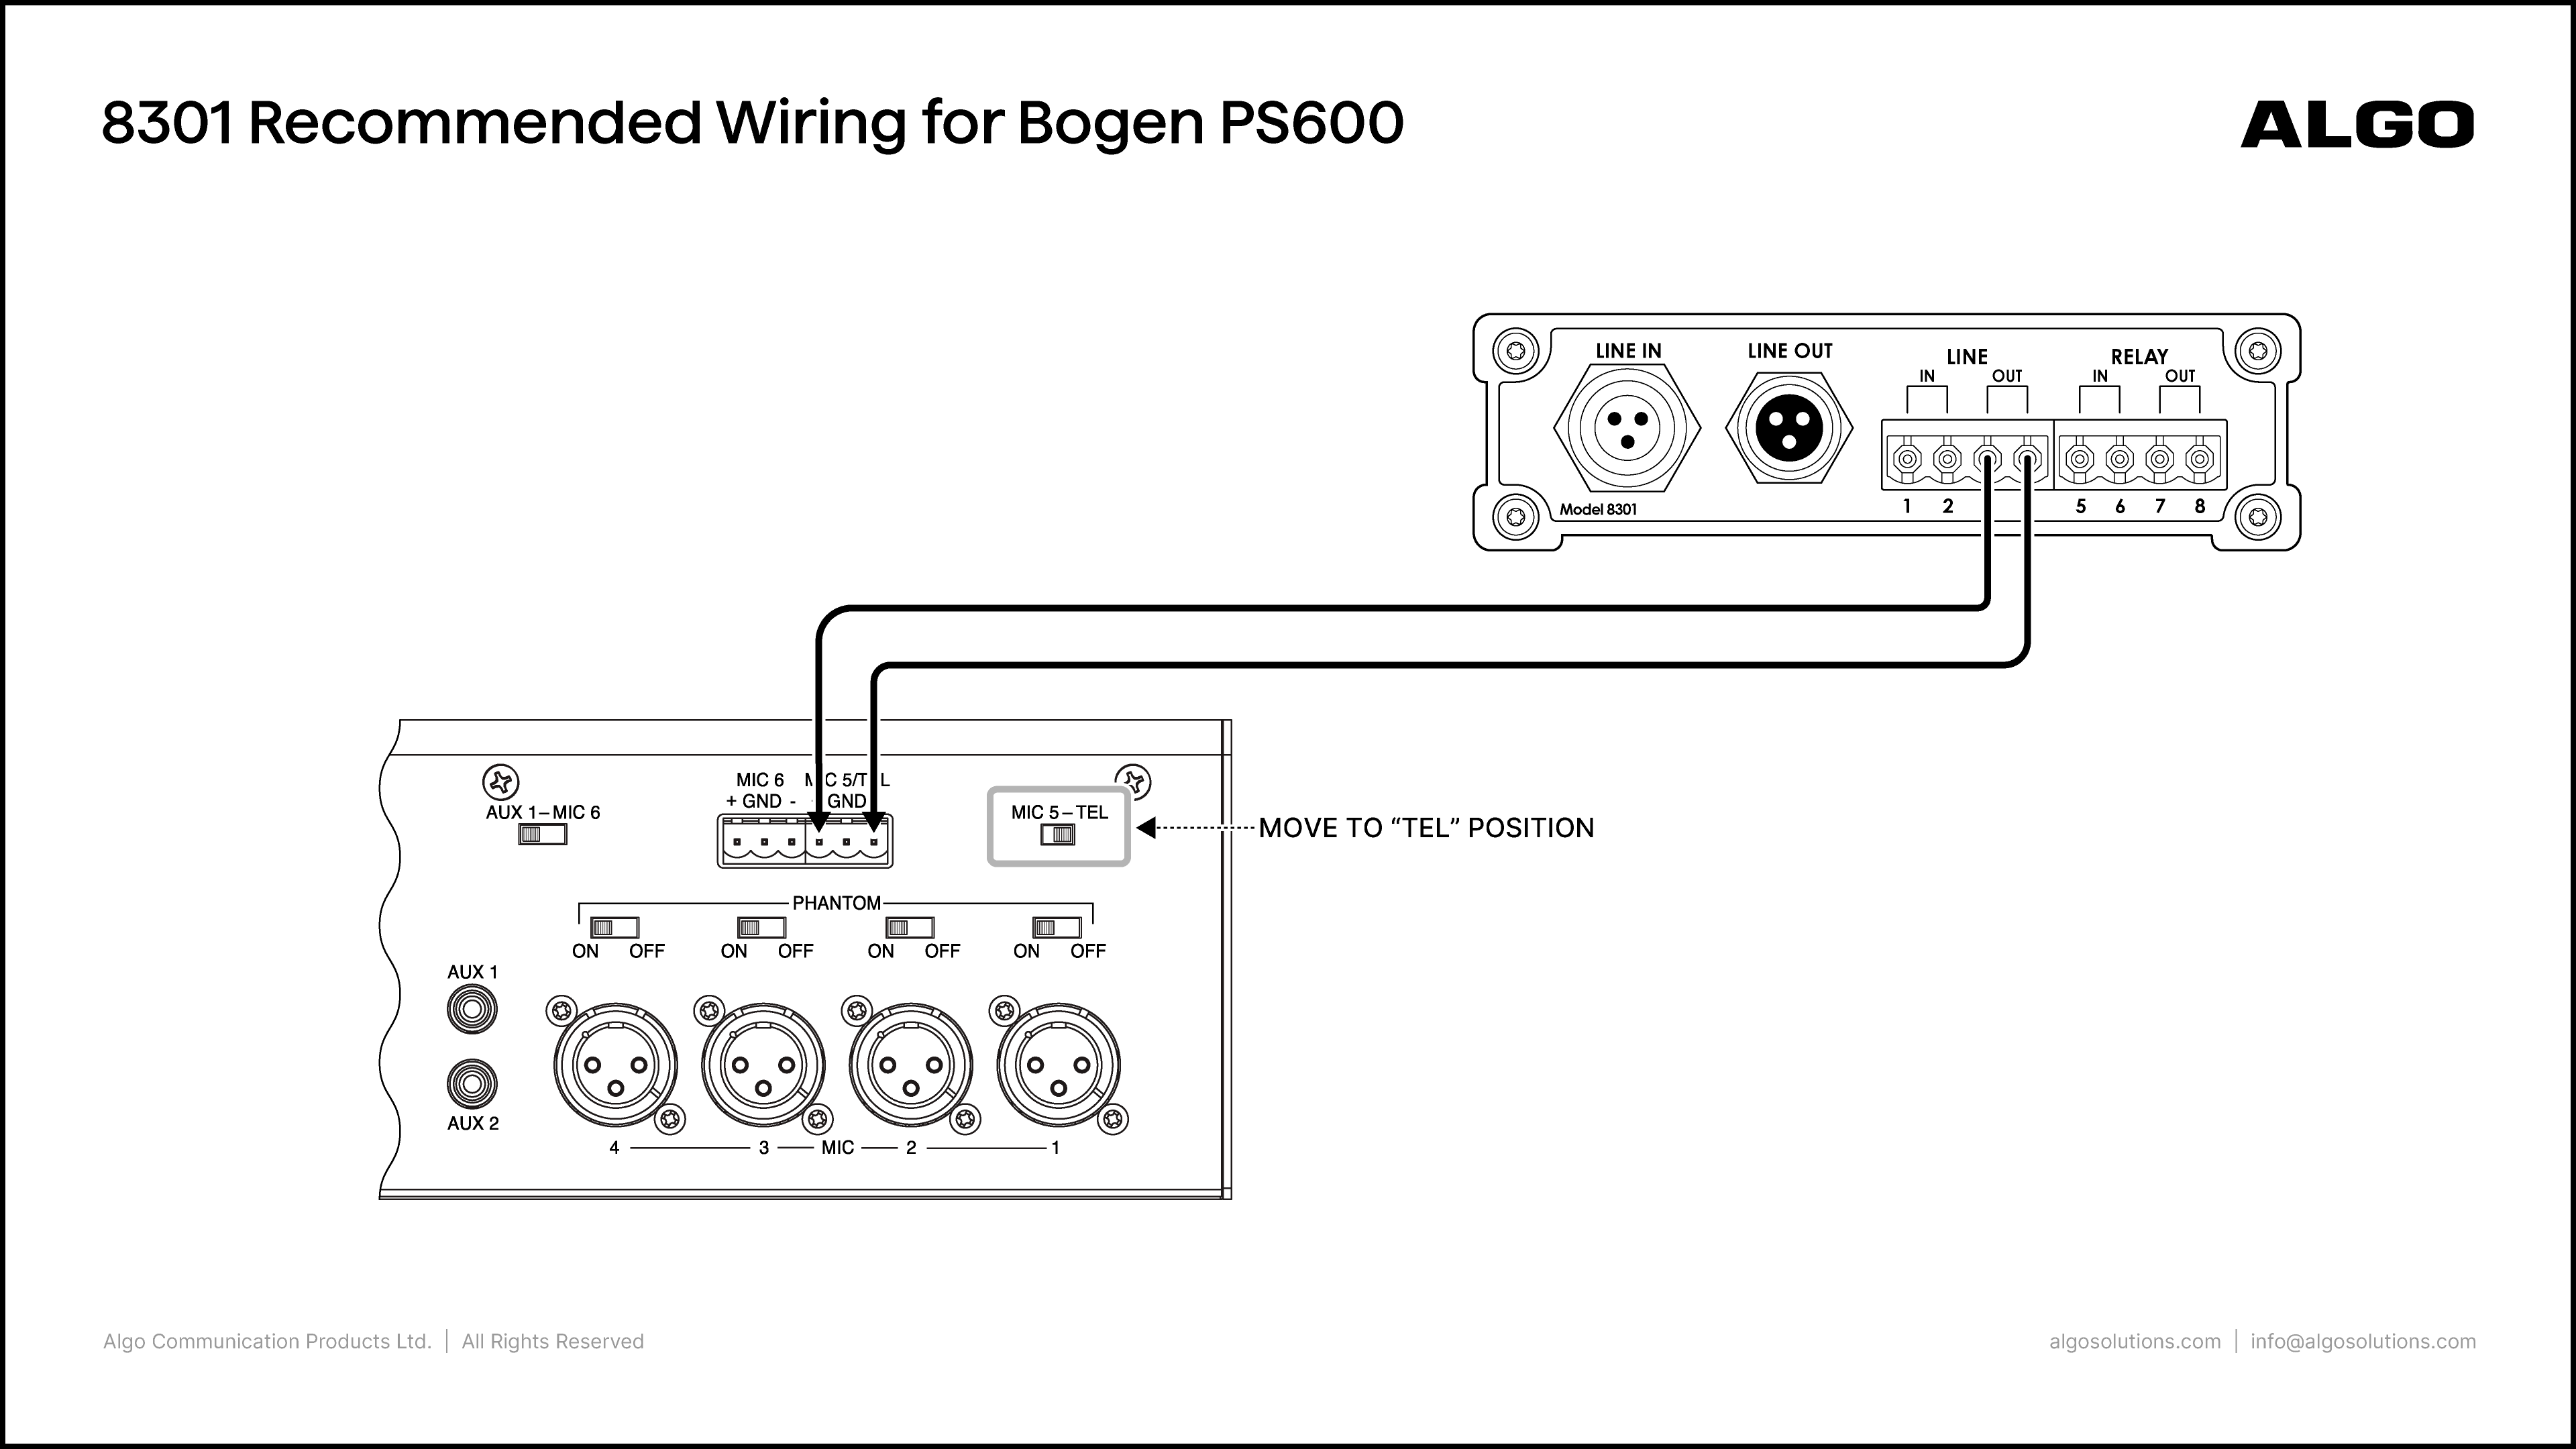
Bogen PS600

Port Connections:

Algo

Bogen

  • Line Out (3, 4)

  • MIC 5/TEL (+, -)

Notes:

  • Set the MIC5/TEL switch to the “TEL” position

  • On the 8301 web interface, go to Basic Settings → Features and set the Line Out Analog Output Level to 0dBm 600 ohm (0.775 Vrms)

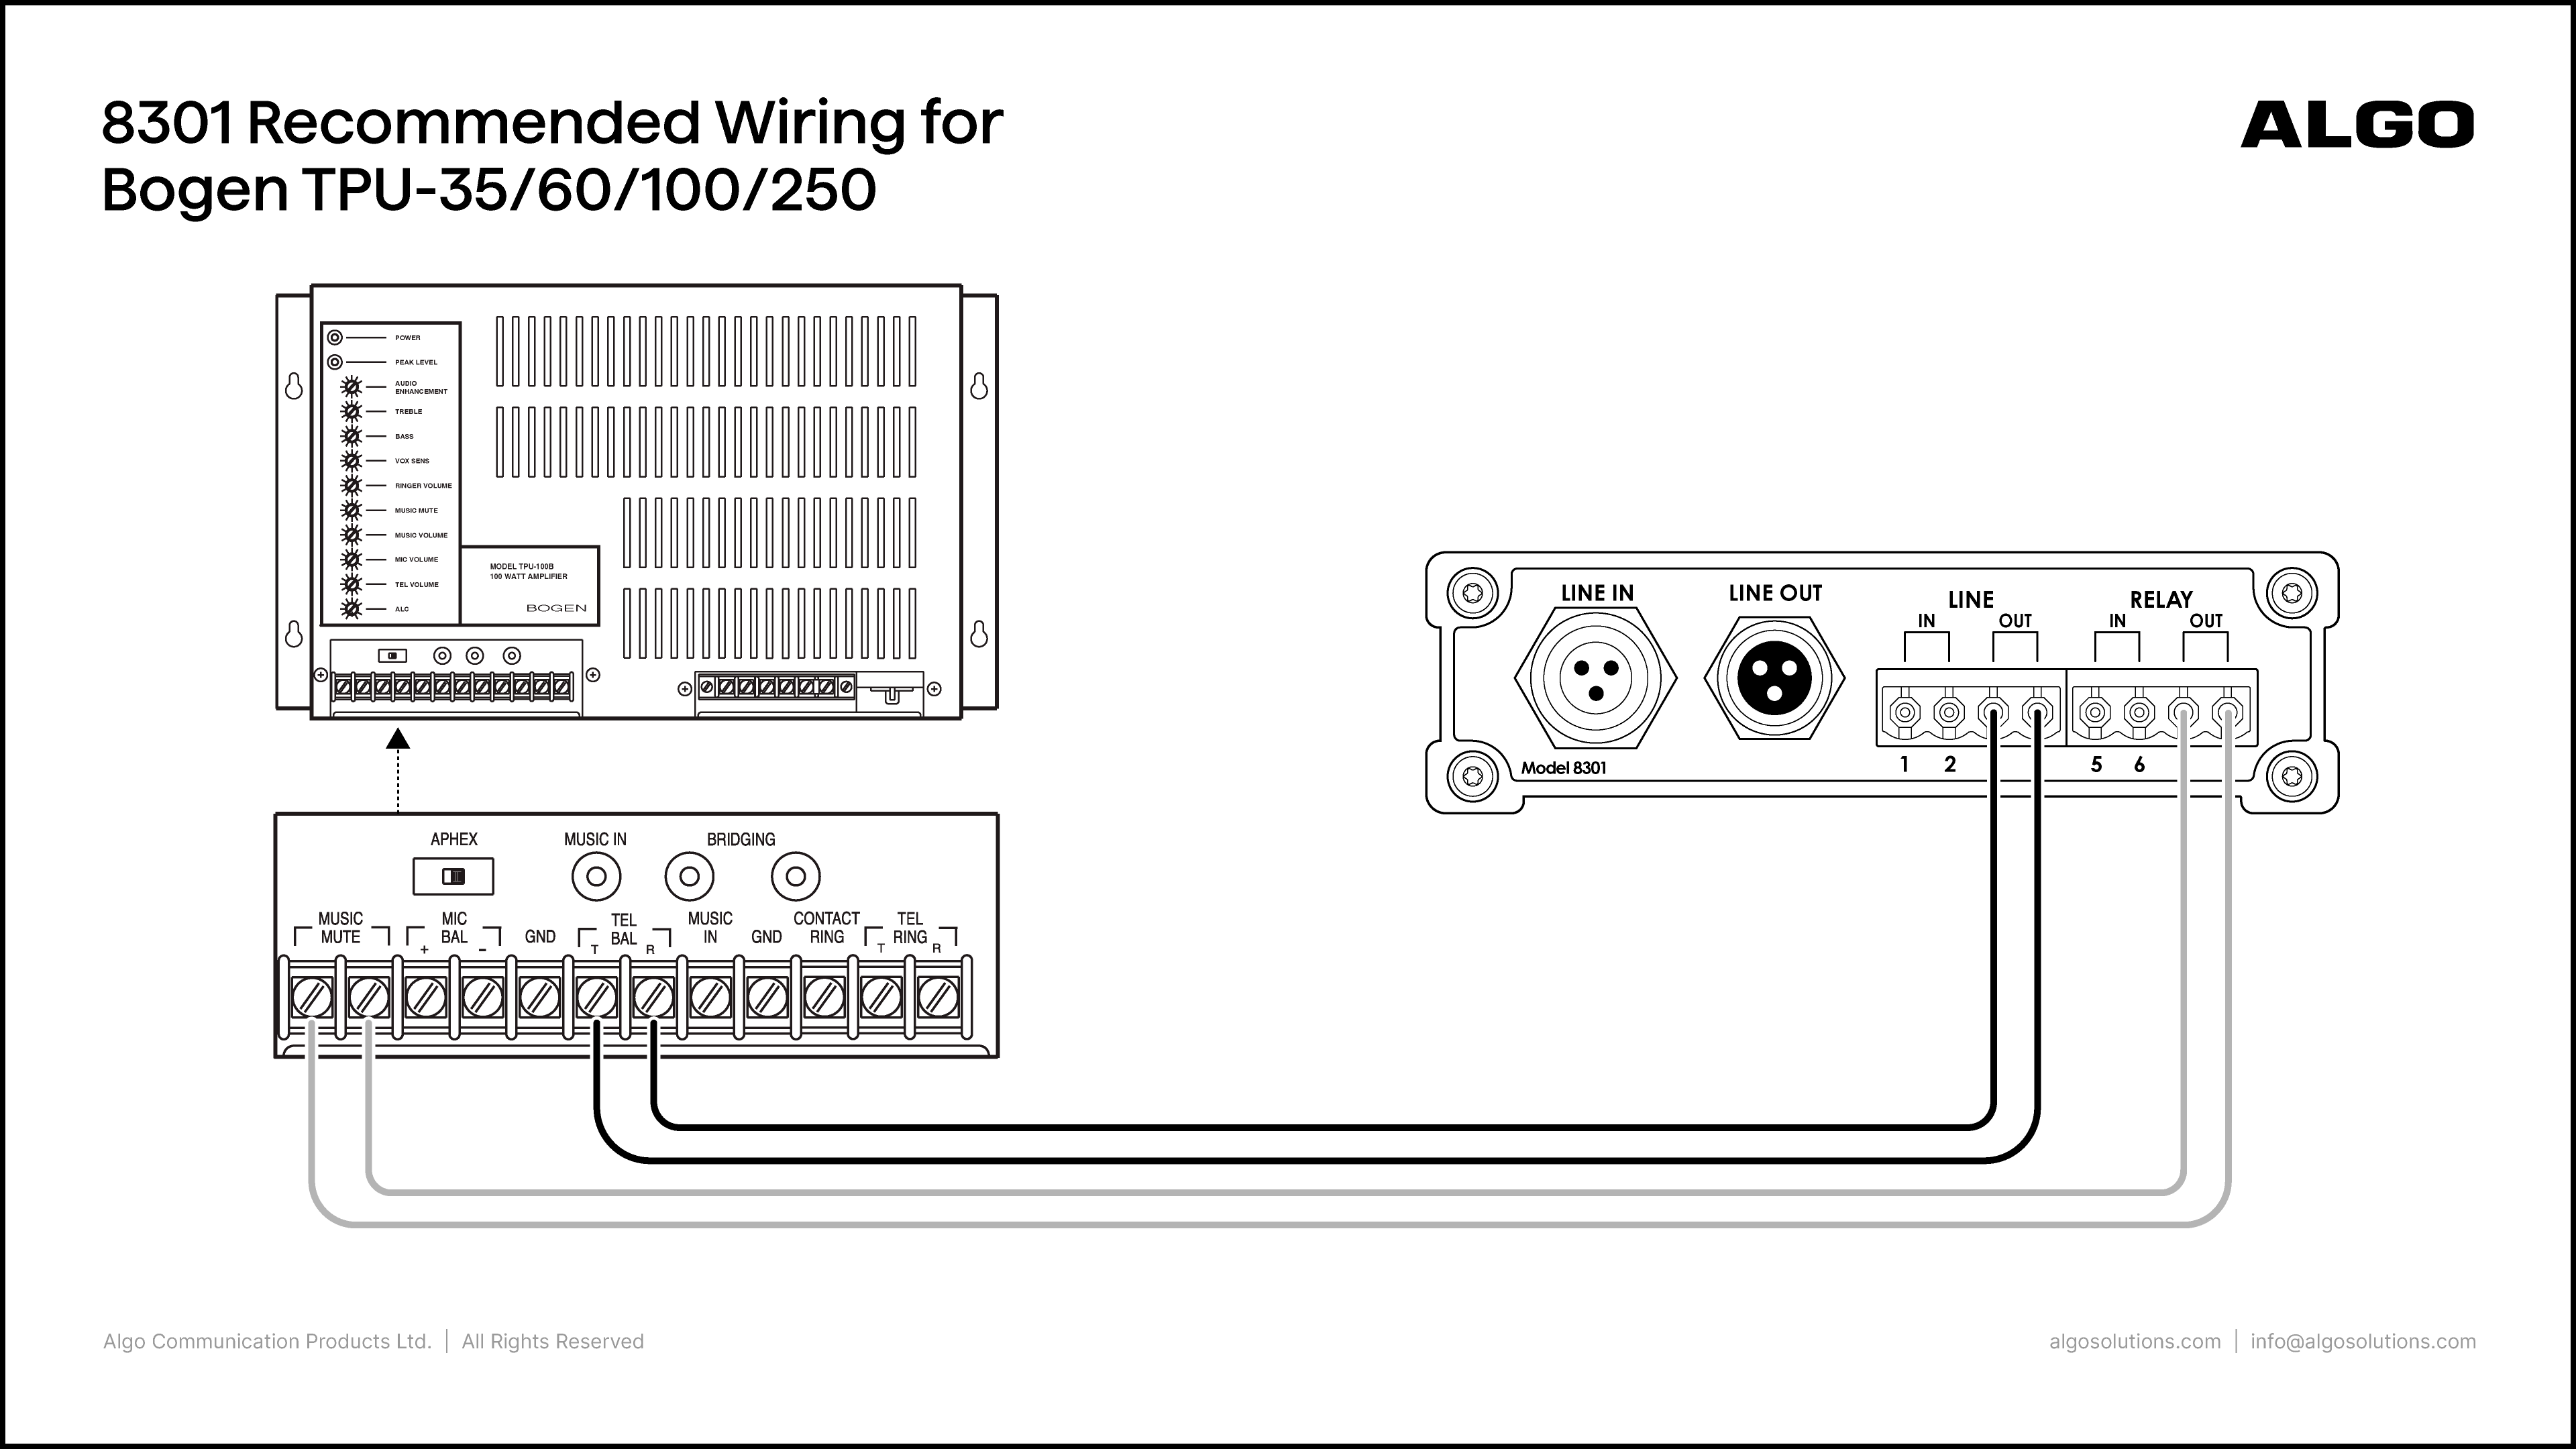
Bogen TPU-35/60/100/250 with 8301

Algo Product:

8301 IP Paging Adapter & Scheduler

Amplifier Product:

Bogen TPU-35/60/100/250

Port Connections:

Algo

Bogen

  • Line Out (3, 4)

  • Relay Out (7, 8)

  • Tel Bal (T, R) Music Mute

Notes:

  • On the 8301 web interface, go to Basic Settings -> Features and set the Line Out Analog Output Level to 0dBm 600 ohm (0.775 Vrms)

  • Before connecting, power off PCM2000 system. Set the dip switch as demonstrated above (CC switch down and P/P switch middle).​

The Bogen Amp
Dedicated audio output available standard on most telephone systems

  • Can be connected directly to the input of most amplifiers

  • Traditionally, a 600-ohm dry audio signal and a normally

  • Control contacts, if available, activate during a page and typically control the muting of background music

The Algo 8301 Typical application:
The Algo 8301 paging adapter and scheulder is used to connect and existing amplifier to UC environment as a SIP extension or a multicast endpoint.

  • Line output of the 8301 is connected directly to the dry audio input of the amplifier with input impedance between 600ohms and 10kOhms

  • For amplifiers connected directly to the dry page port of an existing telephone system, the 8301 will provide a very similar interface providing both dry page audio and dry contact closure to activate the amplifier (if required)

  • For amplifiers connect to an FXS or ATA through a “telephone answering device”, the 8301 will replace the answering device and eliminate the need for an FXS or ATA.

Bogen TPU-35/60/100/250 with 8373

Algo Product:

8373 IP Zone Paging Adapter

Amplifier Product:

Bogen TPU-35/60/100/250

Port Connections:

Algo

Bogen

  • Line Out

  • Relay Out

  • Tel Bal (T, R)

  • Music Mute

Notes:

  • The 8373 is designed to provide a Line Out for audio to a traditional amplifier.

  • On the 8373 web interface, go to Basic Settings → Features and set the Line Out Analog Output Level to 0dBm 600 ohm (0.775 Vrms)

  • Loop the power of the amplifier into the 8373 to switch up to 500W (for 70V output) into 1-3 audio channels. At 25V the 8373 can switch up to 180W and 720W at 100V.

  • The speaker runs will be connected to the channel outputs on the 8373.

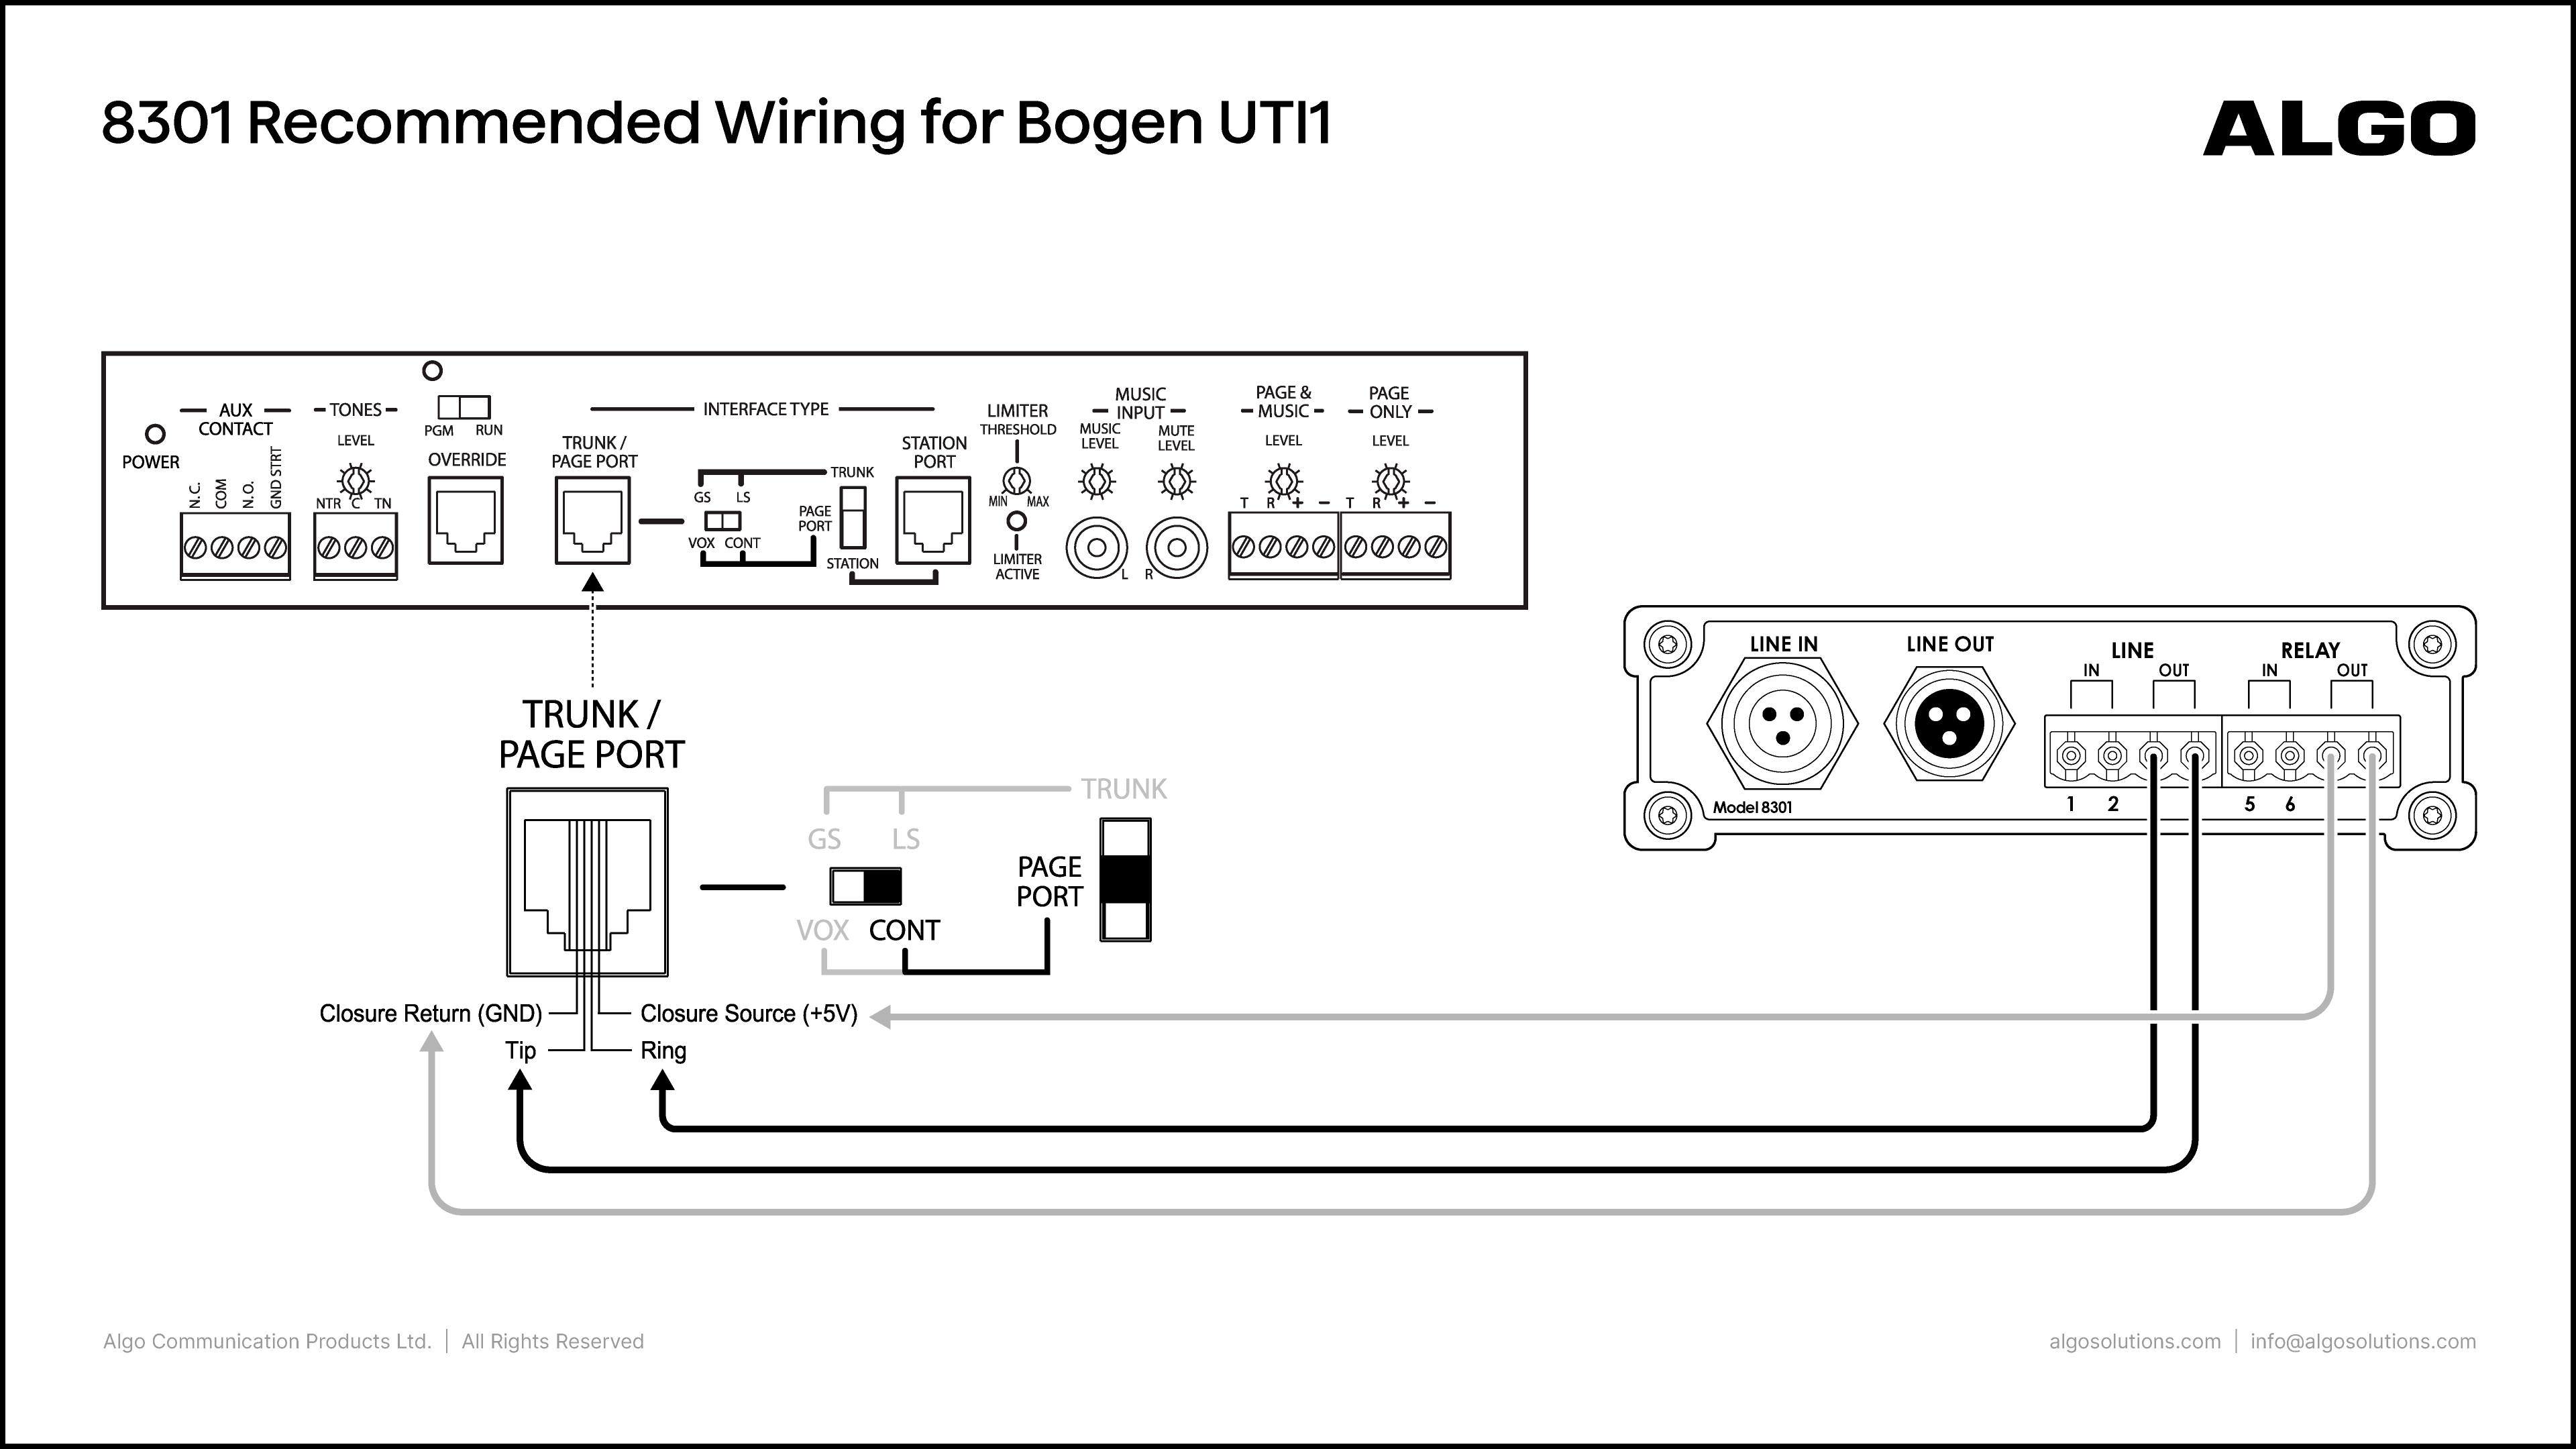
Bogen UTI1 with 8301

Algo Product:

8301 IP Paging Adapter & Scheduler

Amplifier Product:

Bogen UTI1

Port Connections:

Algo

Bogen

  • Line Out (3, 4)

  • Relay Out (7, 8)

  • Trunk/Page Port

Notes:

  • On the Bogen UTI1, set the horizontal switch to “CONT” and the vertical to “Page Port”.

  • On the 8301 web interface, go to Basic Settings → Features and set the Line Out Analog Output Level to 0dBm 600 ohm (0.775 Vrms)

Bogen UTI1 with 8305

Algo Product:

8305 Multi-Interface IP Paging Adapter

Amplifier Product:

Bogen UTI1

Port Connections:

Algo

Bogen

  • Line Out (3, 4)

  • Relay Out (7, 8)

  • Trunk/Page Port (Ring, Tip)

  • Trunk/Page Port (Closure Source (+5V), Closure Return (GND))

Notes:

  • On the Bogen UTI1, set the horizontal switch to “CONT” and the vertical to “Page Port”.

  • On the 8305 web interface, go to Basic Settings → Features and set the Analog Output Port/Level to 0dBm 600 ohm (0.775 Vrms)

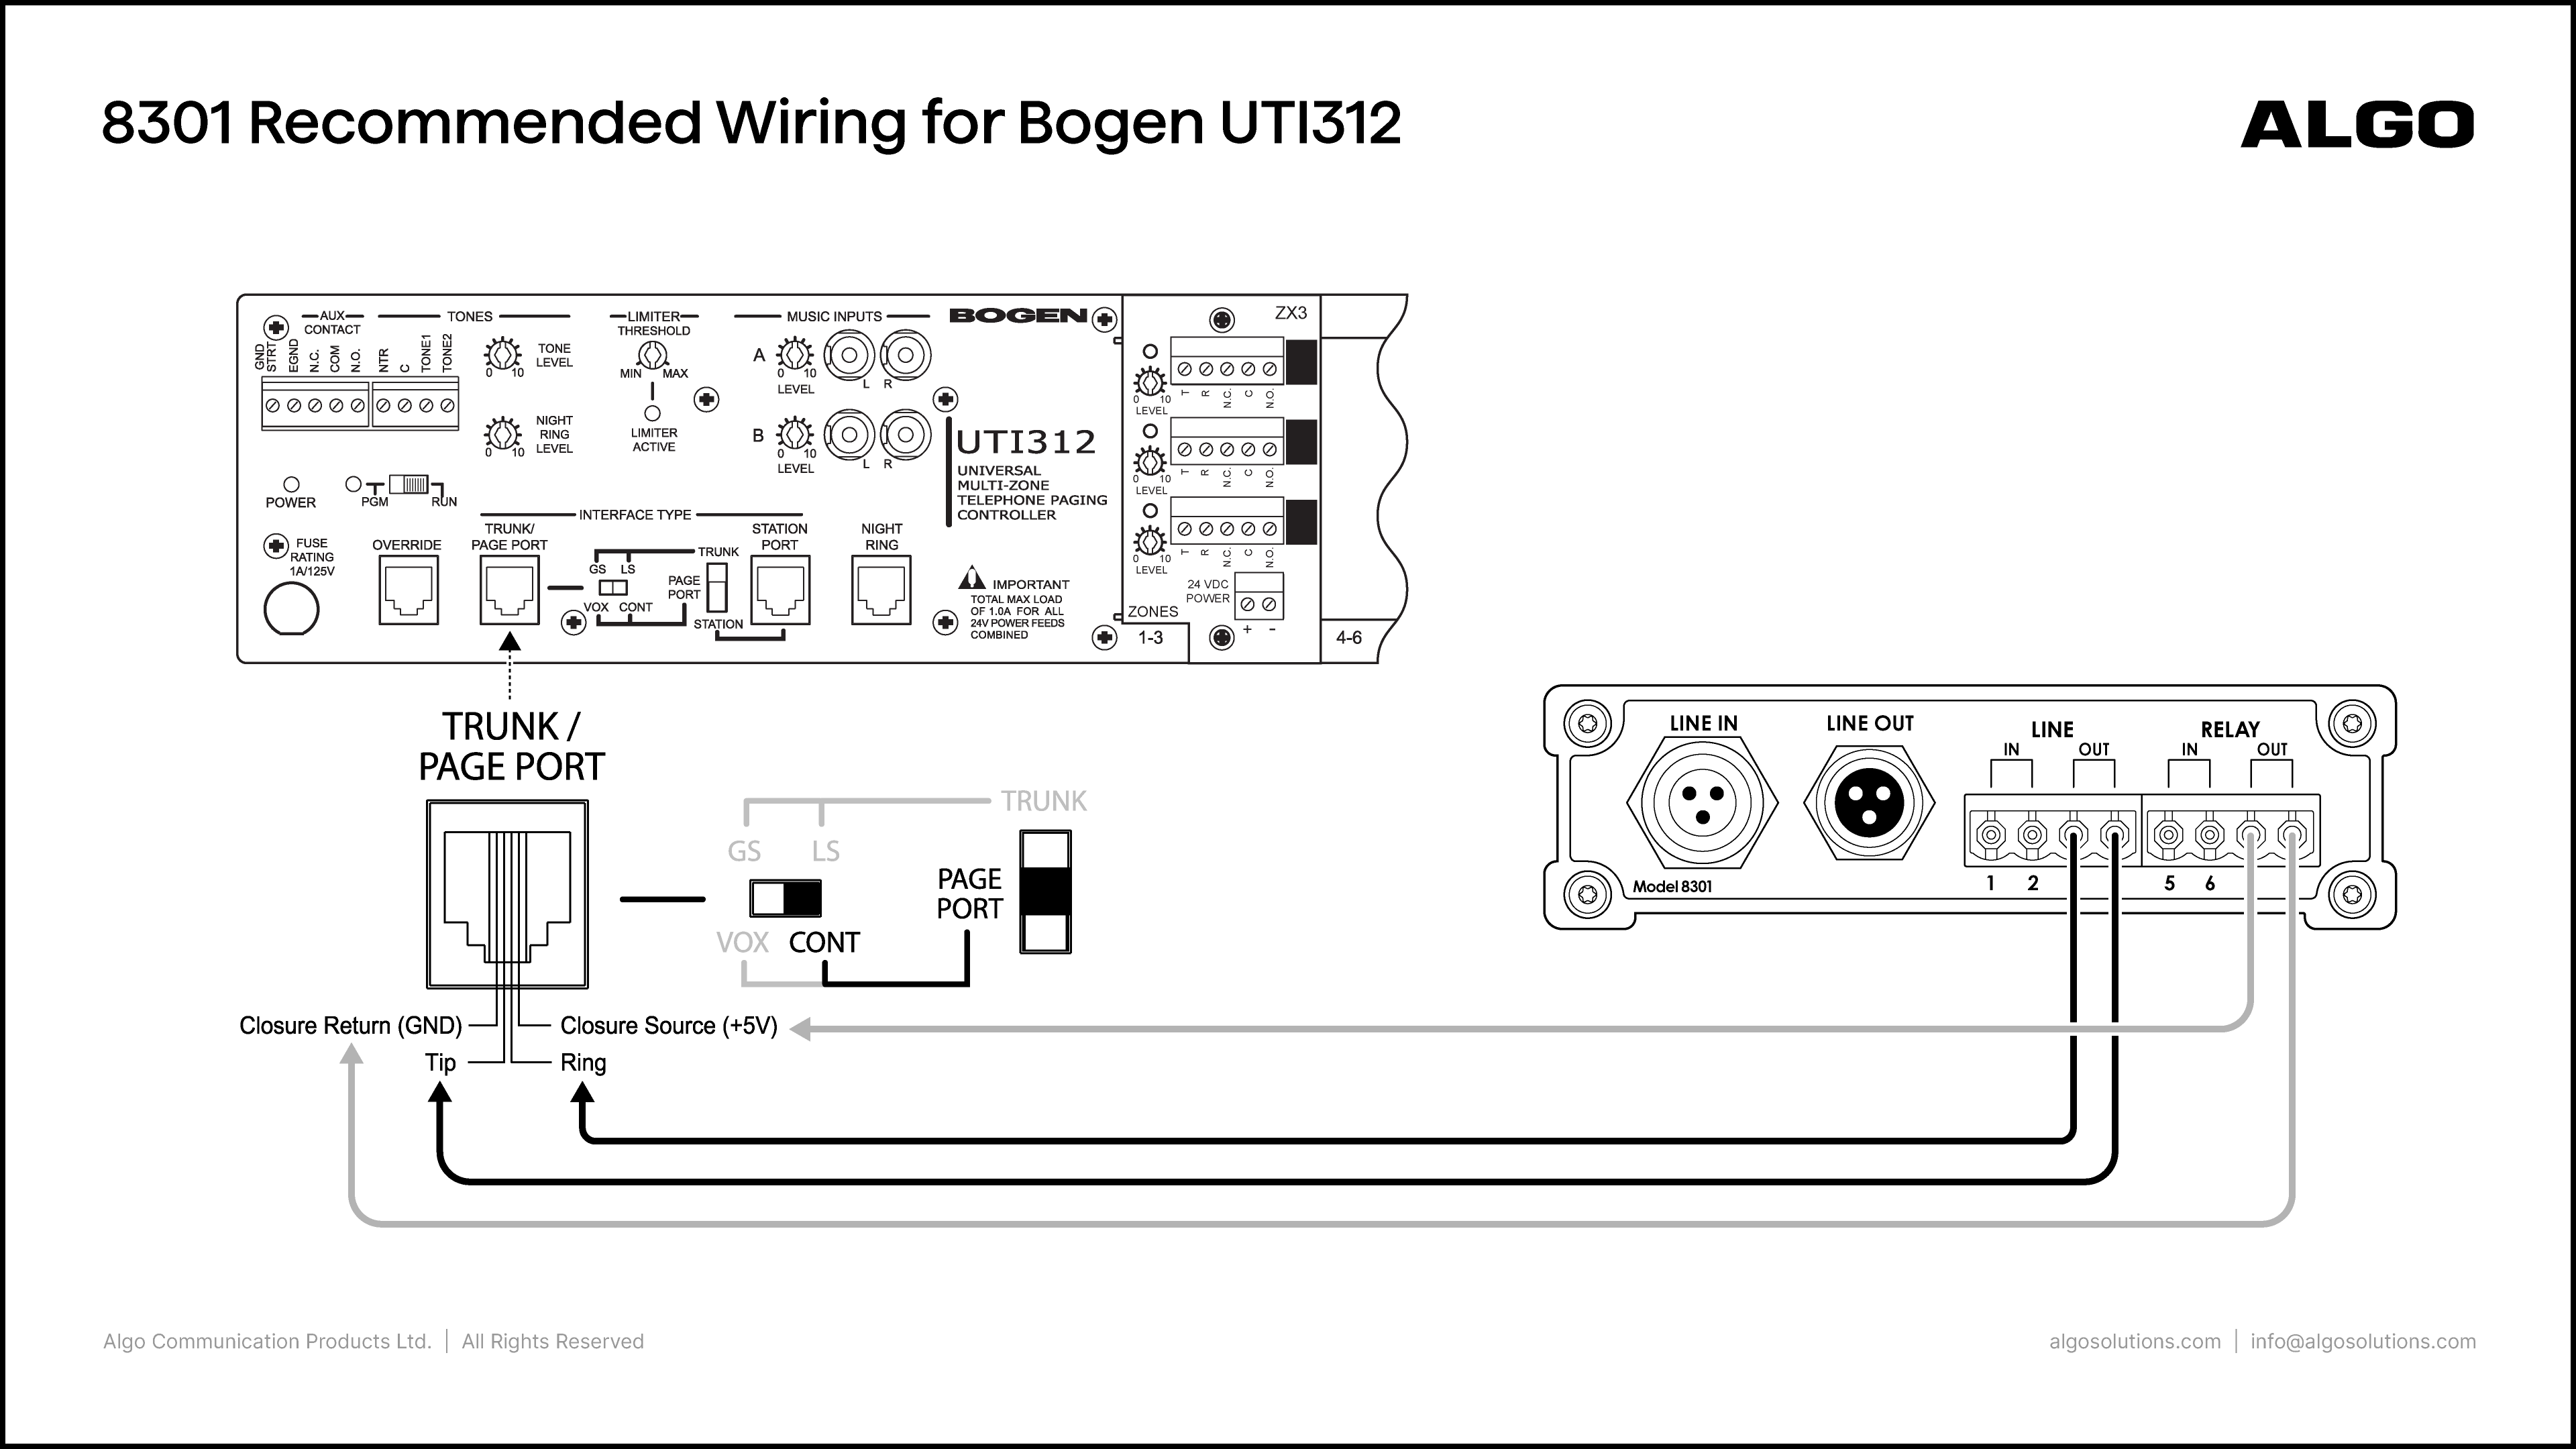
Bogen UTI312 with 8301

Algo Product:

8301 IP Paging Adapter & Scheduler

Amplifier Product:

Bogen UTI312

Port Connections:

Algo

Bogen

  • Line Out (3, 4)

  • Relay Out (7, 8)

  • Trunk/Page Port (Ring, Tip)

  • Trunk/Page Port (Closure Source (+5V), Closure Return (GND))

Notes:

  • On the Bogen UTI312, set the horizontal switch to “CONT” and the vertical to “Page Port”.

  • On the 8301 web interface, go to Basic Settings → Features and set the Line Out Analog Output Level to 0dBm 600 ohm (0.775 Vrms)

  • To play DTMF tones and control the zones, make sure to enable Generate In-Band DTMF Tones under Advanced Settings → Advanced Audio.

Bogen UTI312 with 8305

Algo Product:

8305 Multi-Interface IP Paging Adapter

Amplifier Product:

Bogen UTI312

Port Connections:

Algo

Bogen

  • Line Out (3, 4)

  • Relay Out (7, 8)

  • Trunk/Page Port (Ring, Tip)

  • Trunk/Page Port (Closure Source (+5V), Closure Return (GND))

Notes:

  • On the Bogen UTI312, set the horizontal switch to “CONT” and the vertical to “Page Port”.

  • On the 8305 web interface, go to Basic Settings → Features and set the Line Out Analog Output Level to 0dBm 600 ohm (0.775 Vrms)

  • To play DTMF tones and control the zones, make sure to enable Generate In-Band DTMF Tones under Advanced Settings → Advanced Audio.

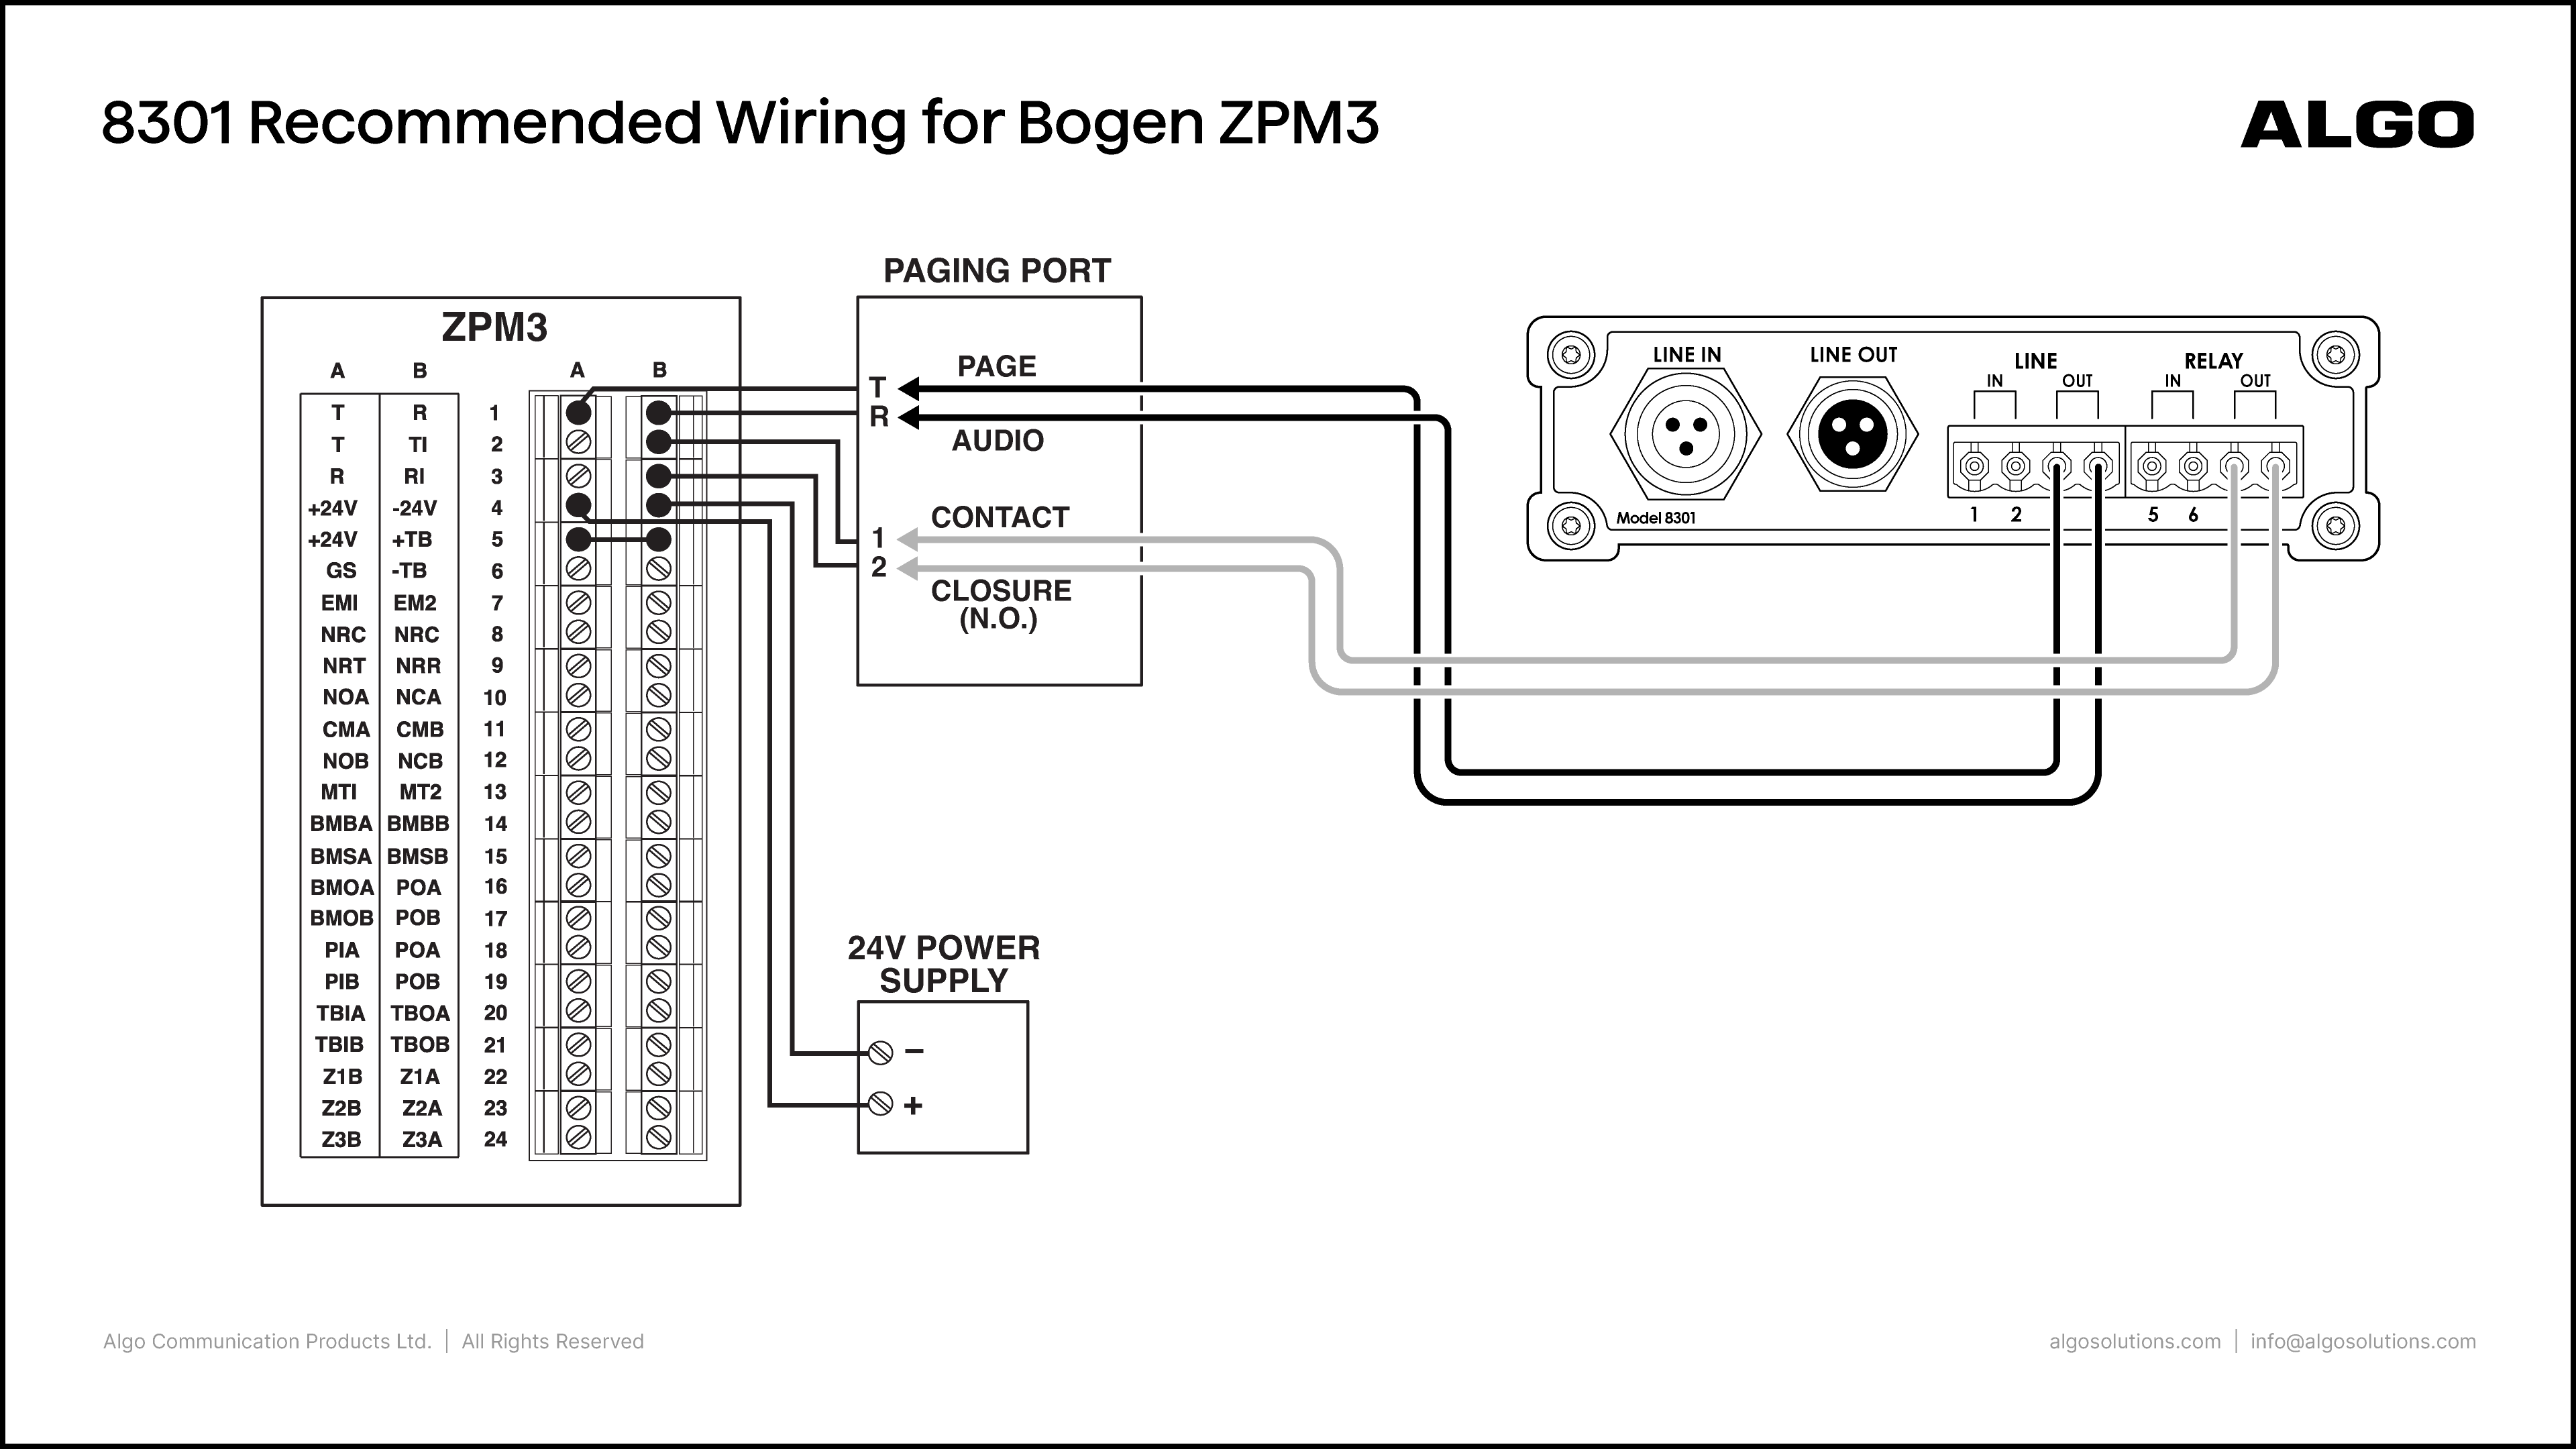
Bogen ZPM3-9 with 8301

Algo Product:

8301 IP Paging Adapter & Scheduler

Amplifier Product:

Bogen ZPM3-9

Port Connections:

Algo

Bogen

  • Line Out (3, 4)

  • Relay Out (7, 8)

  • Paging Port (R, T)

  • Paging Port (1, 2)

Notes:

  • On the 8301 web interface, go to Basic Settings → Features and set the Line Out Analog Output Level to 0dBm 600 ohm (0.775 Vrms)

  • To play DTMF tones and control the zones, make sure to enable Generate In-Band DTMF Tones under Advanced Settings → Advanced Audio.

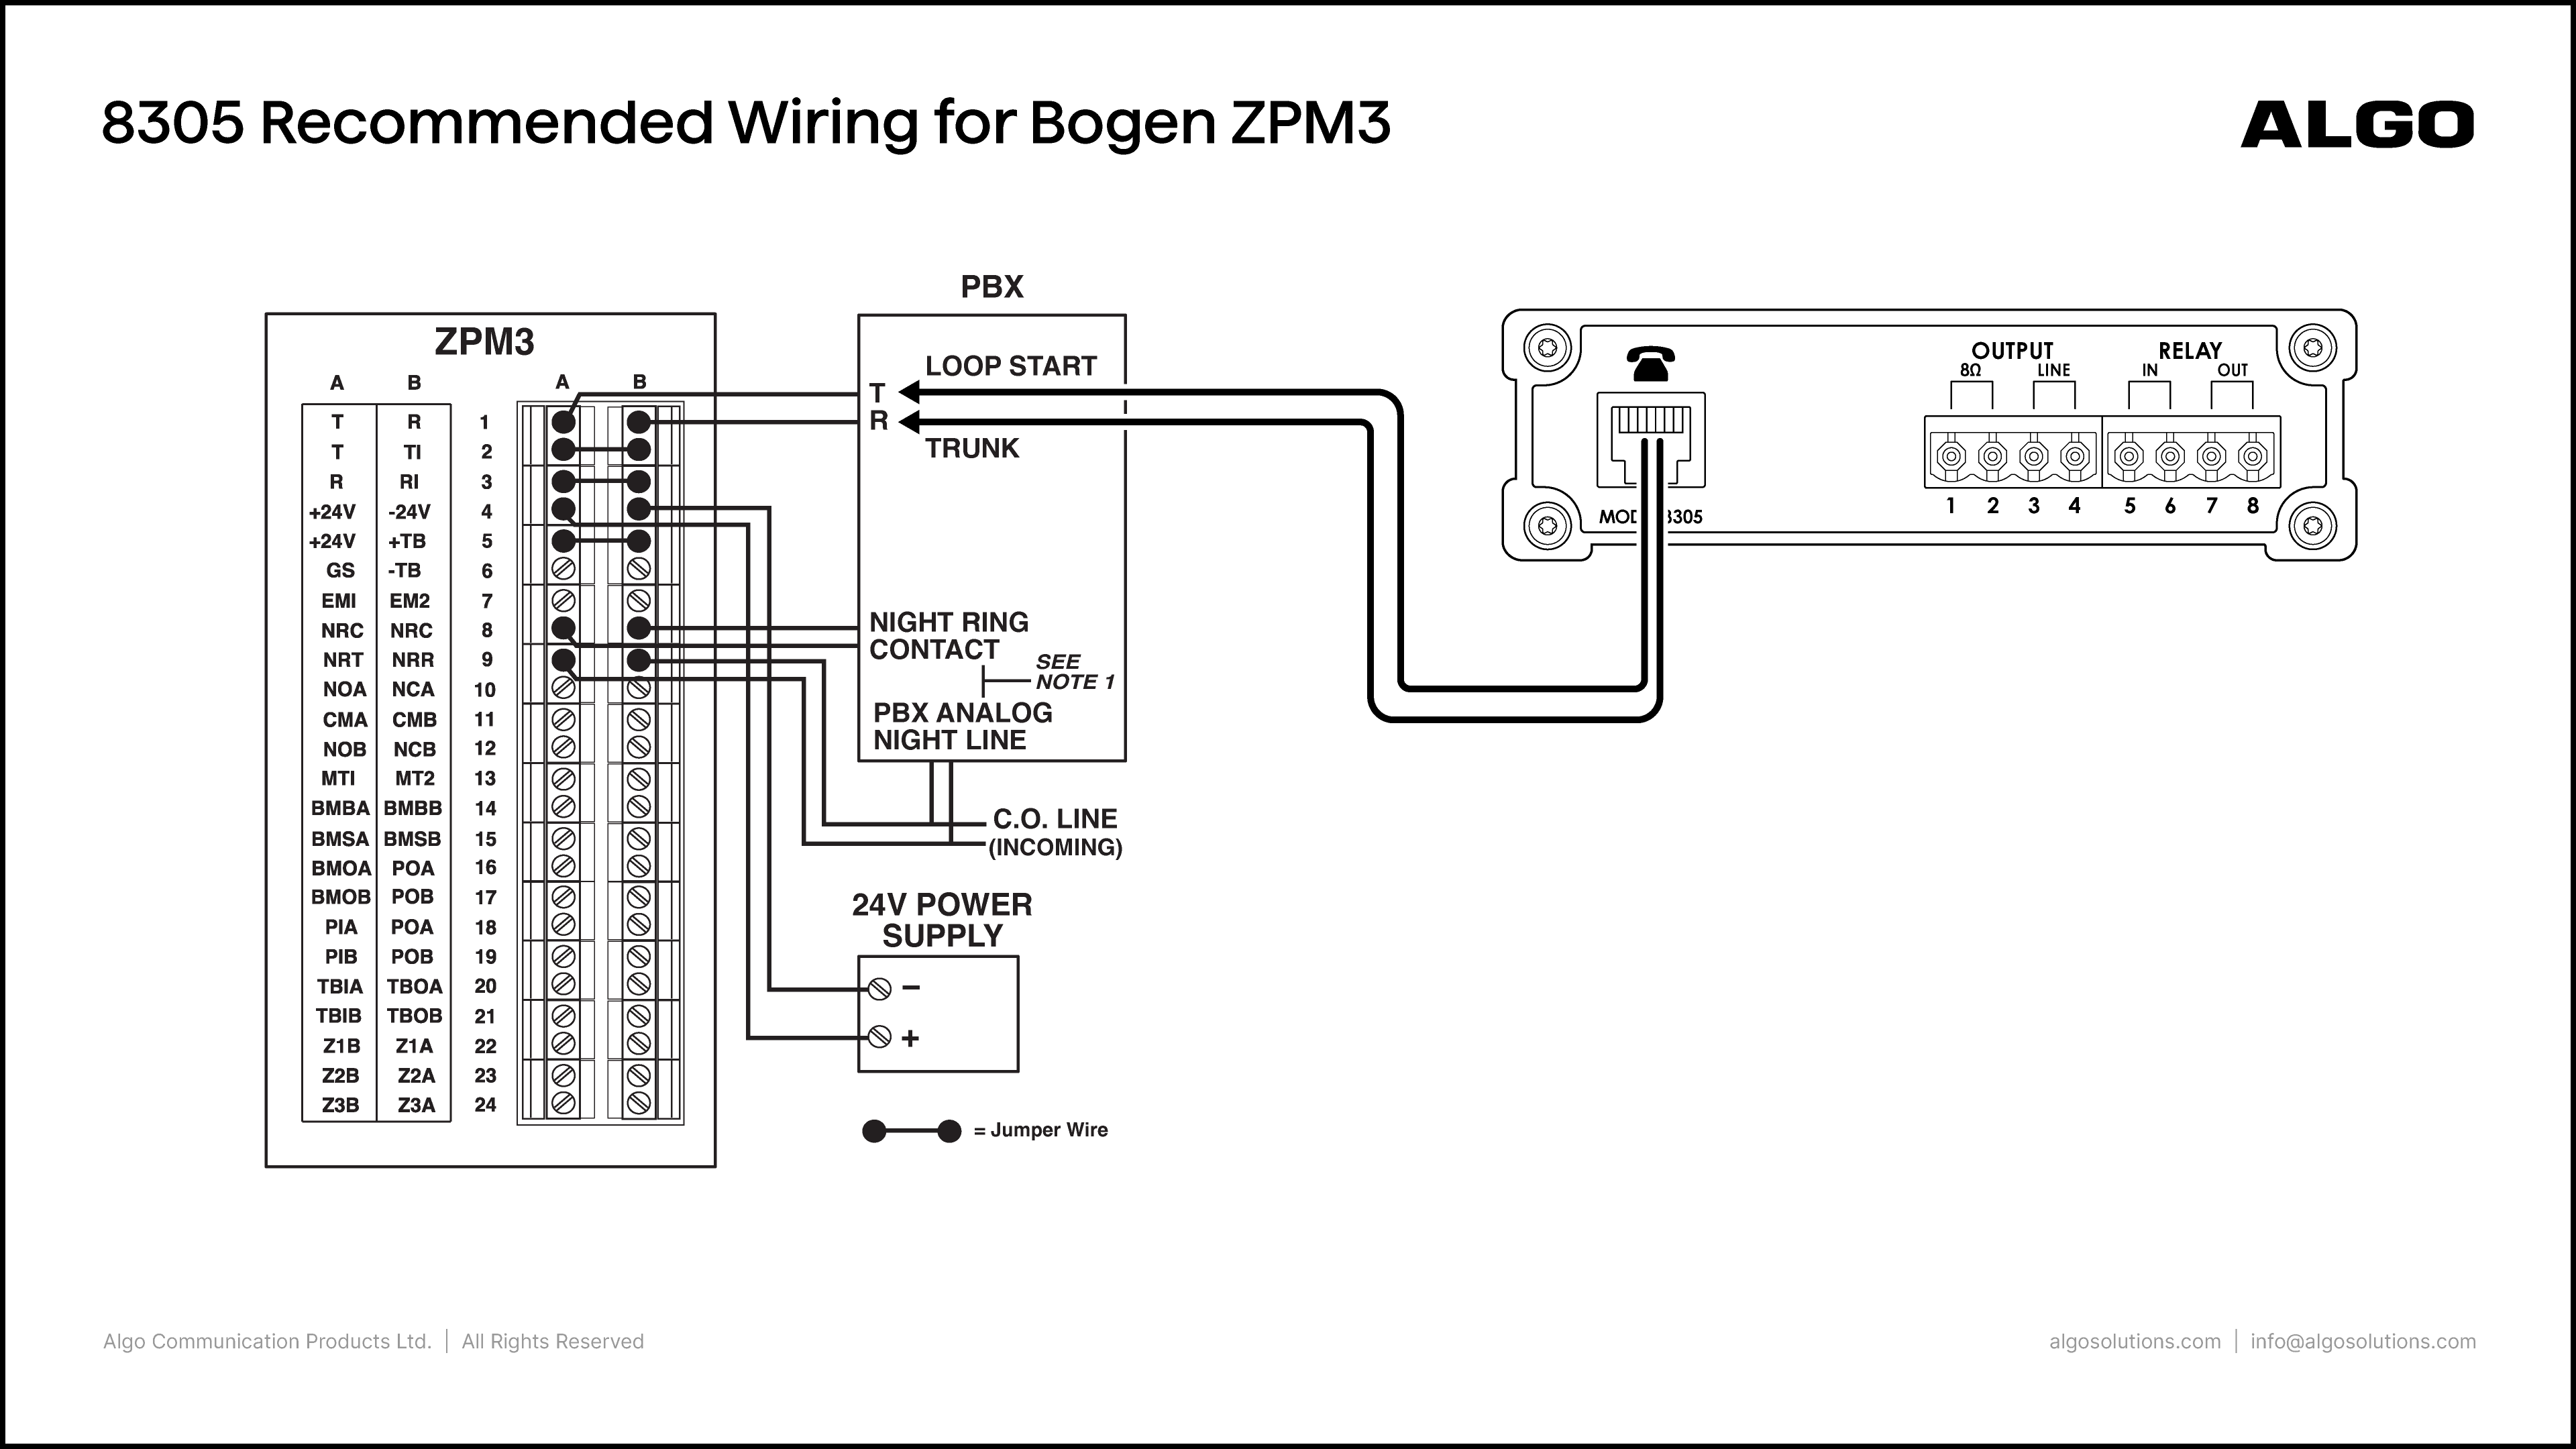
Bogen ZPM3-9 with 8305

Algo Product:

8305 Multi-Interface IP Paging Adapter

Amplifier Product:

Bogen ZPM3-9

Port Connections:

Algo

Bogen

  • Telephone port

  • Paging Port (R, T)

Notes:

  • On the 8305 web interface, go to Basic Settings → Features and set the Analog Output Port/Level to Phone or 8Ω Port

  • To play DTMF tones and control the zones, make sure to enable Generate In-Band DTMF Tones under Advanced Settings → Advanced Audio.

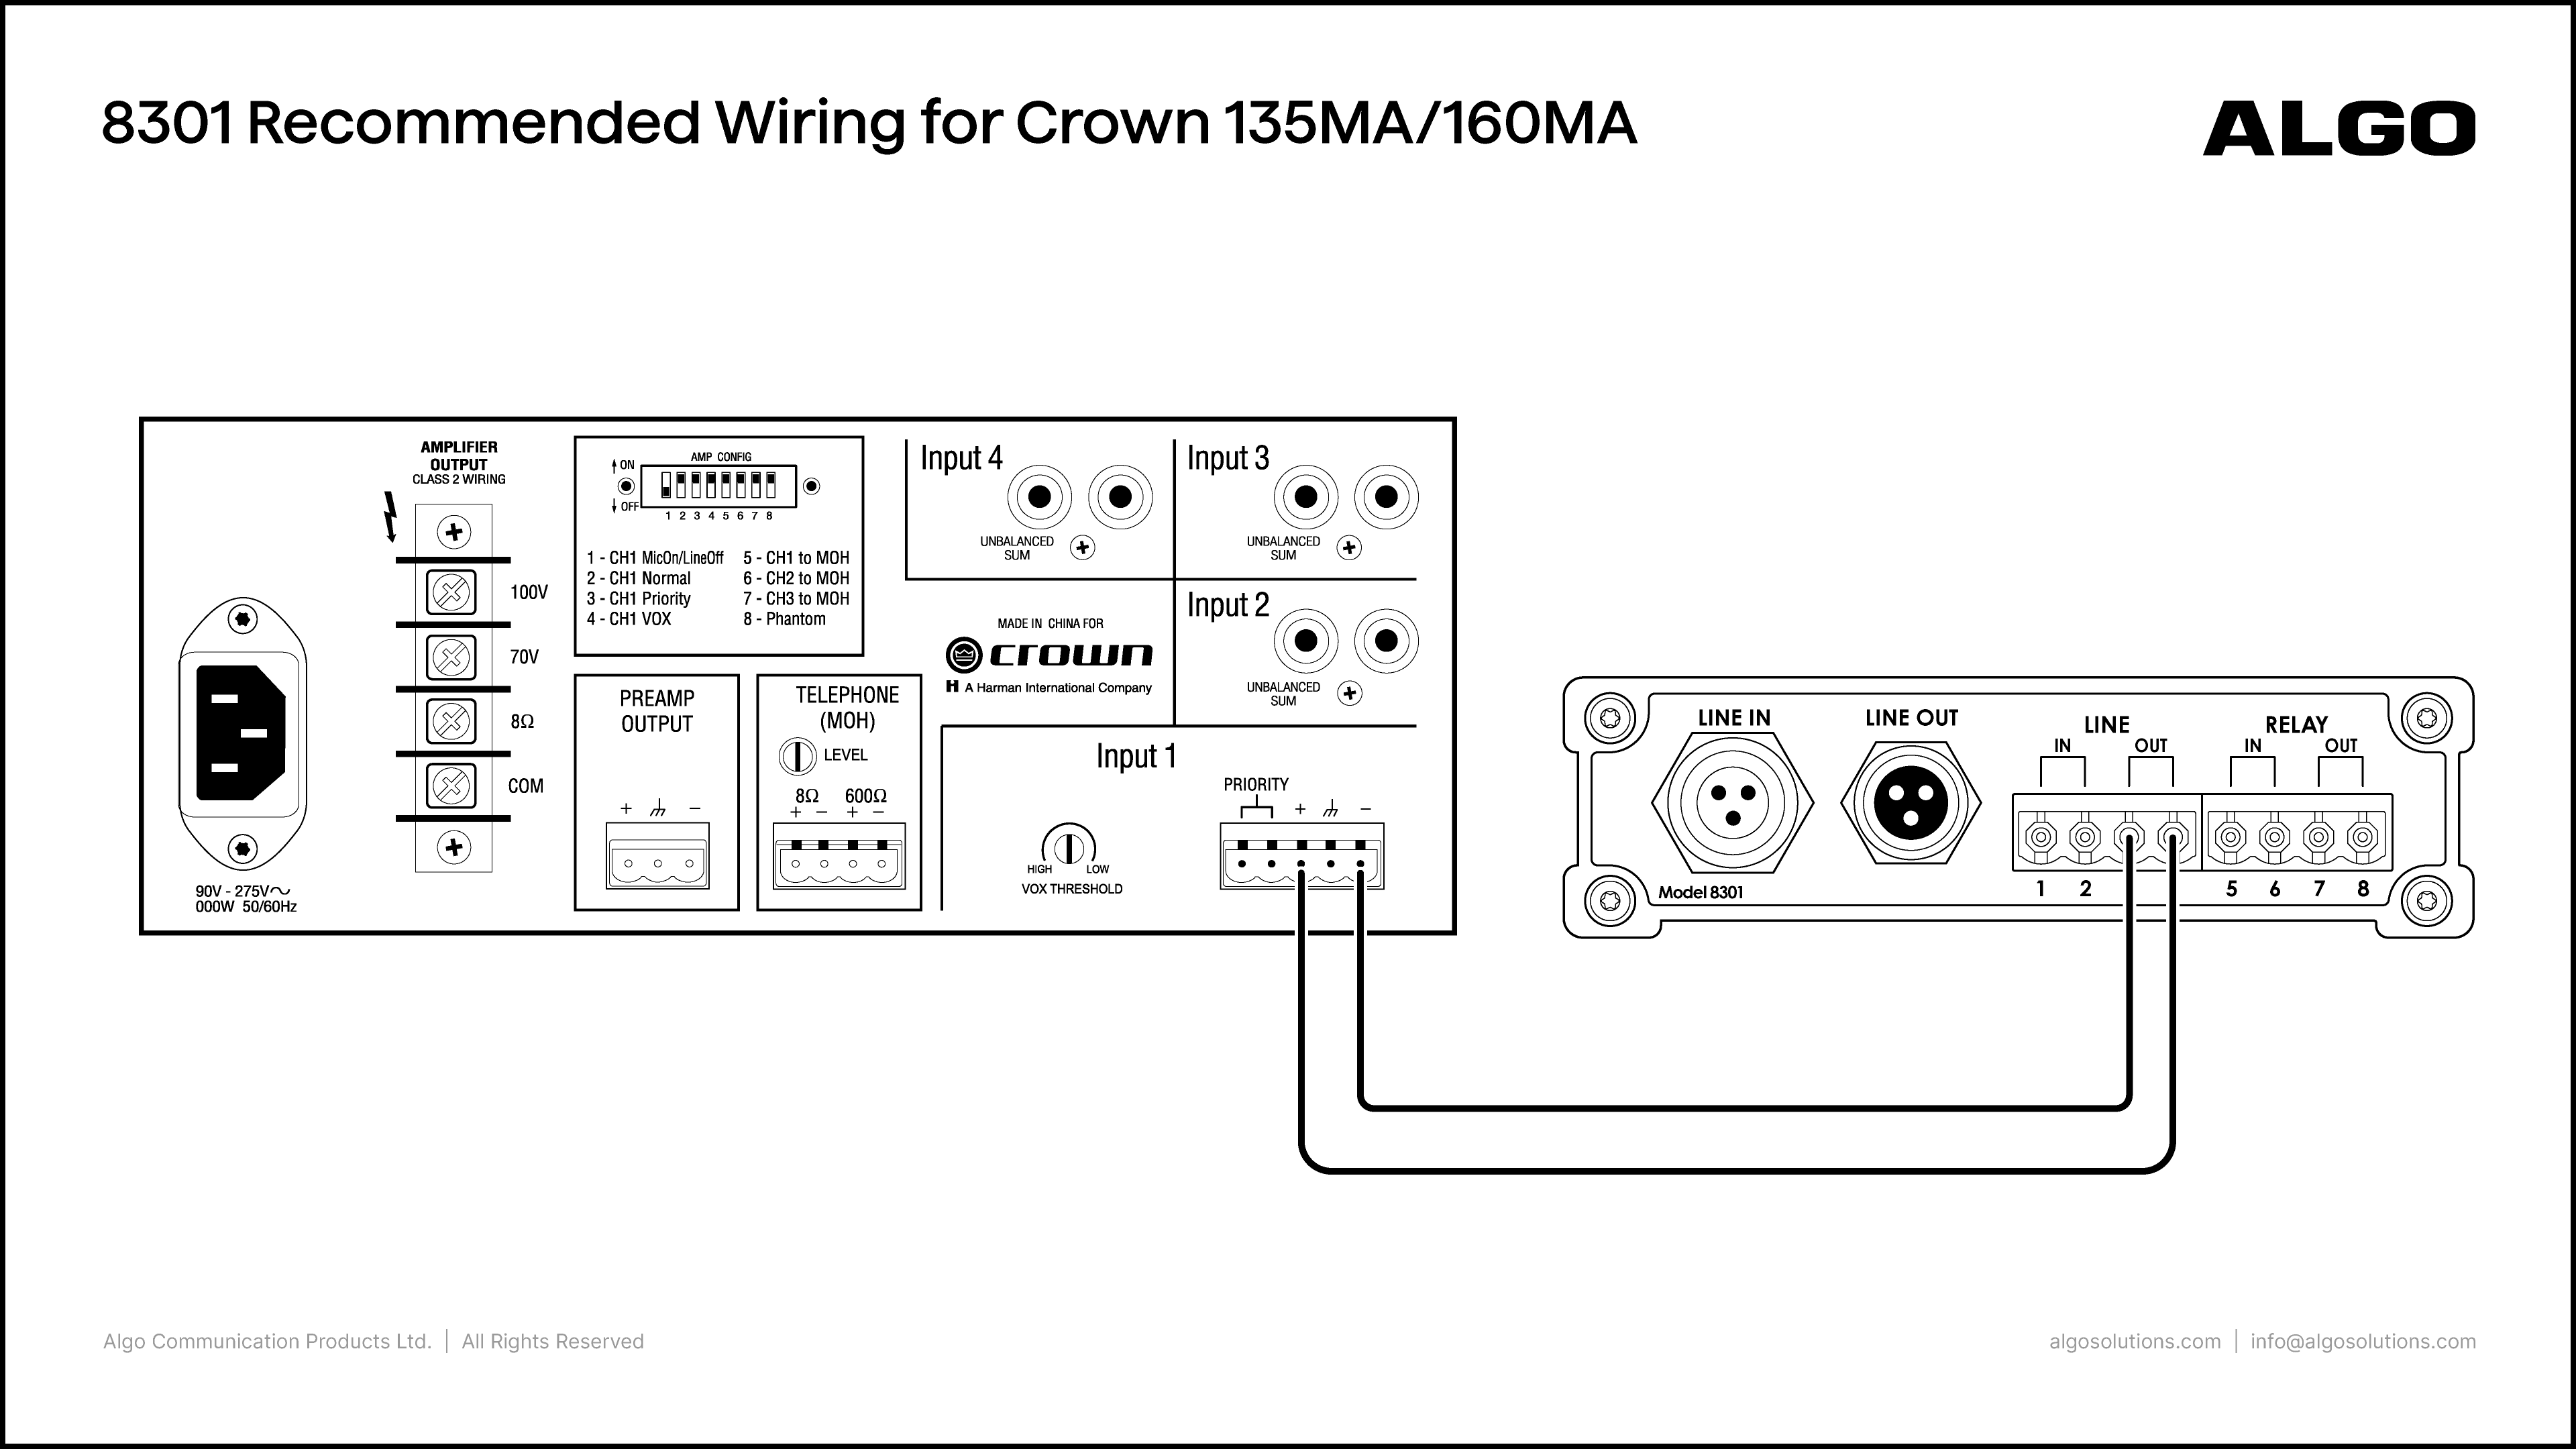
Crown 135MA/160MA with 8301

Algo Product:

8301 IP Paging Adapter & Scheduler

Amplifier Product:

Crown 135MA/160MA

Port Connections:

Algo

Crown

  • Line Out (3, 4)

  • Input 1 (+, -)

Notes:

  • Set switch 1 to “Line” position.

  • On the 8301 web interface, go to Basic Settings → Features and set the Line Out Analog Output Level to 0dBm 600 ohm (0.775 Vrms)

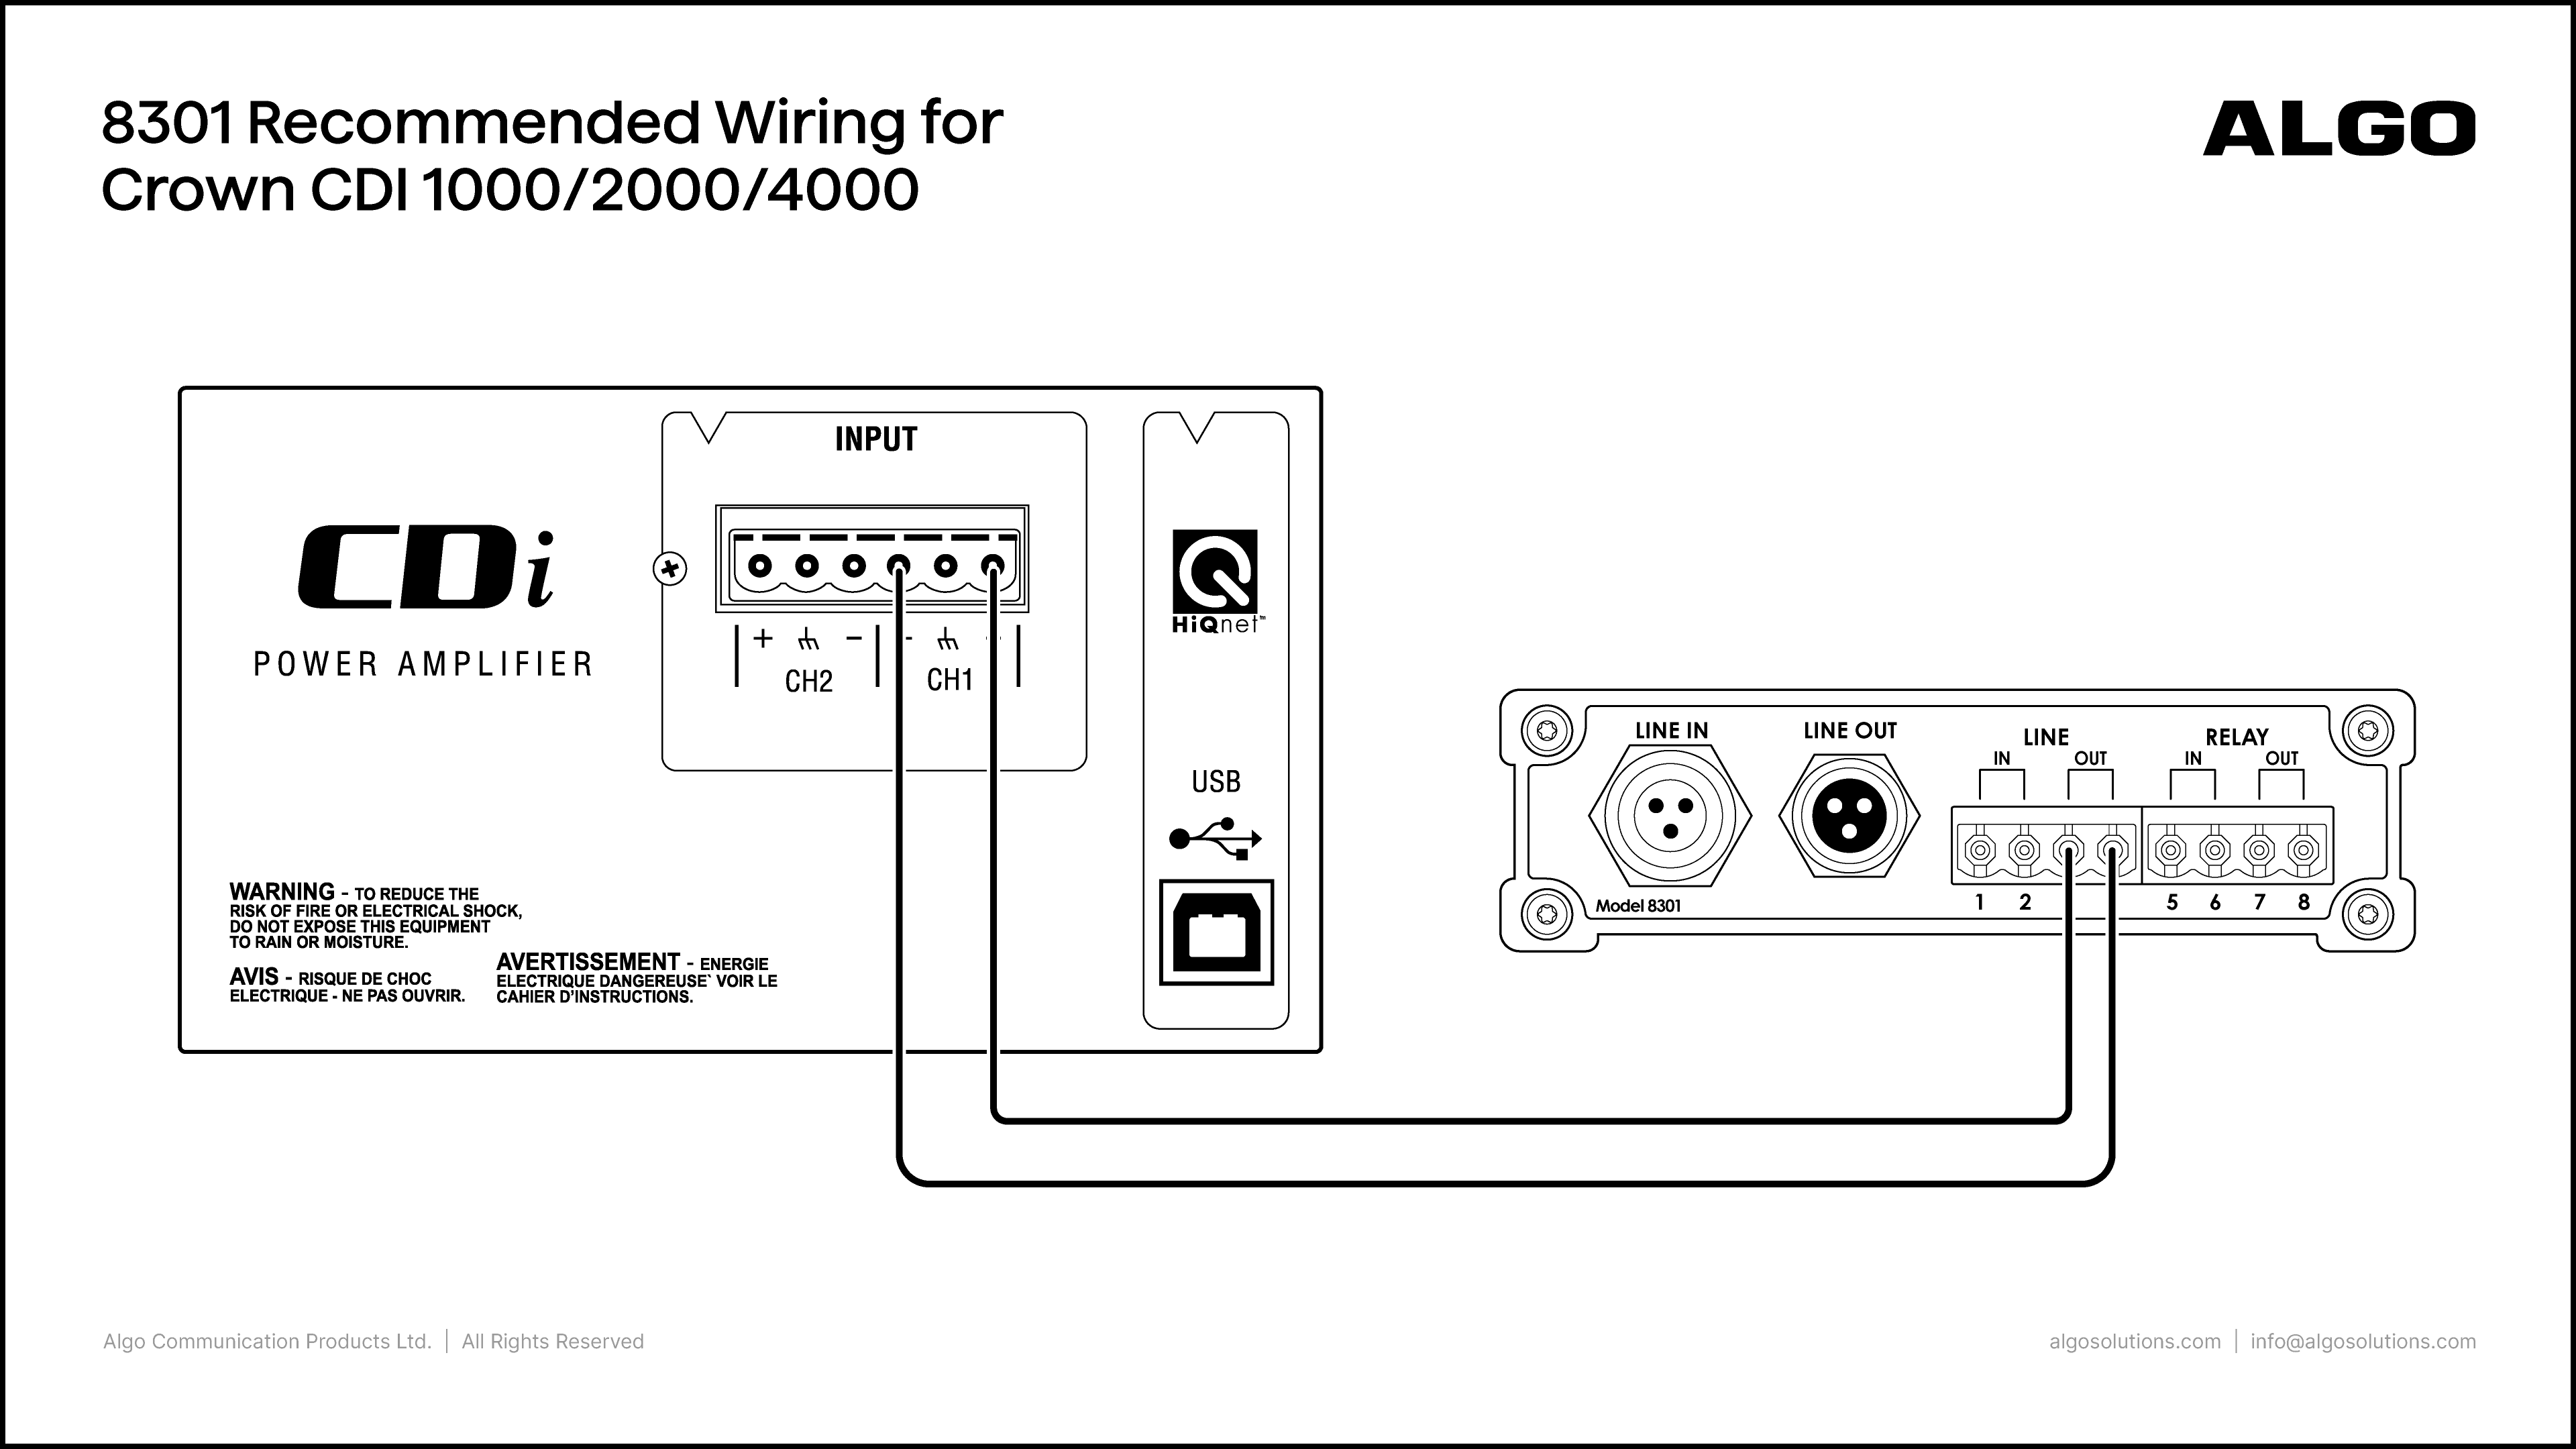
Crown CDi 1000/2000/4000 with 8301

Algo Product:

8301 IP Paging Adapter & Scheduler

Amplifier Product:

CDi 1000/2000/4000

Port Connections:

Algo

Crown

  • Line Out (3, 4)

  • Ch1 (+, -) or Ch2 (+, -)

Notes:

  • On the 8301 web interface, go to Basic Settings → Features and set the Line Out Analog Output Level to +4dBu 10k (1.23 Vrms)

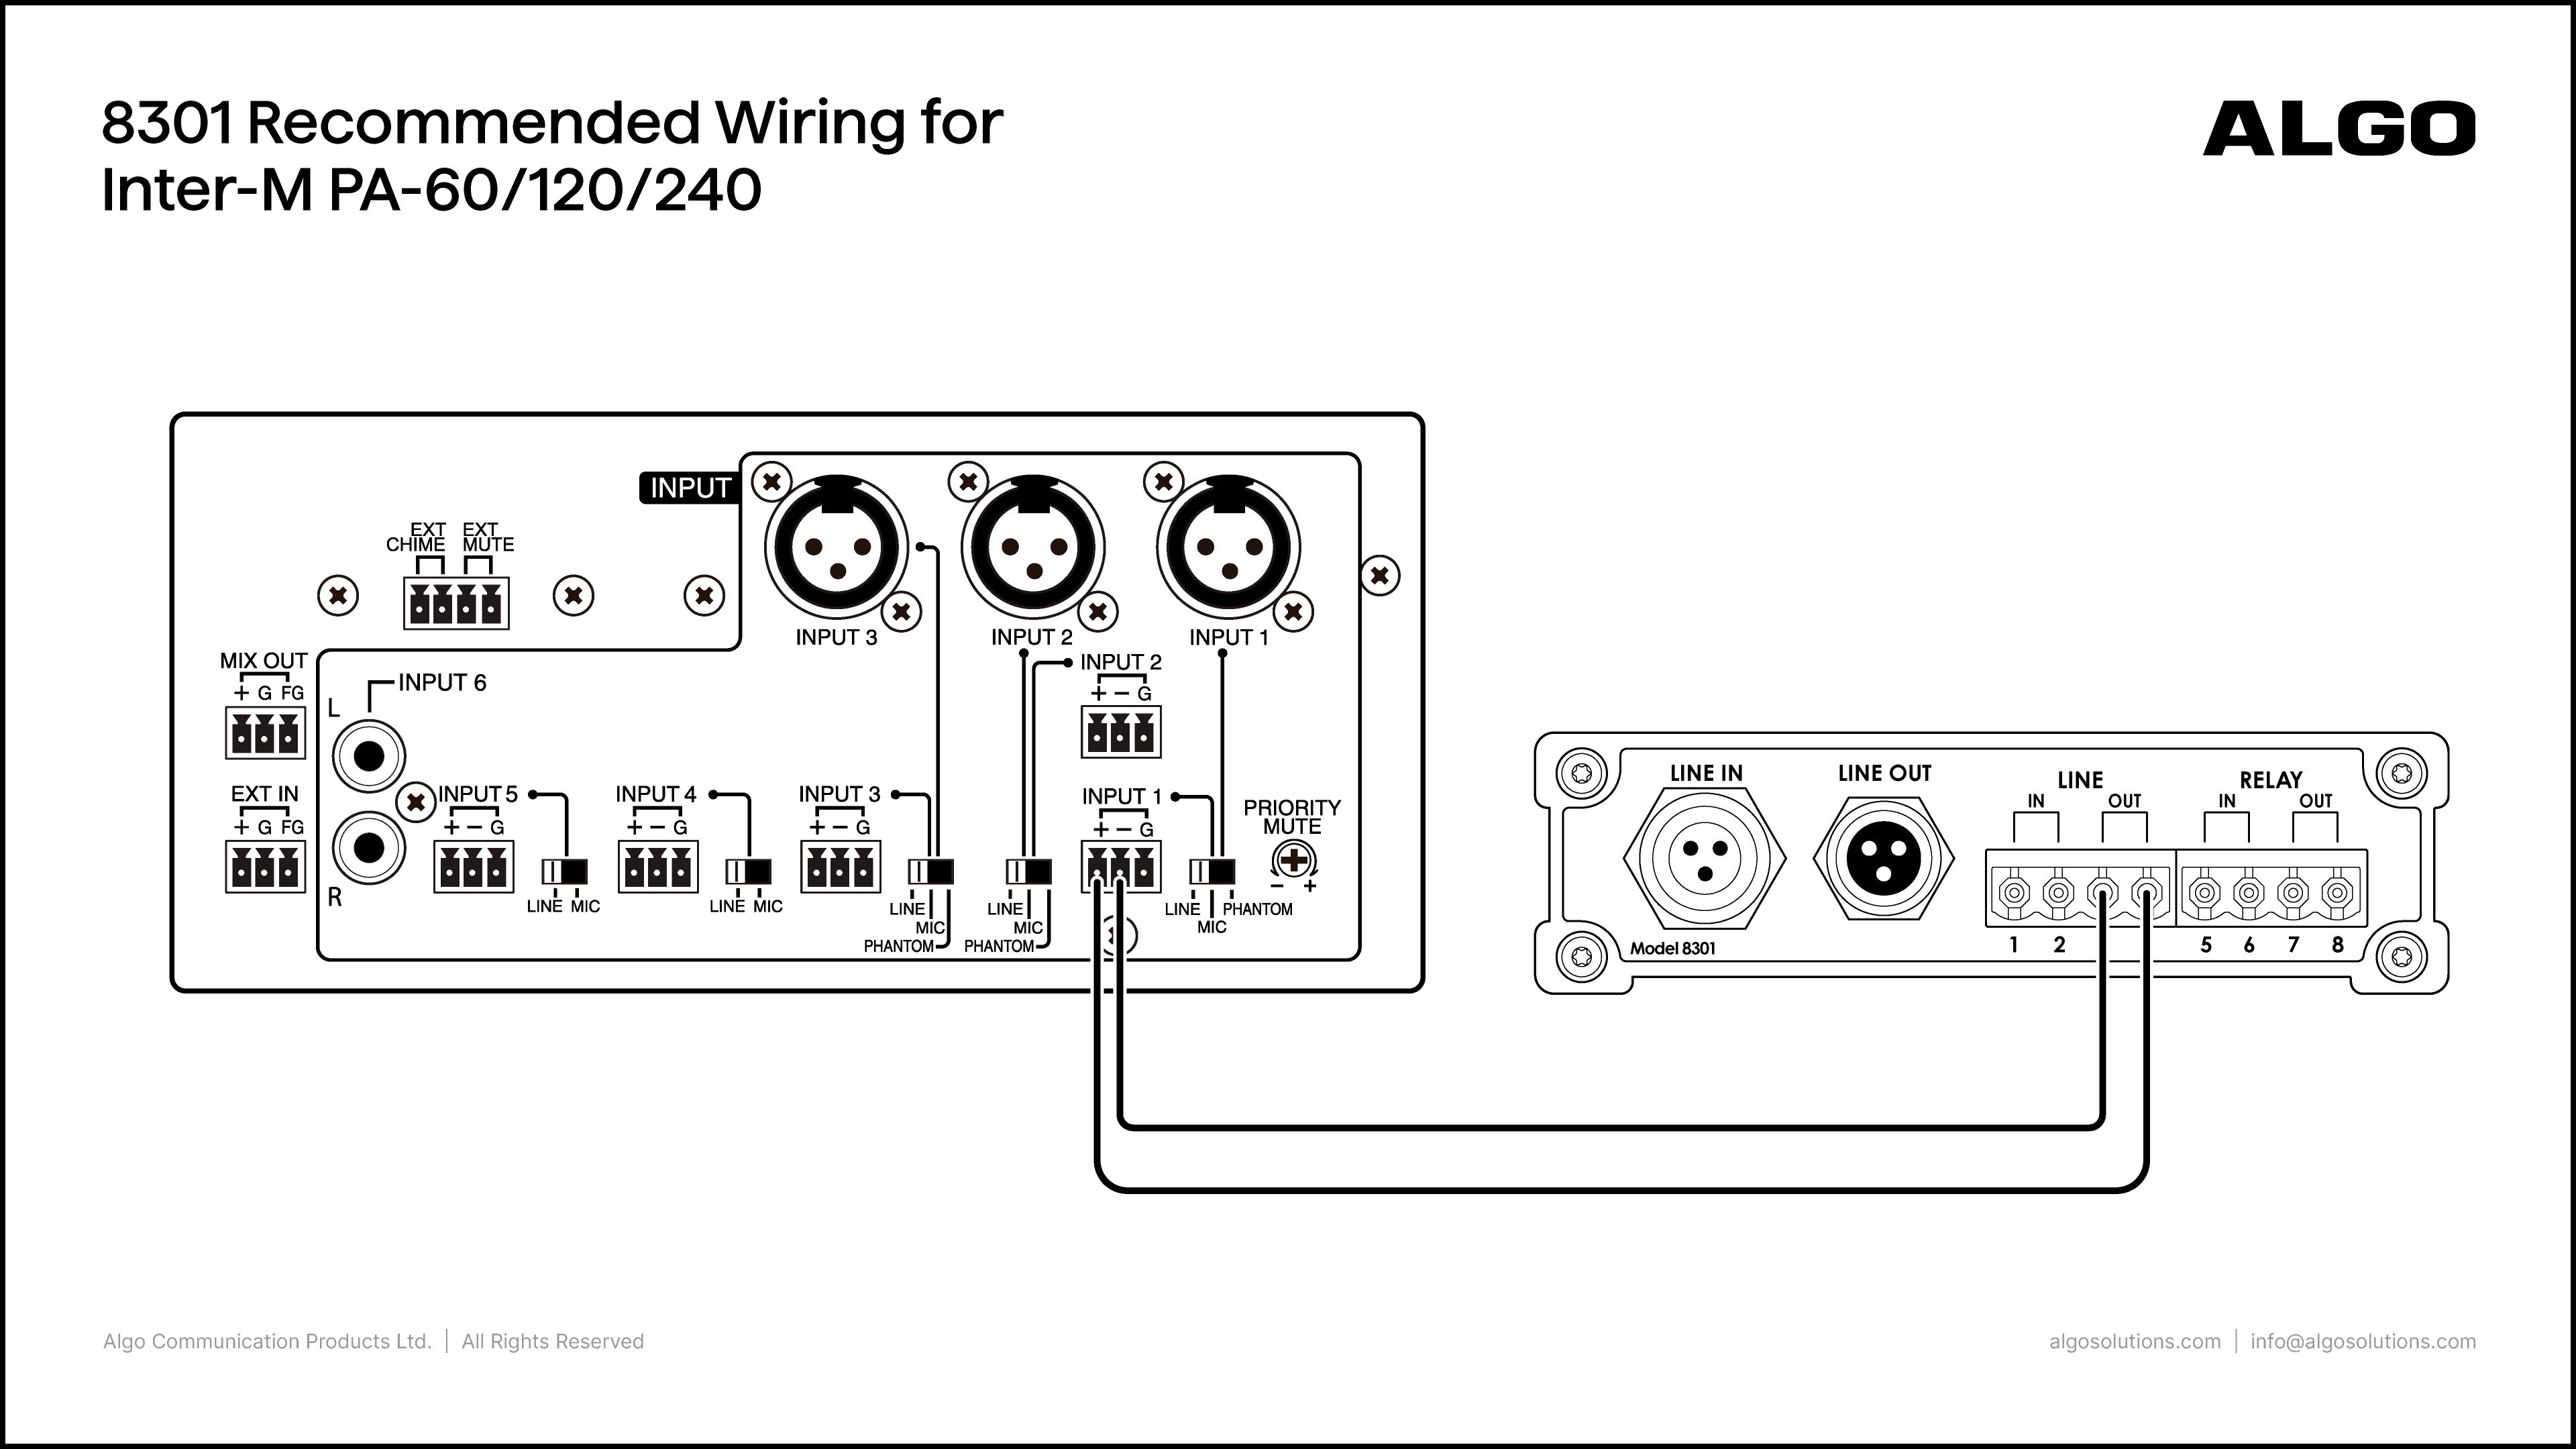
Inter-M PA-60/120/240 with 8301

Algo Product:

8301 IP Paging Adapter & Scheduler

Amplifier Product:

Inter-M PA-60/120/240

Port Connections:

Algo

Inter-M

  • Line Out (3, 4)

  • Input 1 (+, -)

Notes:

  • Connect the Line Out pair on the 8301 to the + and – terminals on one of the Inter-M inputs. Move the input selection switch to the “Line” position.

  • On the 8301 web interface, go to Basic Settings → Features and set the Line Out Analog Output Level to 0dBm 600 ohm (0.775 Vrms)

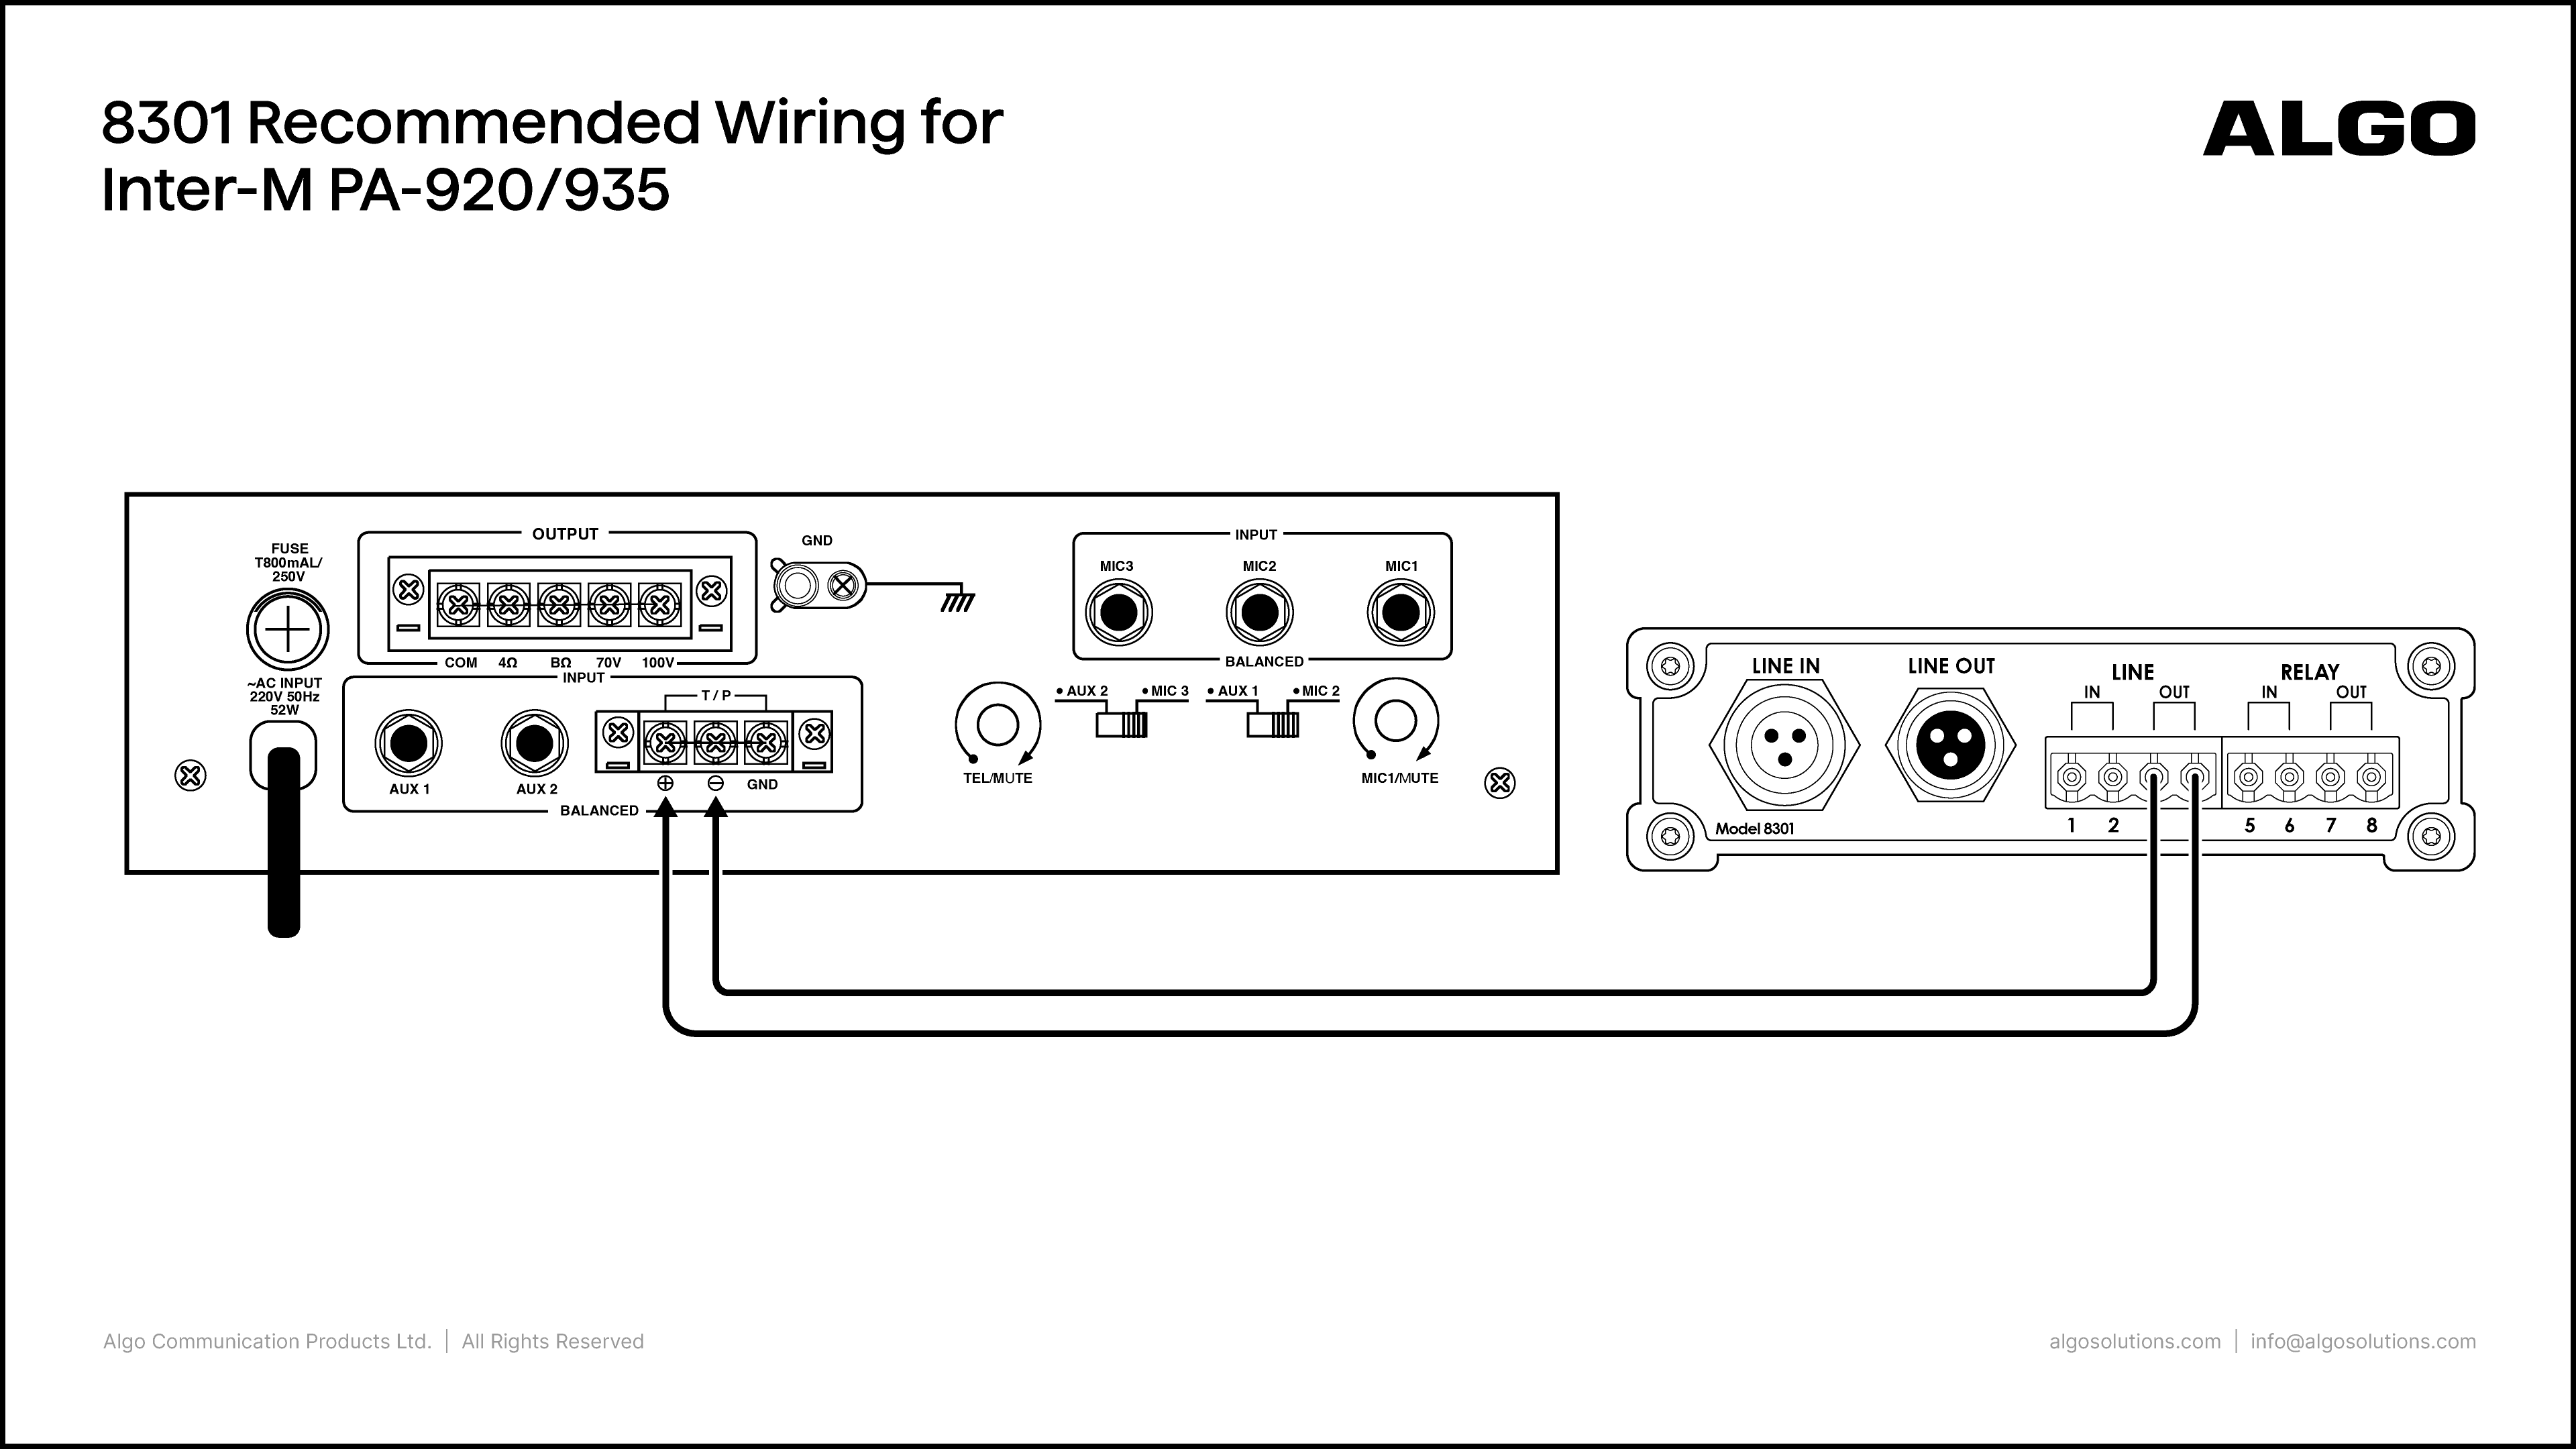
Inter-M PA-920/935 with 8301

Algo Product:

8301 IP Paging Adapter & Scheduler

Amplifier Product:

Inter-M PA-920/935

Port Connections:

Algo

Inter-M

  • Line Out (3, 4)

  • T/P (+, -)

Notes:

  • On the 8301 web interface, go to Basic Settings → Features and set the Line Out Analog Output Level to 0dBm 600 ohm (0.775 Vrms)

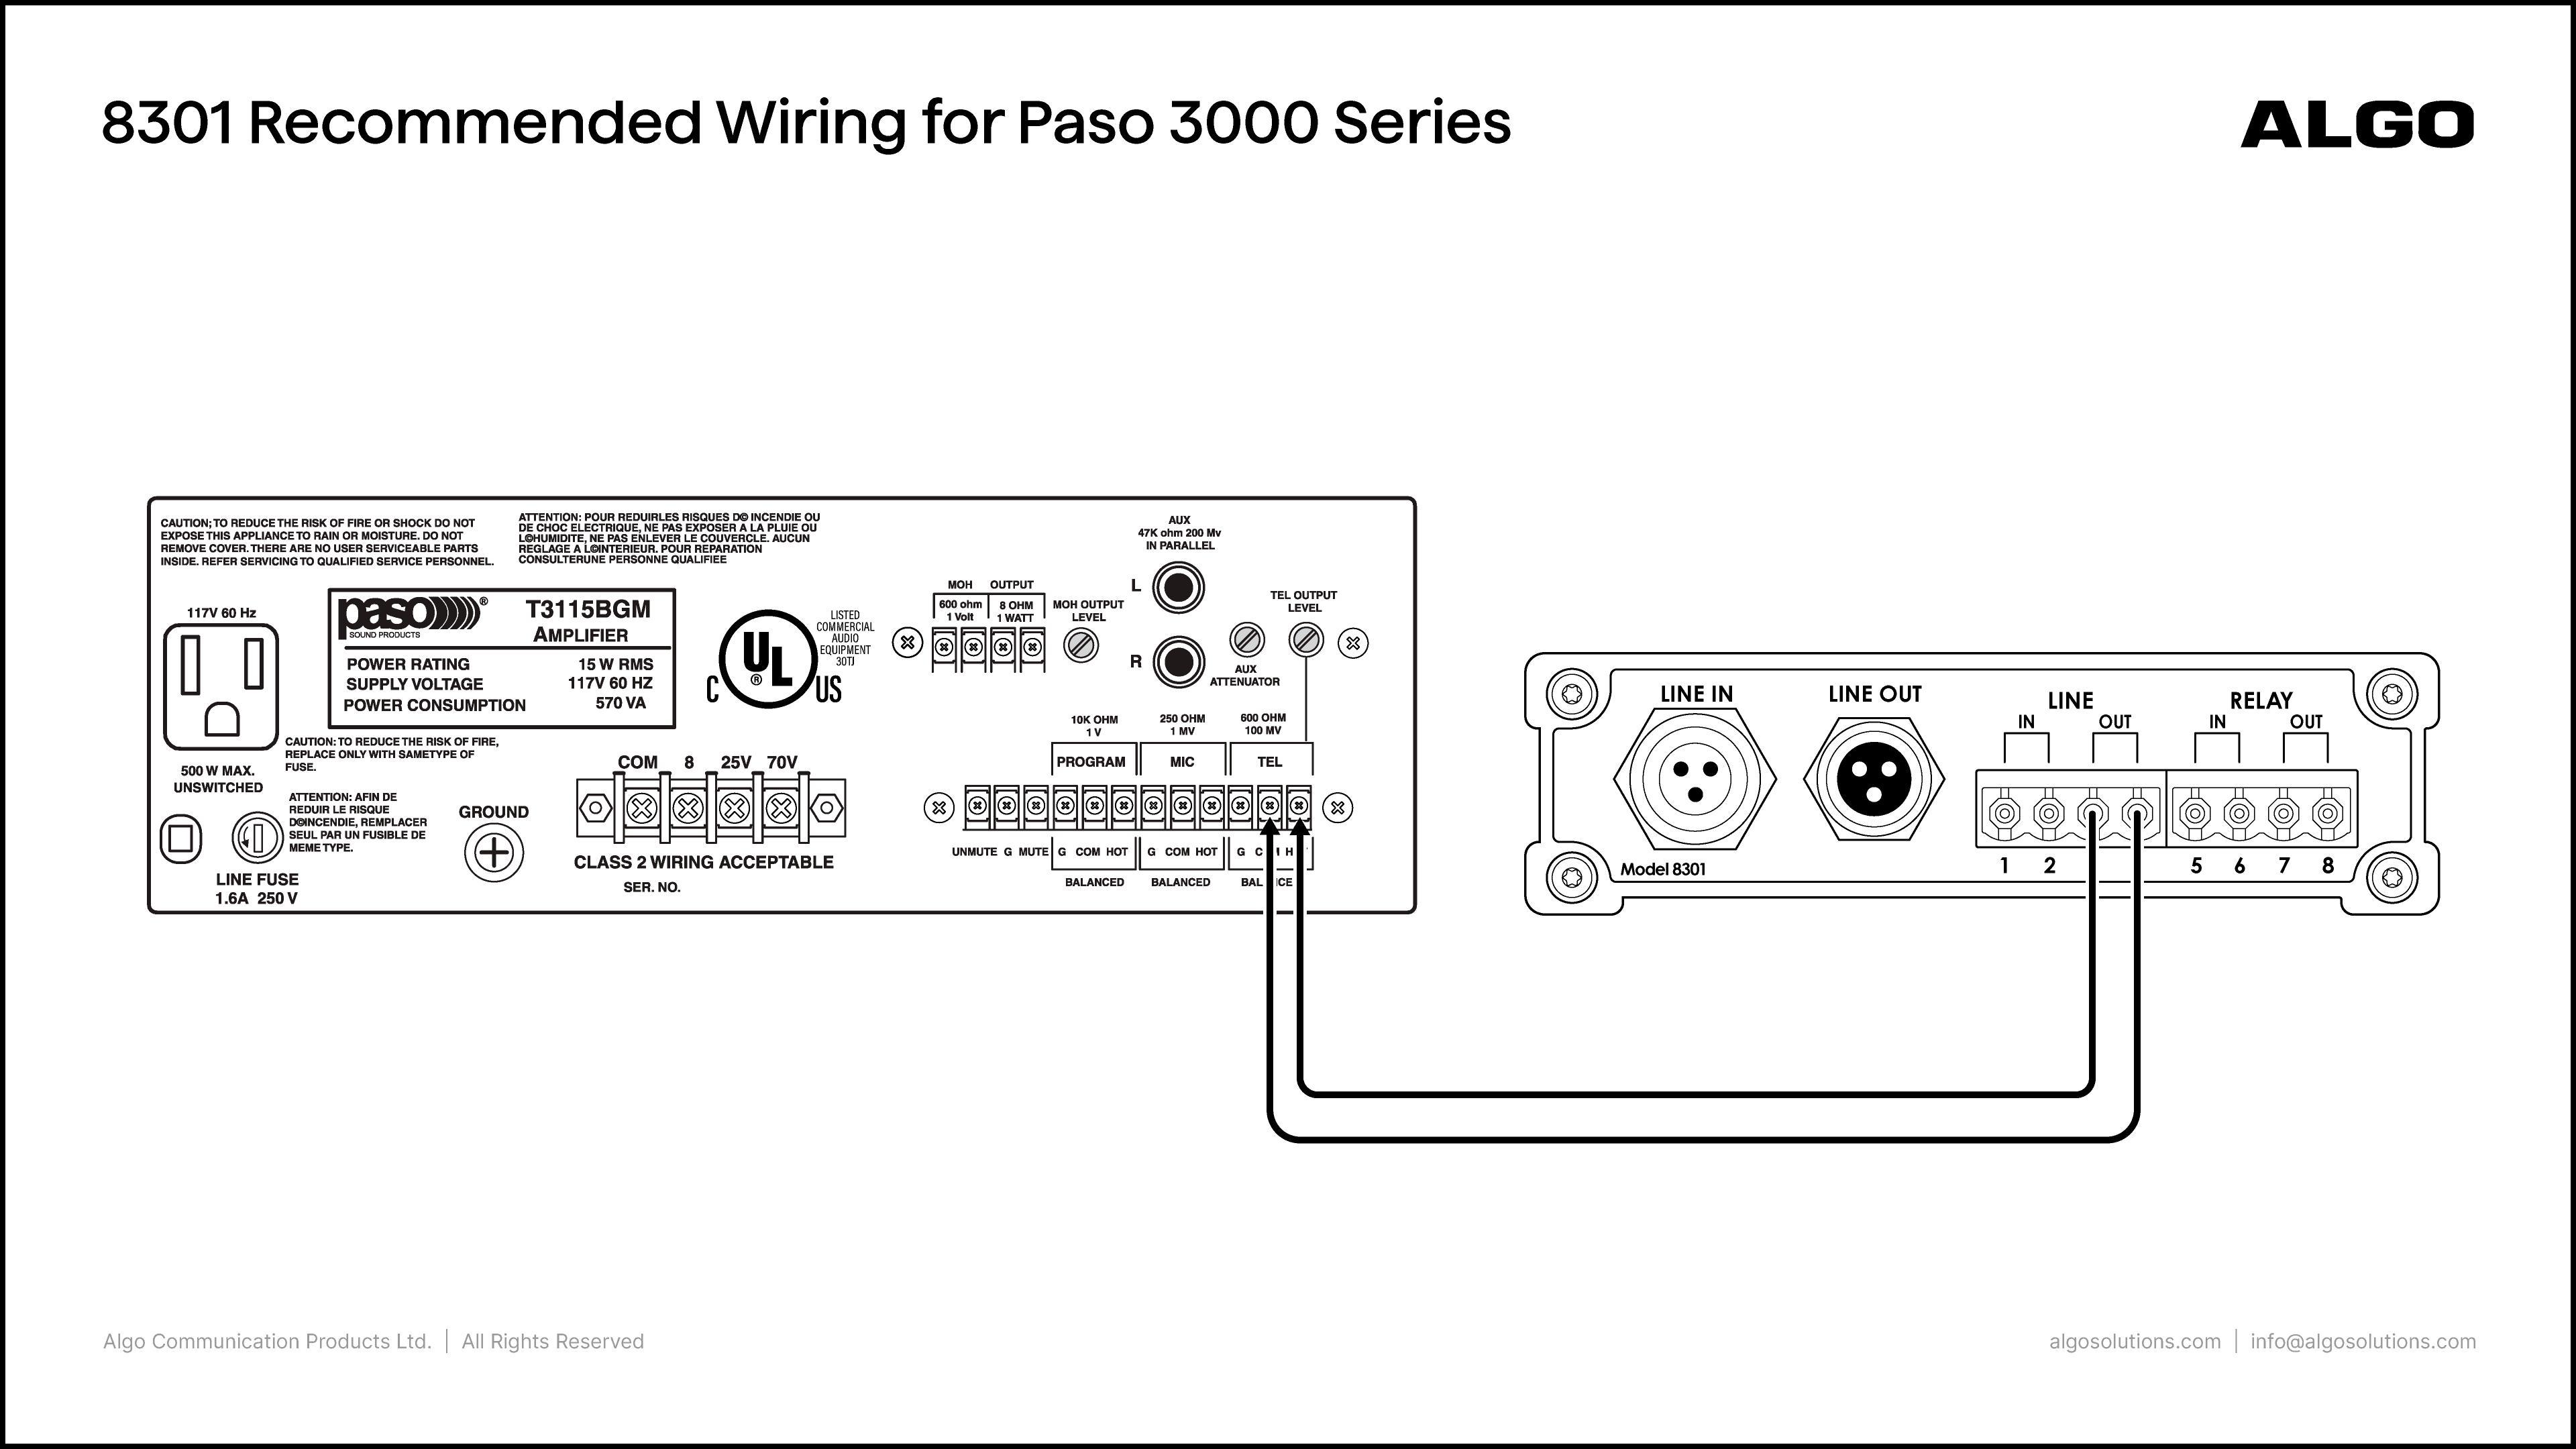
Paso 3000 Series with 8301

Algo Product:

8301 IP Paging Adapter & Scheduler

Amplifier Product:

Paso 3000

Port Connections:

Algo

Paso

  • Line Out (3, 4)

  • Tel (Com, Hot)

Notes:

  • On the 8301 web interface, go to Basic Settings → Features and set the Line Out Analog Output Level to 0dBm 600 ohm (0.775 Vrms)

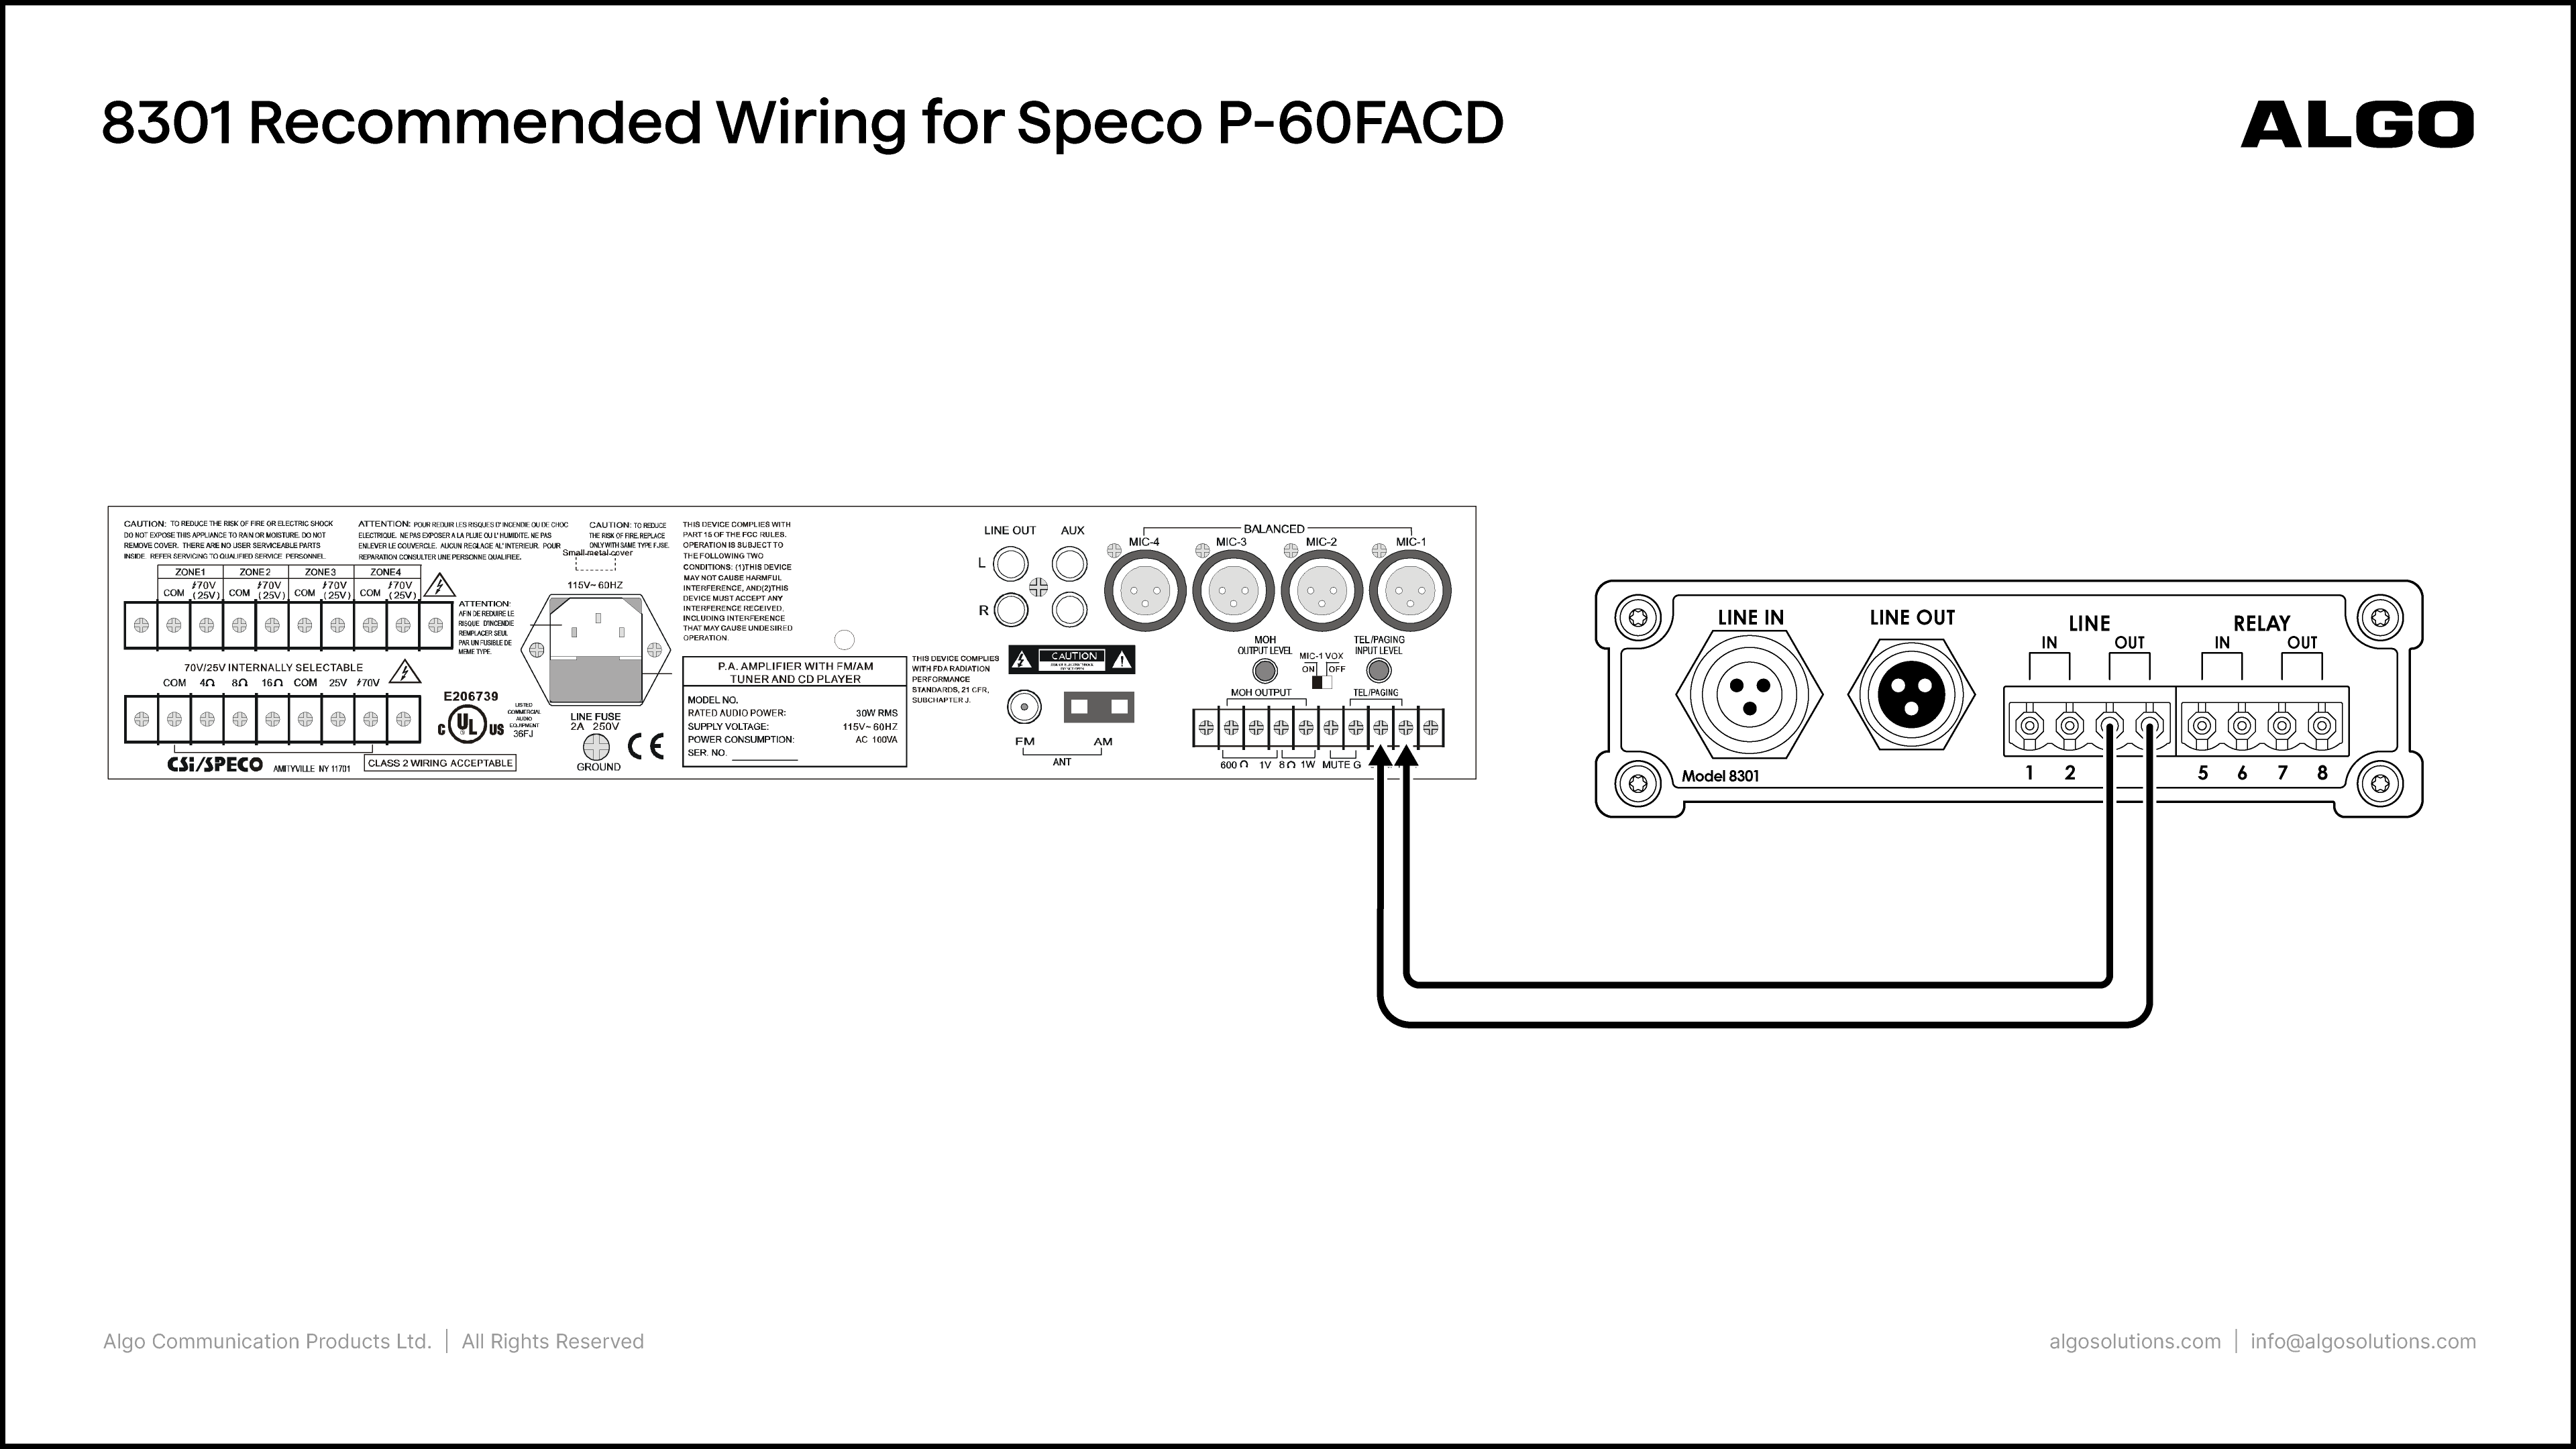
Speco P-60FACD with 8301

Algo Product:

8301 IP Paging Adapter & Scheduler

Amplifier Product:

Speco P-60FACD

Port Connections:

Algo

Speco

  • Line Out (3, 4)

  • TEL/PAGING input terminals (HOT, COM)

Notes:

  • On the 8301 web interface, go to Basic Settings → Features and set the Line Out Analog Output Level to 0dBm 600 ohm (0.775 Vrms)

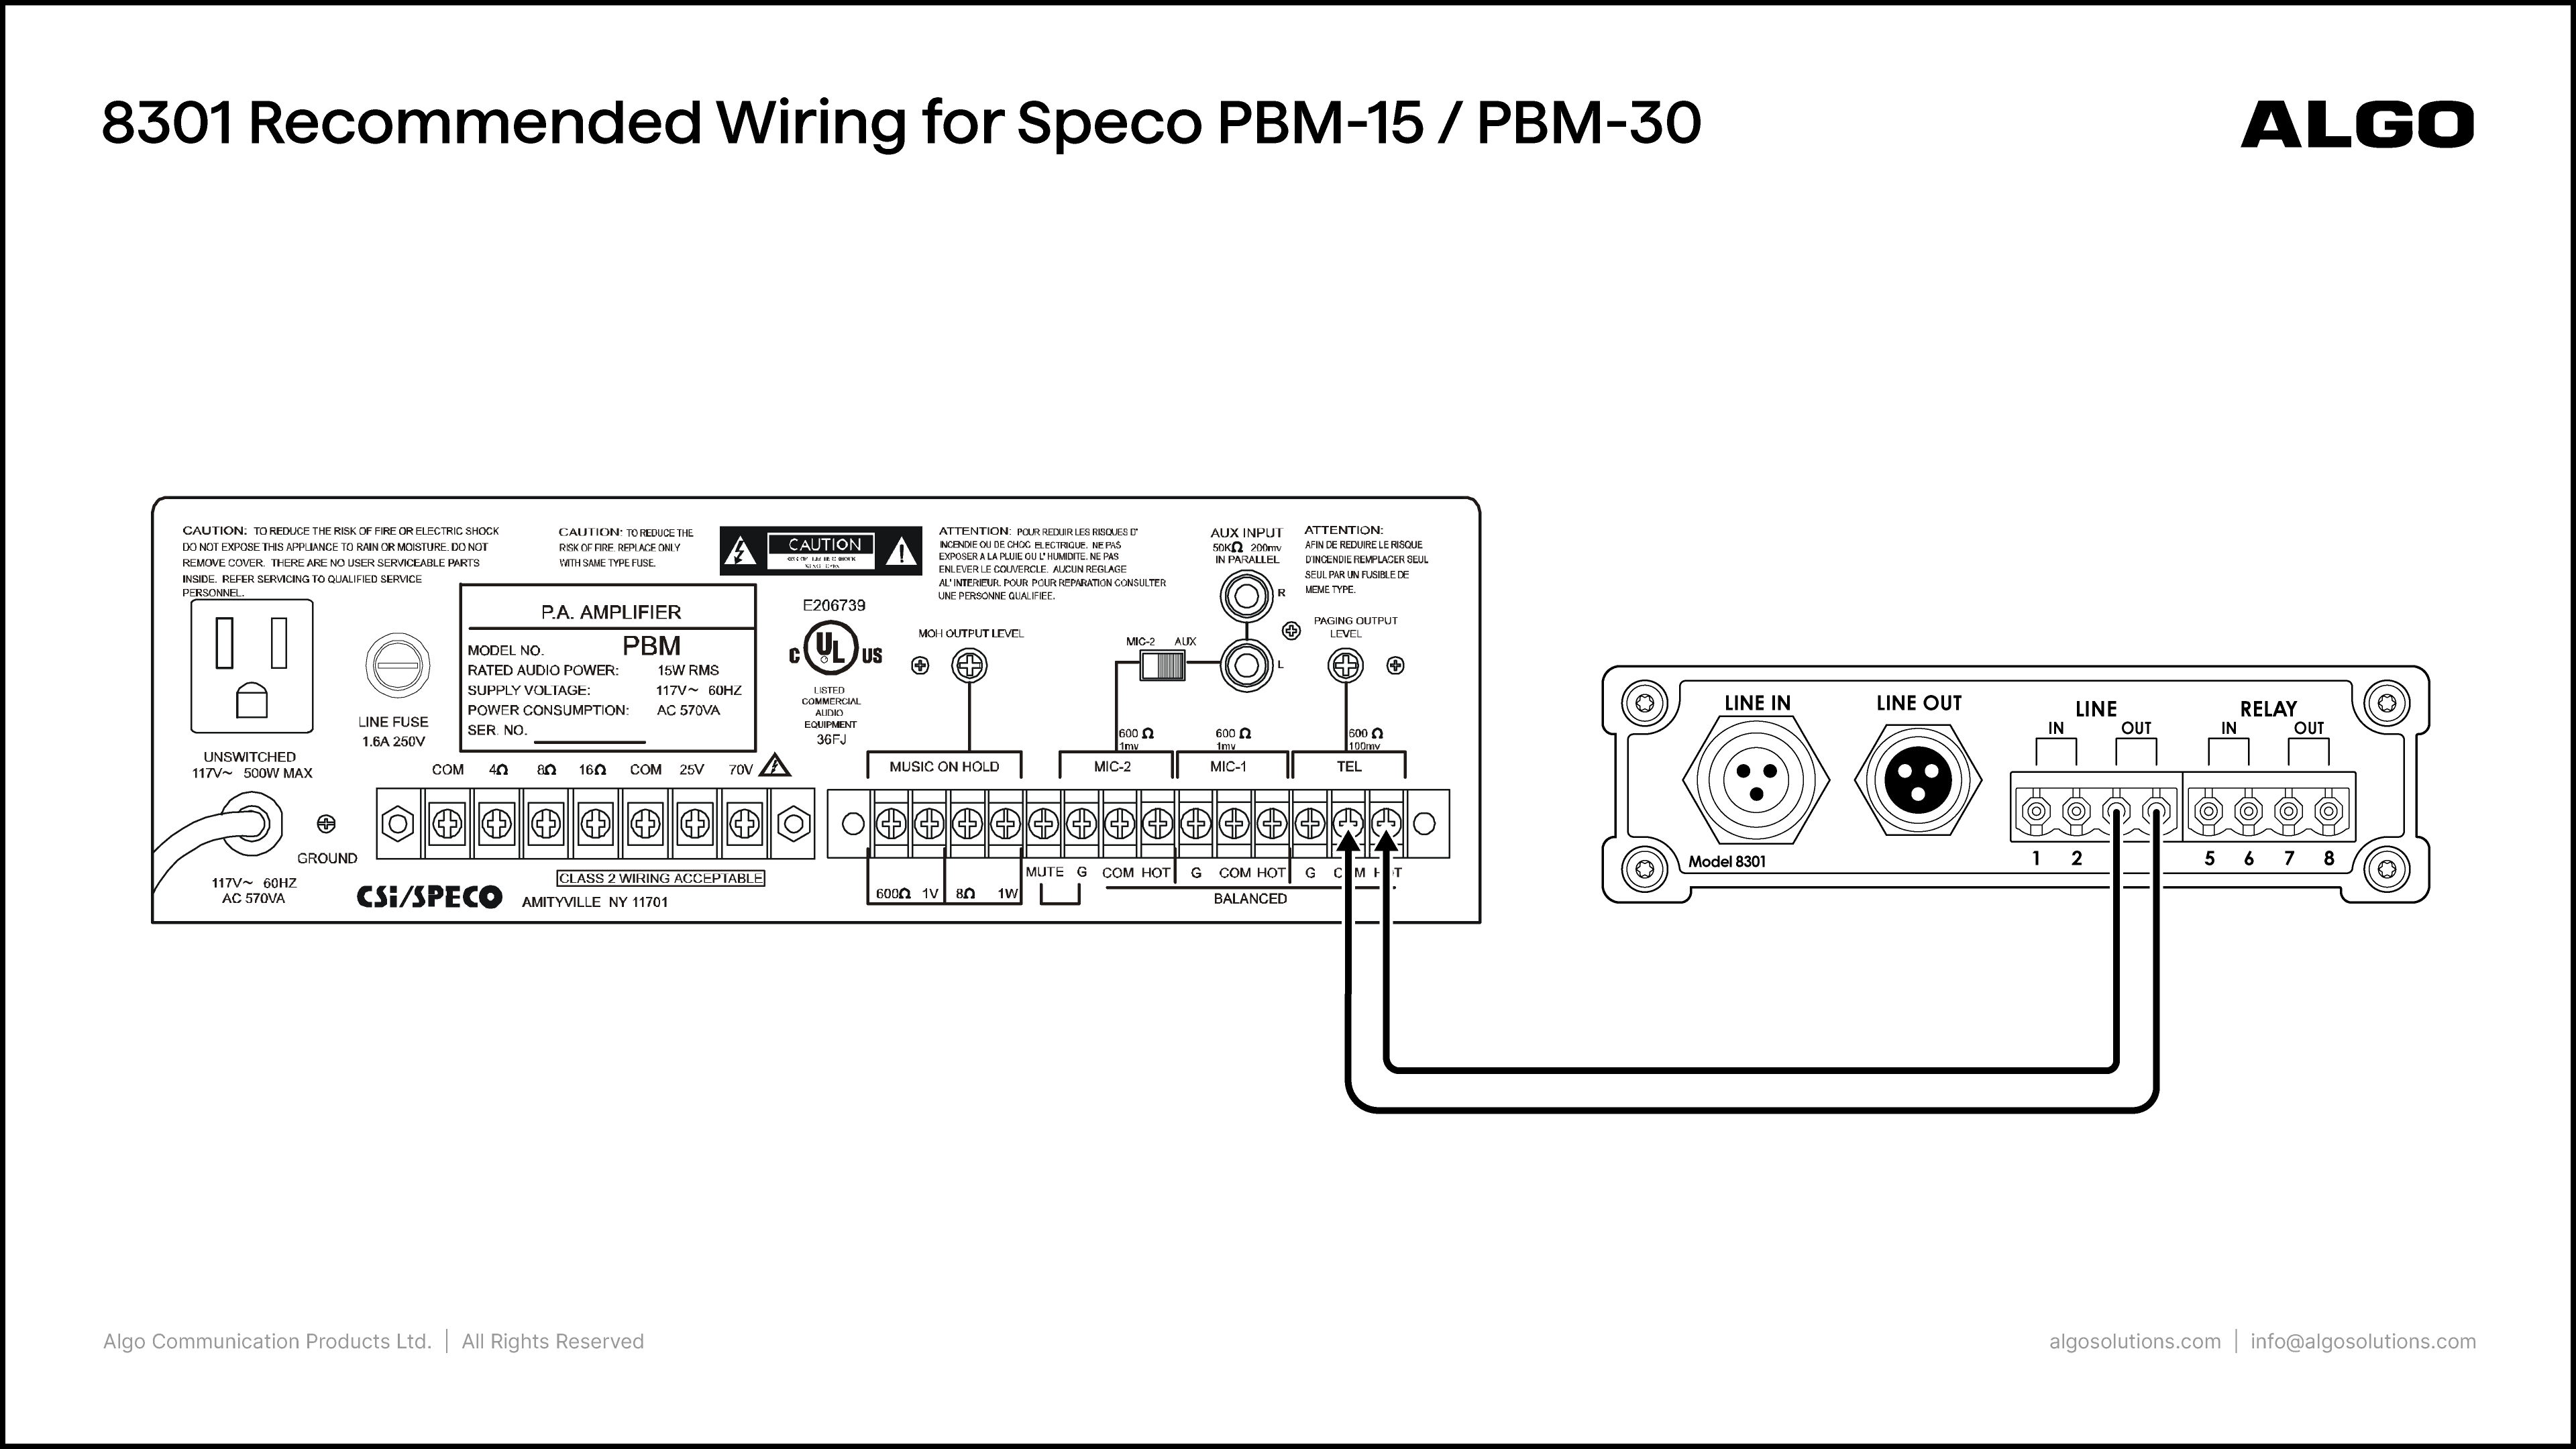
Speco PBM-15/PBM-30 with 8301

Algo Product:

8301 IP Paging Adapter & Scheduler

Amplifier Product:

Speco PBM-15/PBM-30

Port Connections:

Algo

Speco

  • Line Out (3, 4)

  • TEL input terminals (HOT, COM)

Notes:

  • On the 8301 web interface, go to Basic Settings → Features and set the Line Out Analog Output Level to 0dBm 600 ohm (0.775 Vrms)

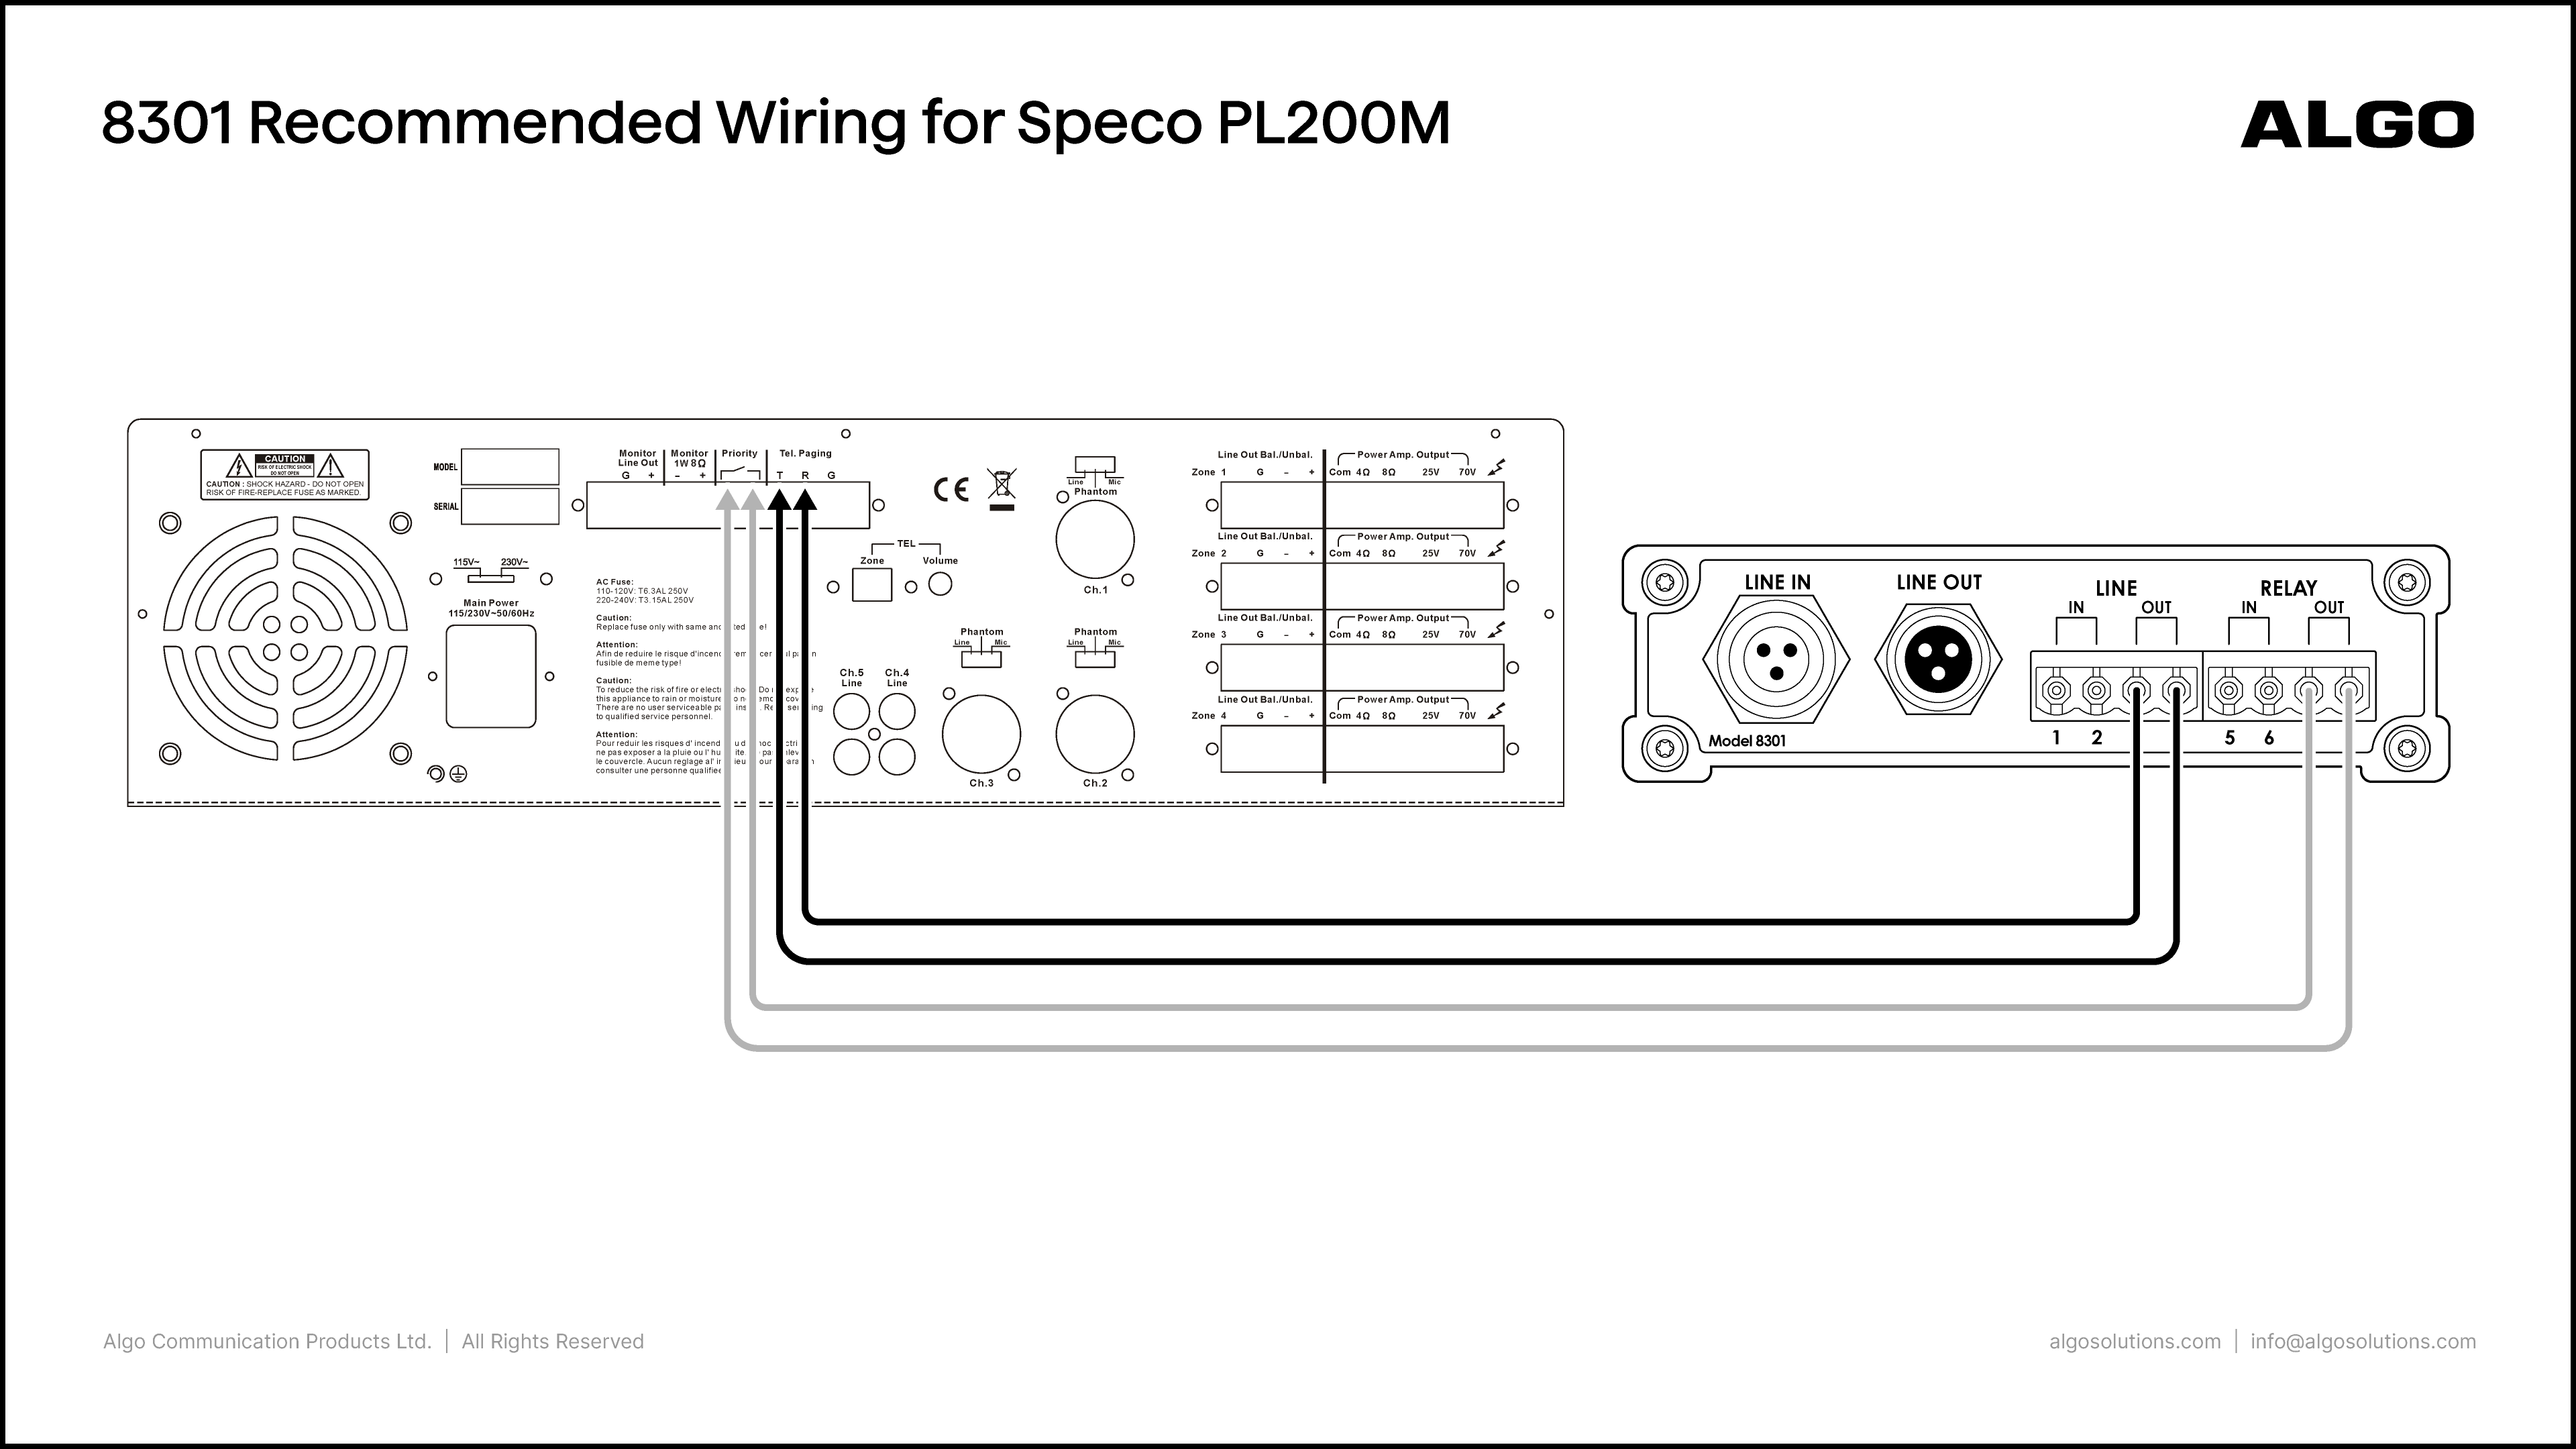
Speco PL200M with 8301

Algo Product:

8301 IP Paging Adapter & Scheduler

Amplifier Product:

Speco PL200M

Port Connections:

Algo

Speco

  • Line Out (3, 4)

  • Relay Out (7, 8)

  • Tel. Paging (R, T)

  • Priority

Notes:

  • On the 8301 web interface, go to Basic Settings → Features and set the Line Out Analog Output Level to 0dBm 600 ohm (0.775 Vrms)

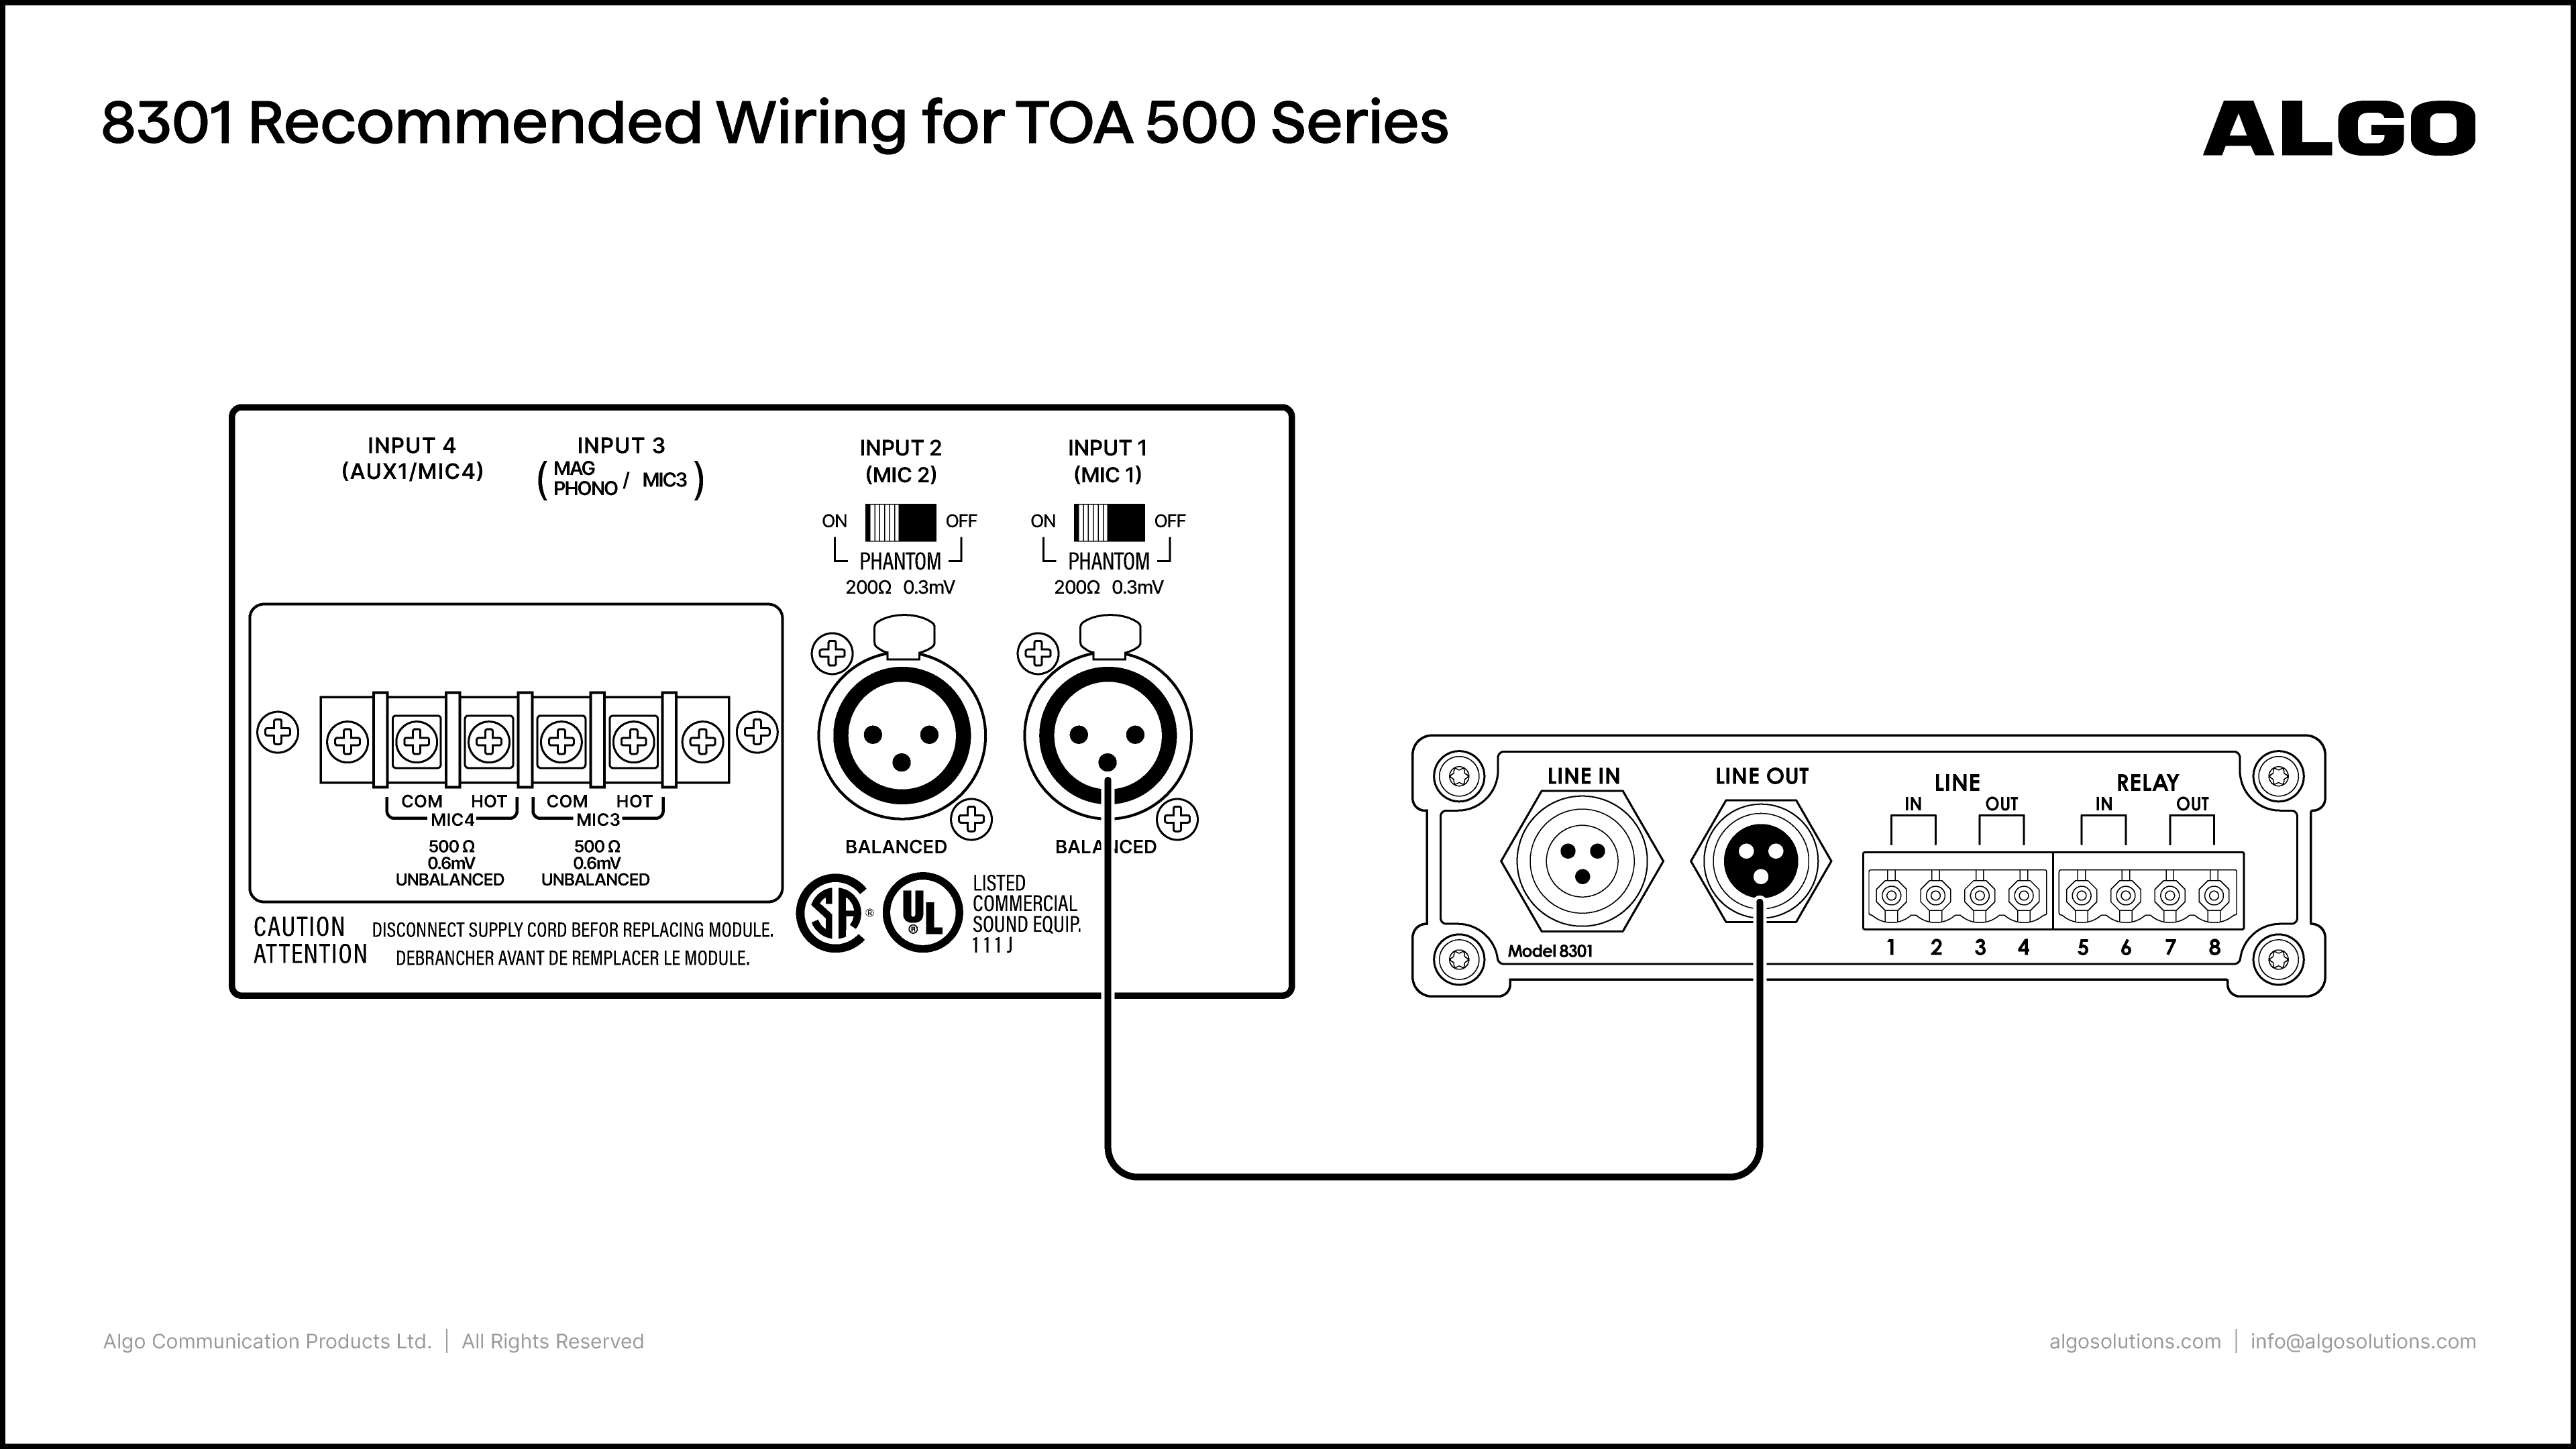
TOA 500 Series with 8301

Algo Product:

8301 IP Paging Adapter & Scheduler

Amplifier Product:

TOA 500 Series

Port Connections:

Algo

TOA

  • Line Out

  • Input 1

Recommended Equipment:

  • Algo 2504 Output XLR-Mini Female to XLR Male

Notes:

  • On the 8301 web interface, go to Basic Settings → Features and set the Line Out Analog Output Level to -10dBm 600 ohm (0.245 Vrms)

  • On the amp, set the Phantom switch above the input to the off position

TOA BG-115/130 with 8301

Algo Product:

8301 IP Paging Adapter & Scheduler

Amplifier Product:

TOA BG-115/130

Port Connections:

Algo

TOA

  • Line Out (3, 4)

  • Relay Out (7, 8)

  • MIC/TEL (Com, Hot)

  • Mute (G, /)

Notes:

  • On the 8301 web interface, go to Basic Settings → Features and set the Line Out Analog Output Level to 0dBm 600 ohm (0.775 Vrms)

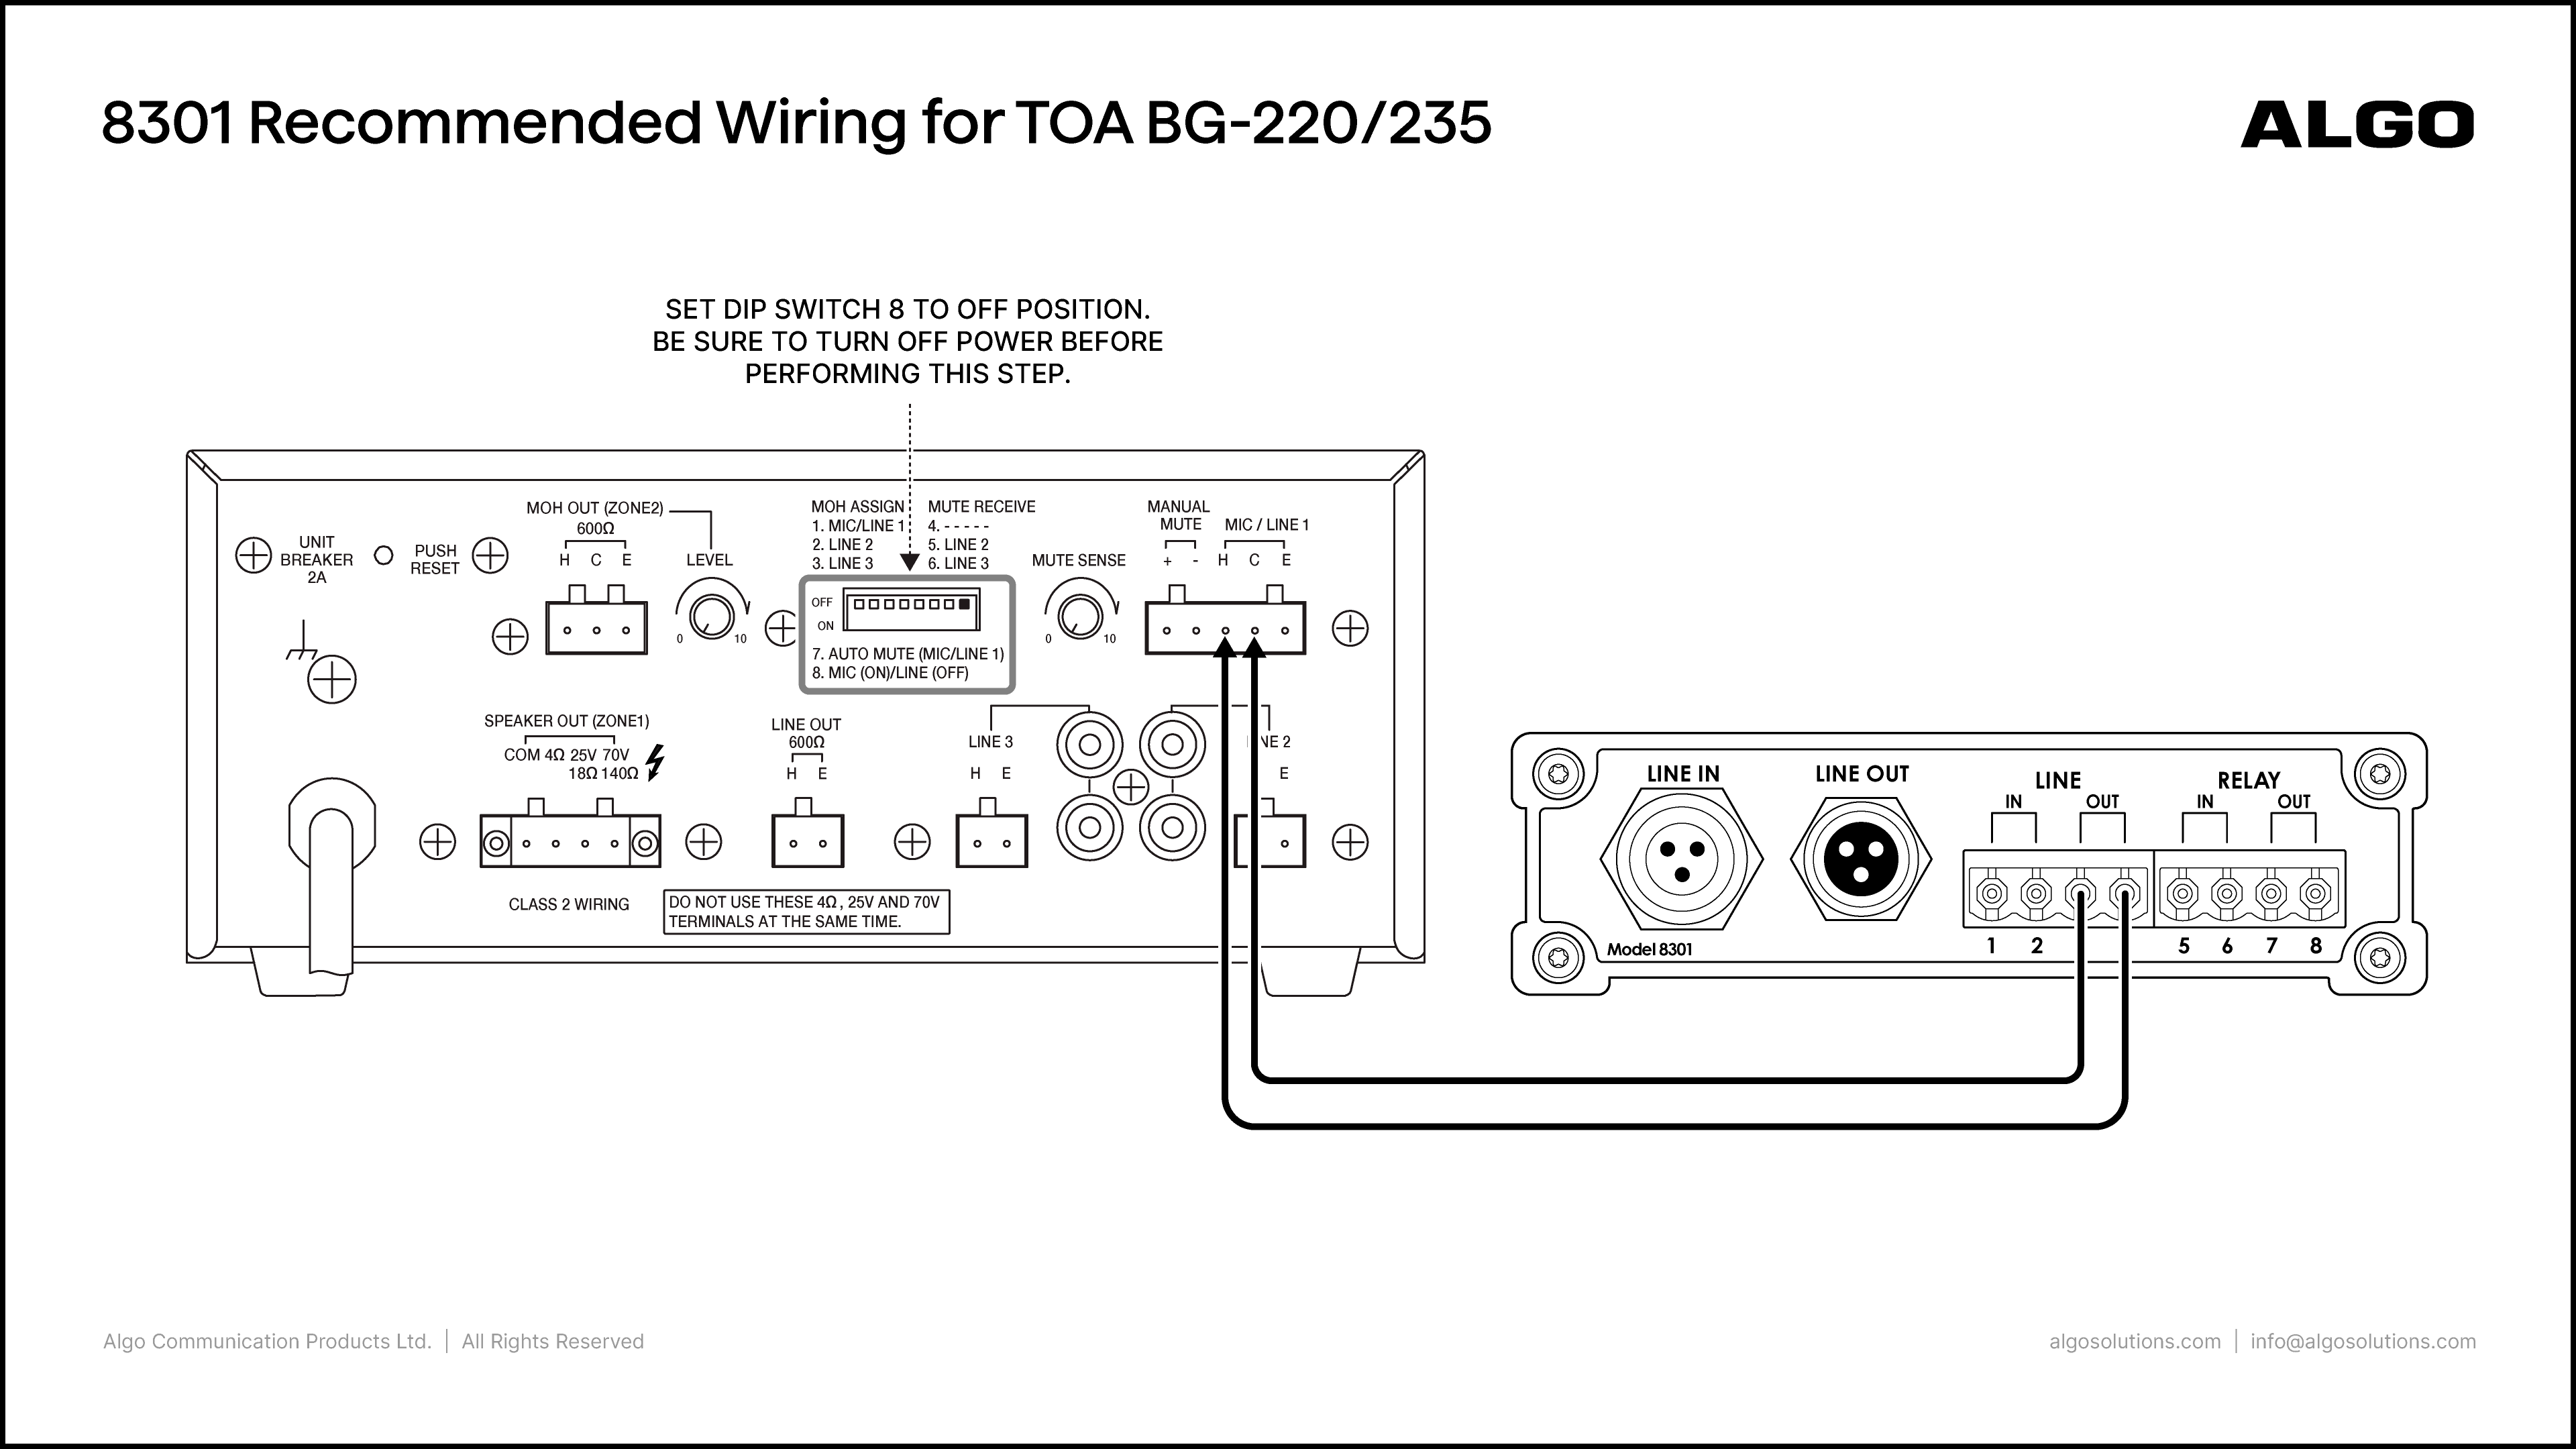
TOA BG-220/235 with 8301

Algo Product:

8301 IP Paging Adapter & Scheduler

Amplifier Product:

TOA BG-220/235

Port Connections:

Algo

TOA

  • Line Out (3, 4)

  • MIC/LINE 1 (H, C)

Notes:

  • On the TOA amplifier, set DIP switch 8 to the OFF position and be sure to turn off the power before performing this step

  • On the 8301 web interface, go to Basic Settings → Features and set the Line Out Analog Output Level to -10dBm 600 ohm (0.245 Vrms)

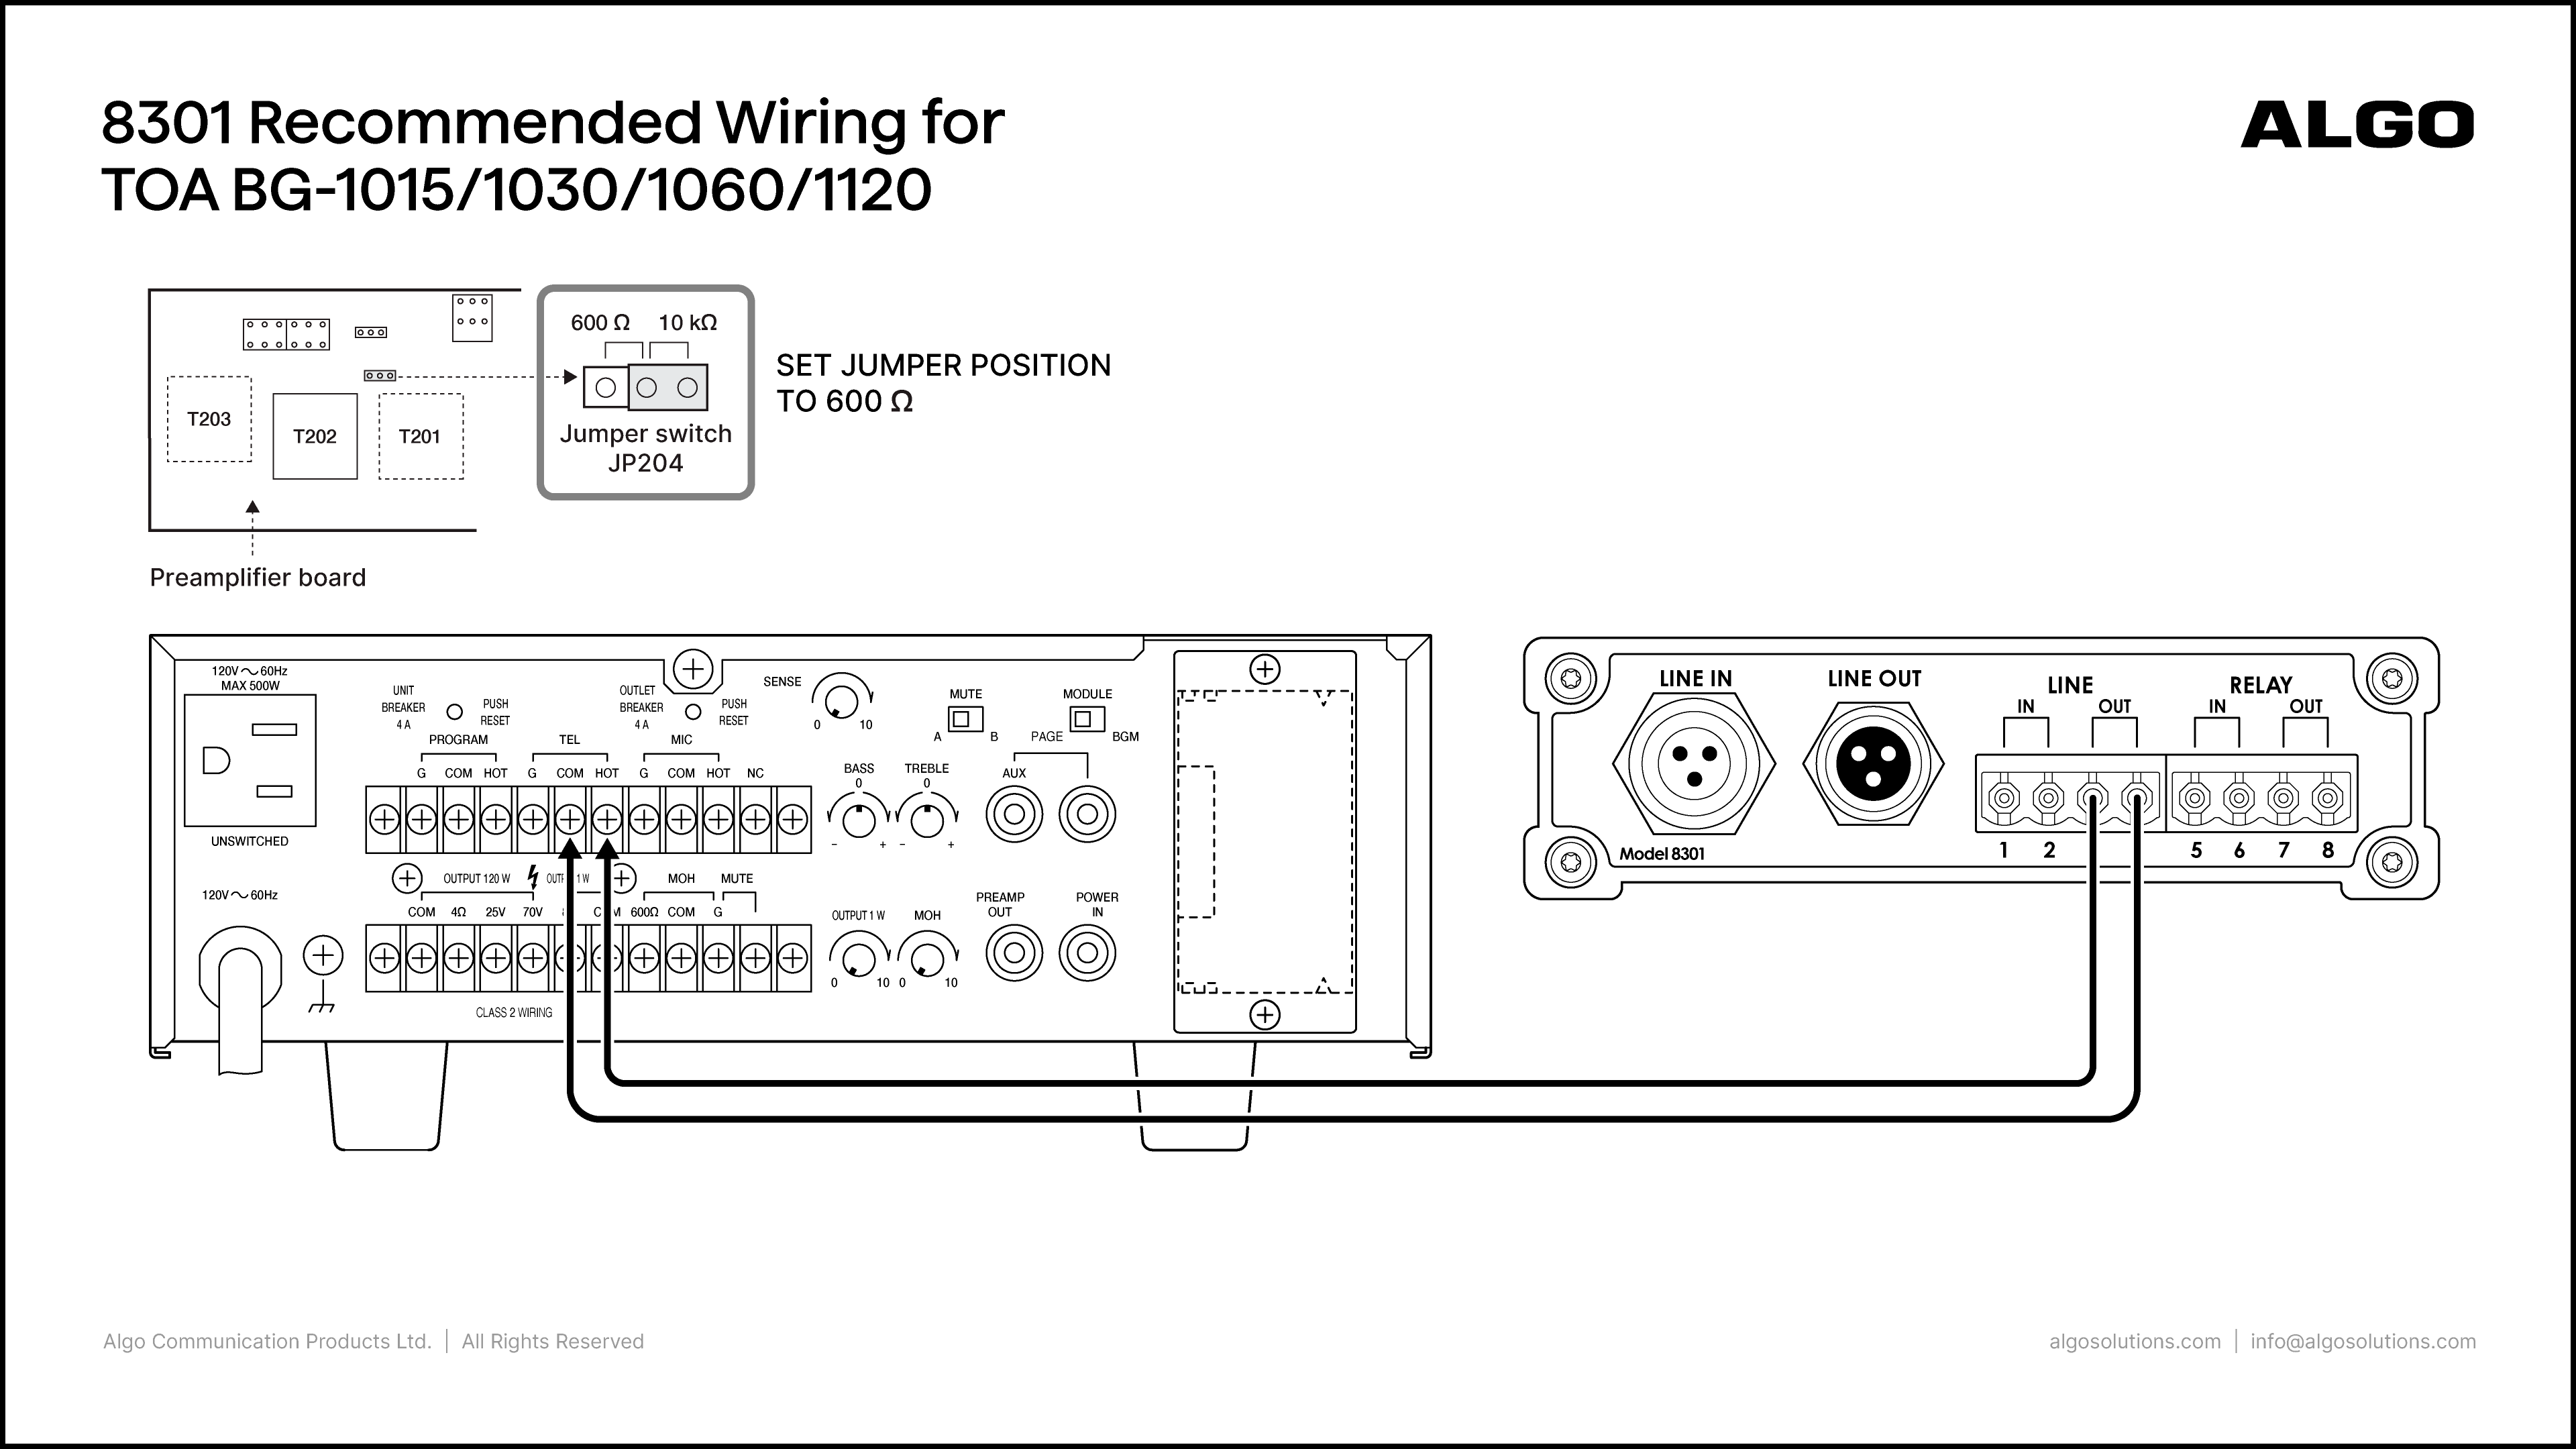
TOA BG-1015/1030/1060/1120 with 8301

Algo Product:

8301 IP Paging Adapter & Scheduler

Amplifier Product:

TOA BG-1015/1030/1060/1120

Port Connections:

Algo

TOA

  • Line Out (3, 4)

  • MIC/LINE 1 (H, C)

Notes:

  • TOA Amp: The impedance is set from factory to 10 kΩ. To switch to 600 Ω, change the position of the unit's internal jumper switch JP204 as per diagram below.

  • On the 8301 web interface, go to Basic Settings → Features and set the Line Out Analog Output Level to 0dBm 600 ohm (0.775 Vrms)

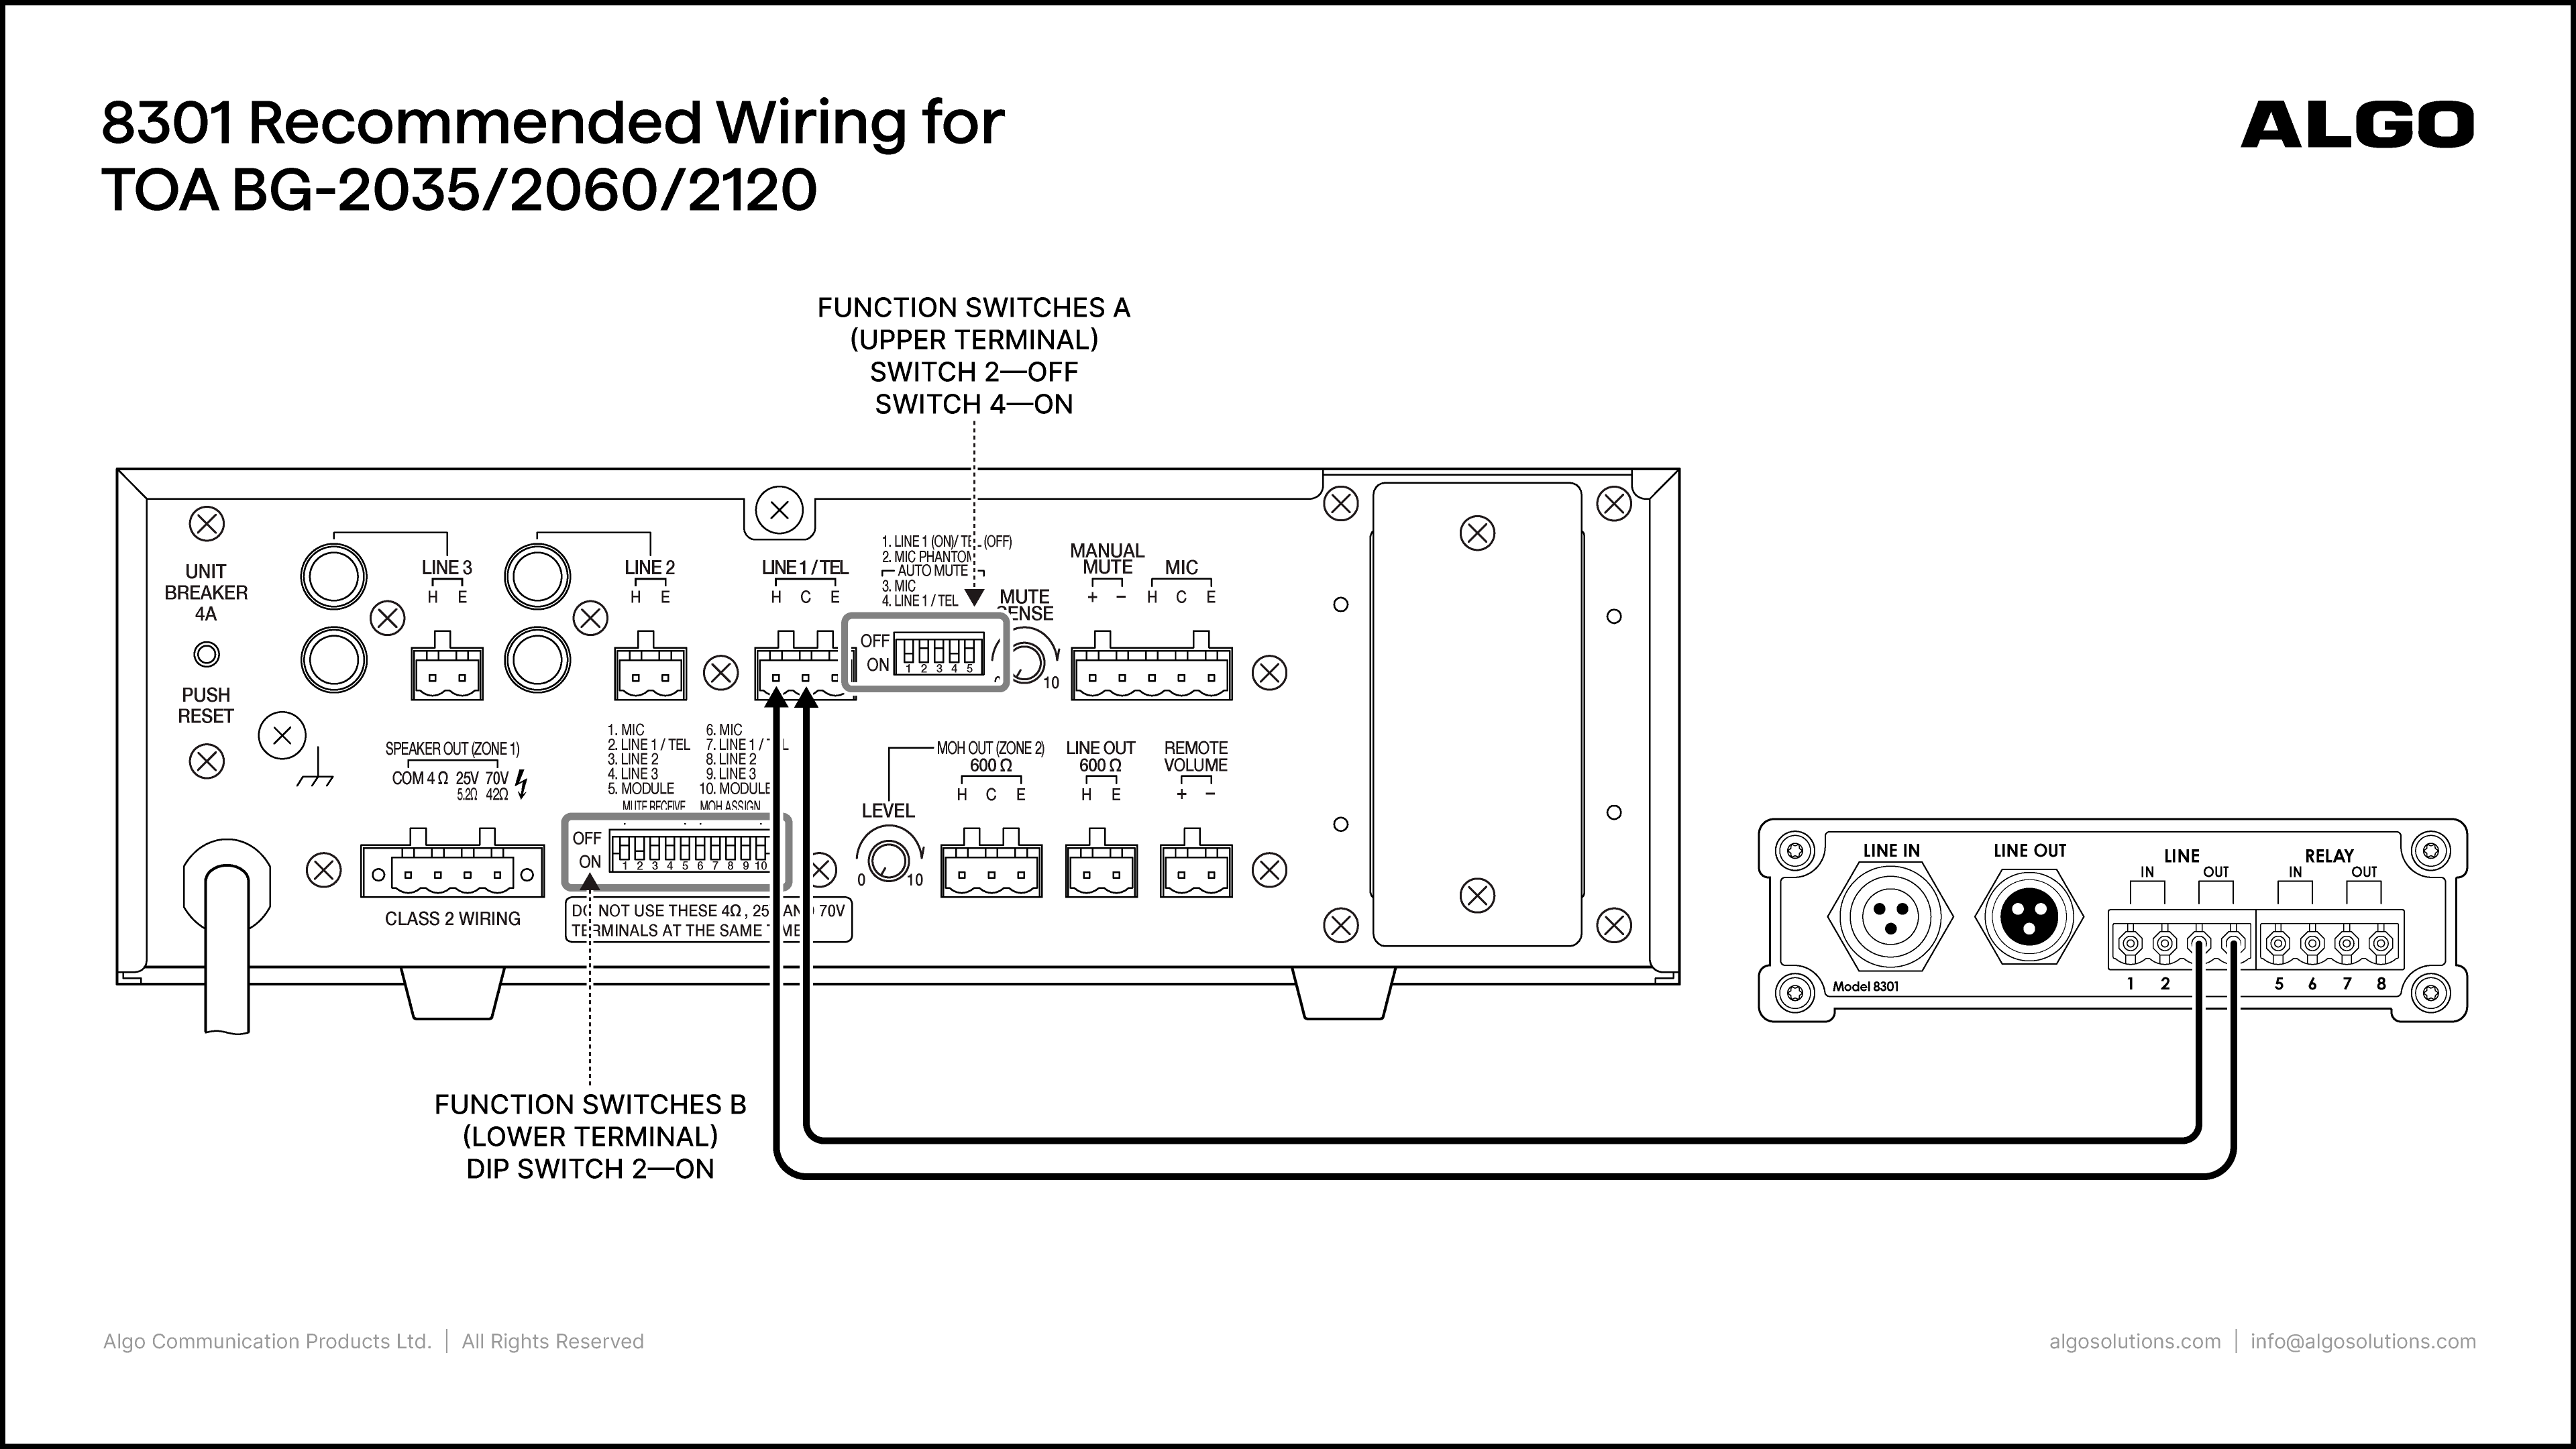
TOA BG-2035/2060/2120 with 8301

Algo Product:

8301 IP Paging Adapter & Scheduler

Amplifier Product:

TOA BG-2035/2060/2120

Port Connections:

Algo

TOA

  • Line Out (3, 4)

  • Line 1/TEL (H, C)

Notes:

  • On the 8301 web interface, go to Basic Settings → Features and set the Line Out Analog Output Level to -20dBm 600 ohm (0.077 Vrms)

Set the DIP switches as below:

  • Function Switches A (upper terminal)

    • Switch 2 – Off

    • Switch 4 – On

  • Function Switches B (lower terminal)

    • DIP Switch 2 – On

Valcom 2003AHF with 8305

Algo Product:

8305 Multi-Interface IP Paging Adapter

Amplifier Product:

Valcom 2003AHF

Port Connections:

Algo

Valcom

  • Telephone port

  • J1/RJ11

Notes:

  • Set SW2 Battery feed to Battery Feed ON

  • Set SW3 talkback zones to off

  • Set SW5 to Loop Start

  • On the 8305 web interface, go to Basic SettingsFeatures and set Audio Input Port to Phone Port

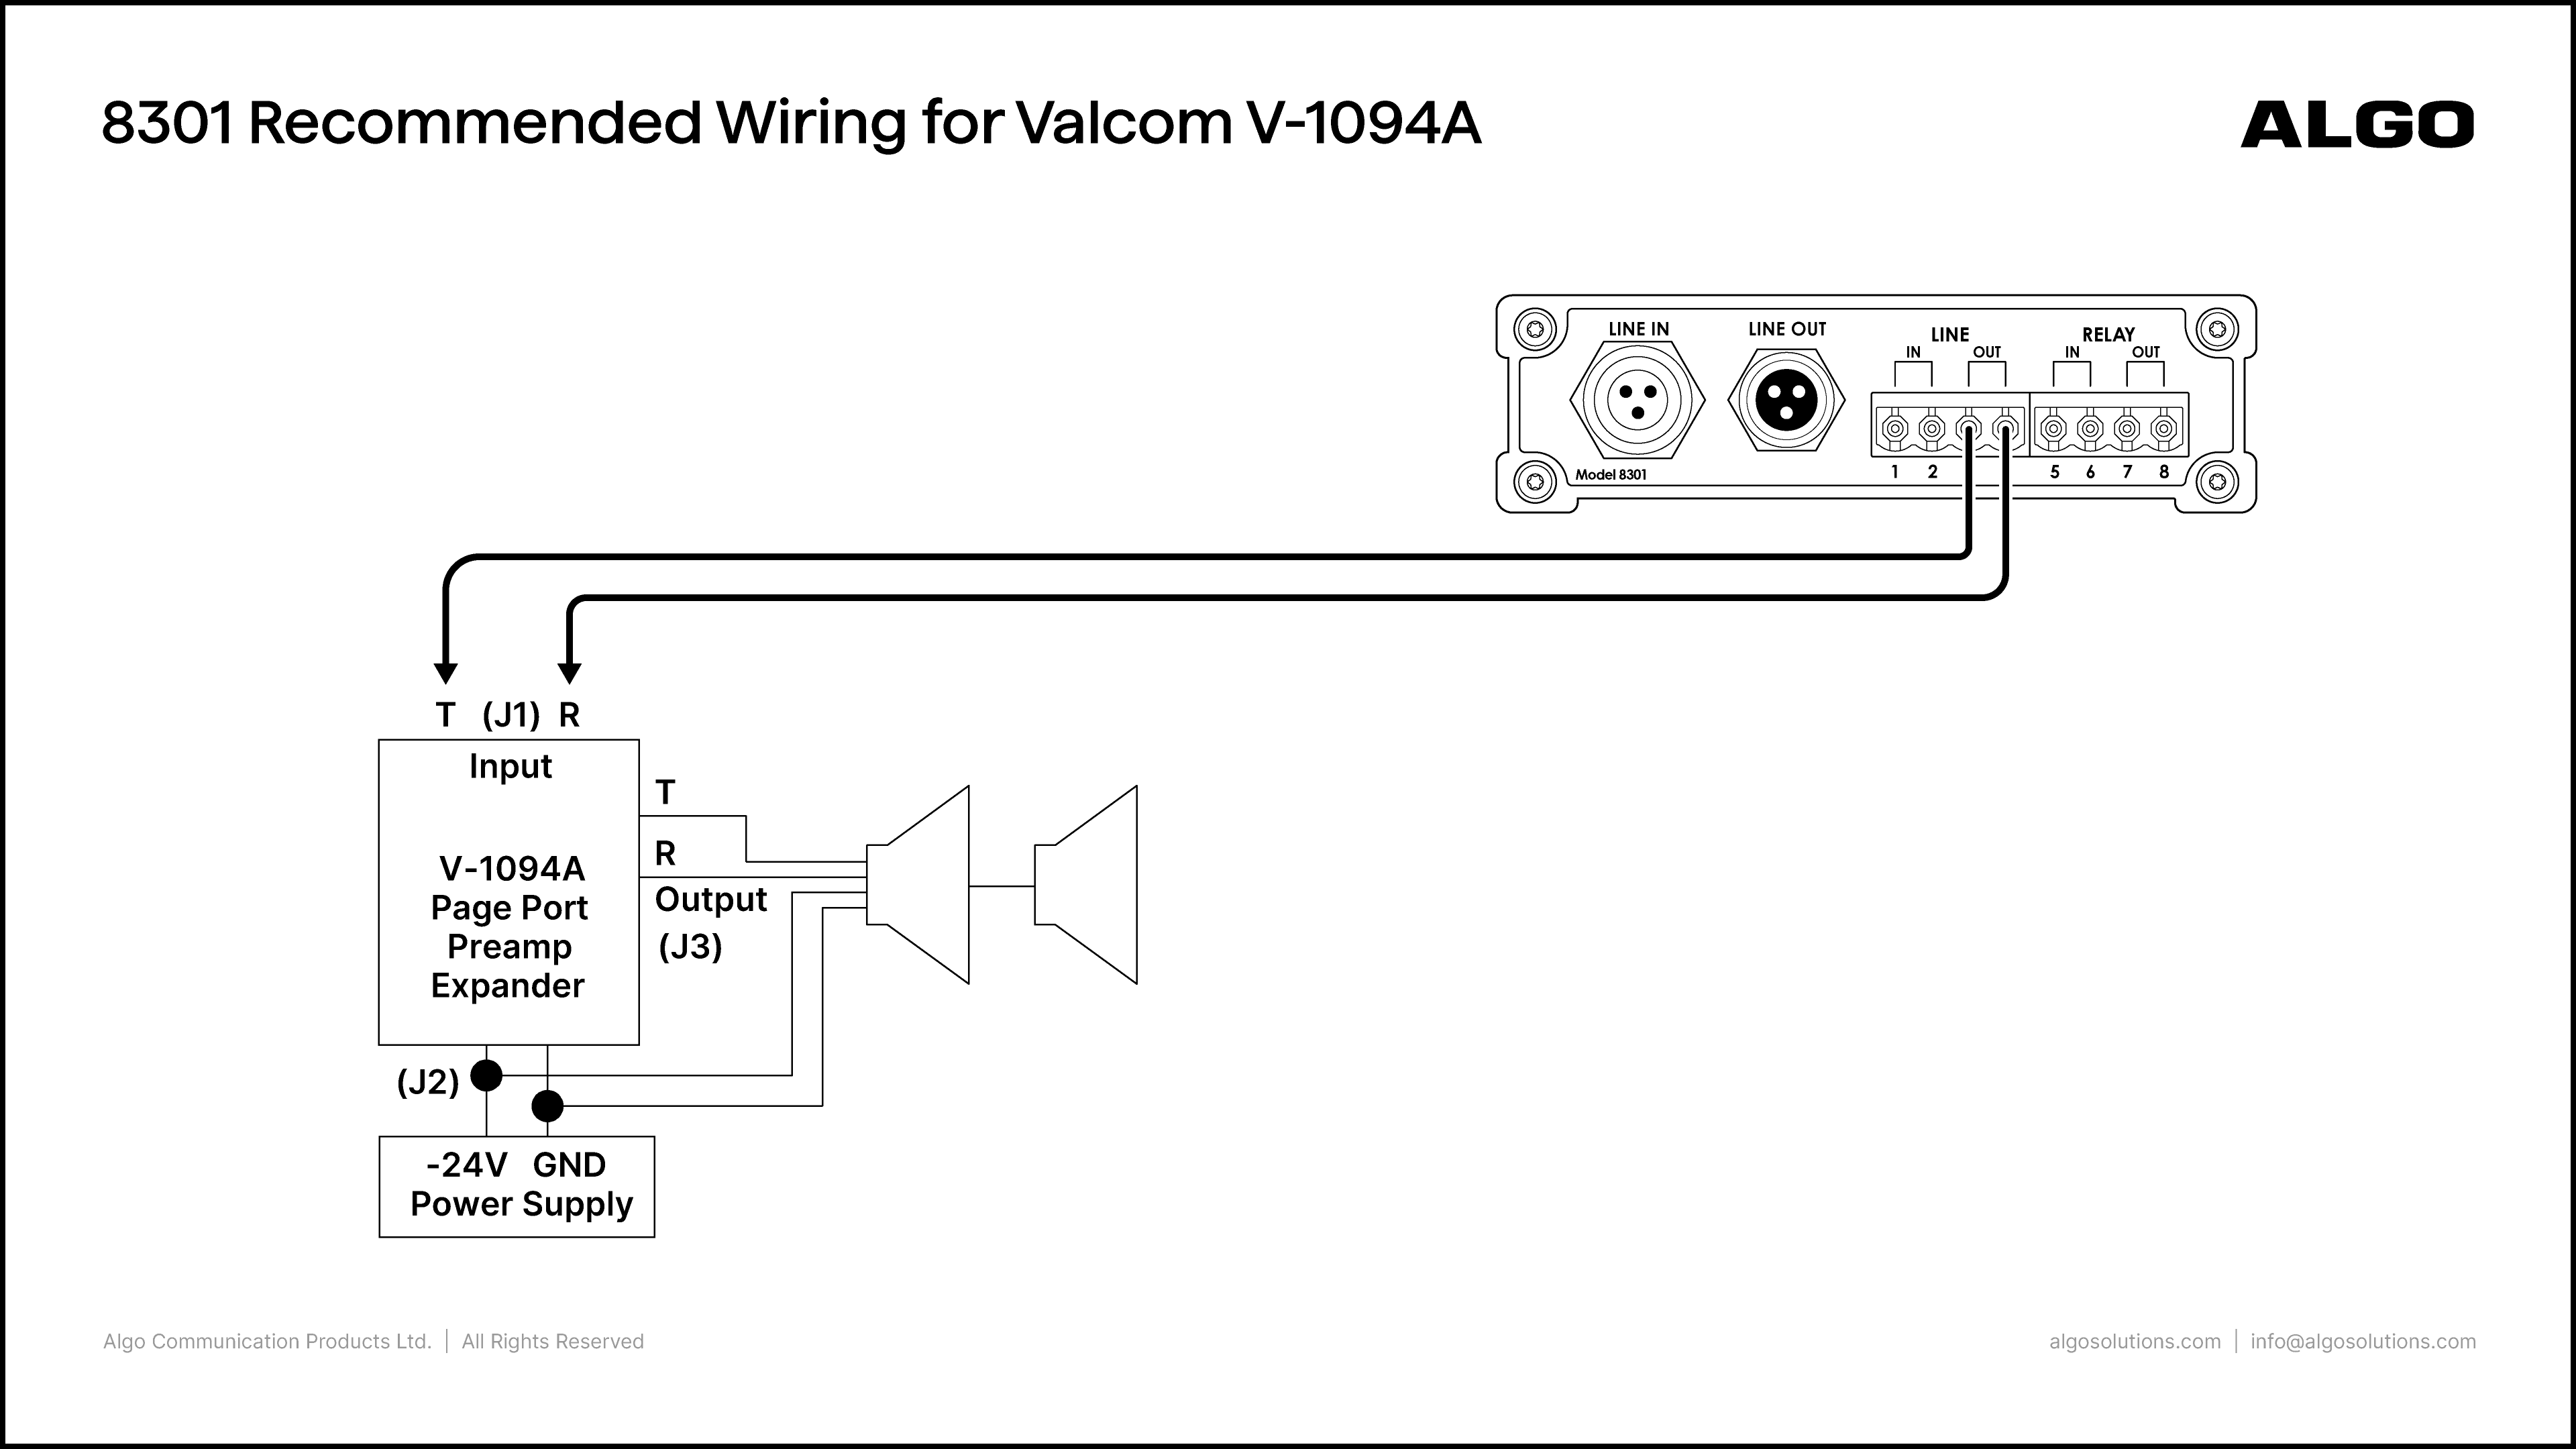
Valcom V-1094A with 8301

Algo Product:

8301 IP Paging Adapter & Scheduler

Amplifier Product:

Valcom V-1094A

Port Connections:

Algo

Valcom

  • Line Out (3, 4)

  • J1 Input (T, R)

Notes:

  • On the 8301 web interface, go to Basic Settings → Features and set the Line Out Analog Output Level to 0dBm 600 ohm (0.775 Vrms)

Valcom V-2000a with 8301

Algo Product:

8301 IP Paging Adapter & Scheduler

Amplifier Product:

Valcom V-2000a

Port Connections:

Algo

Valcom

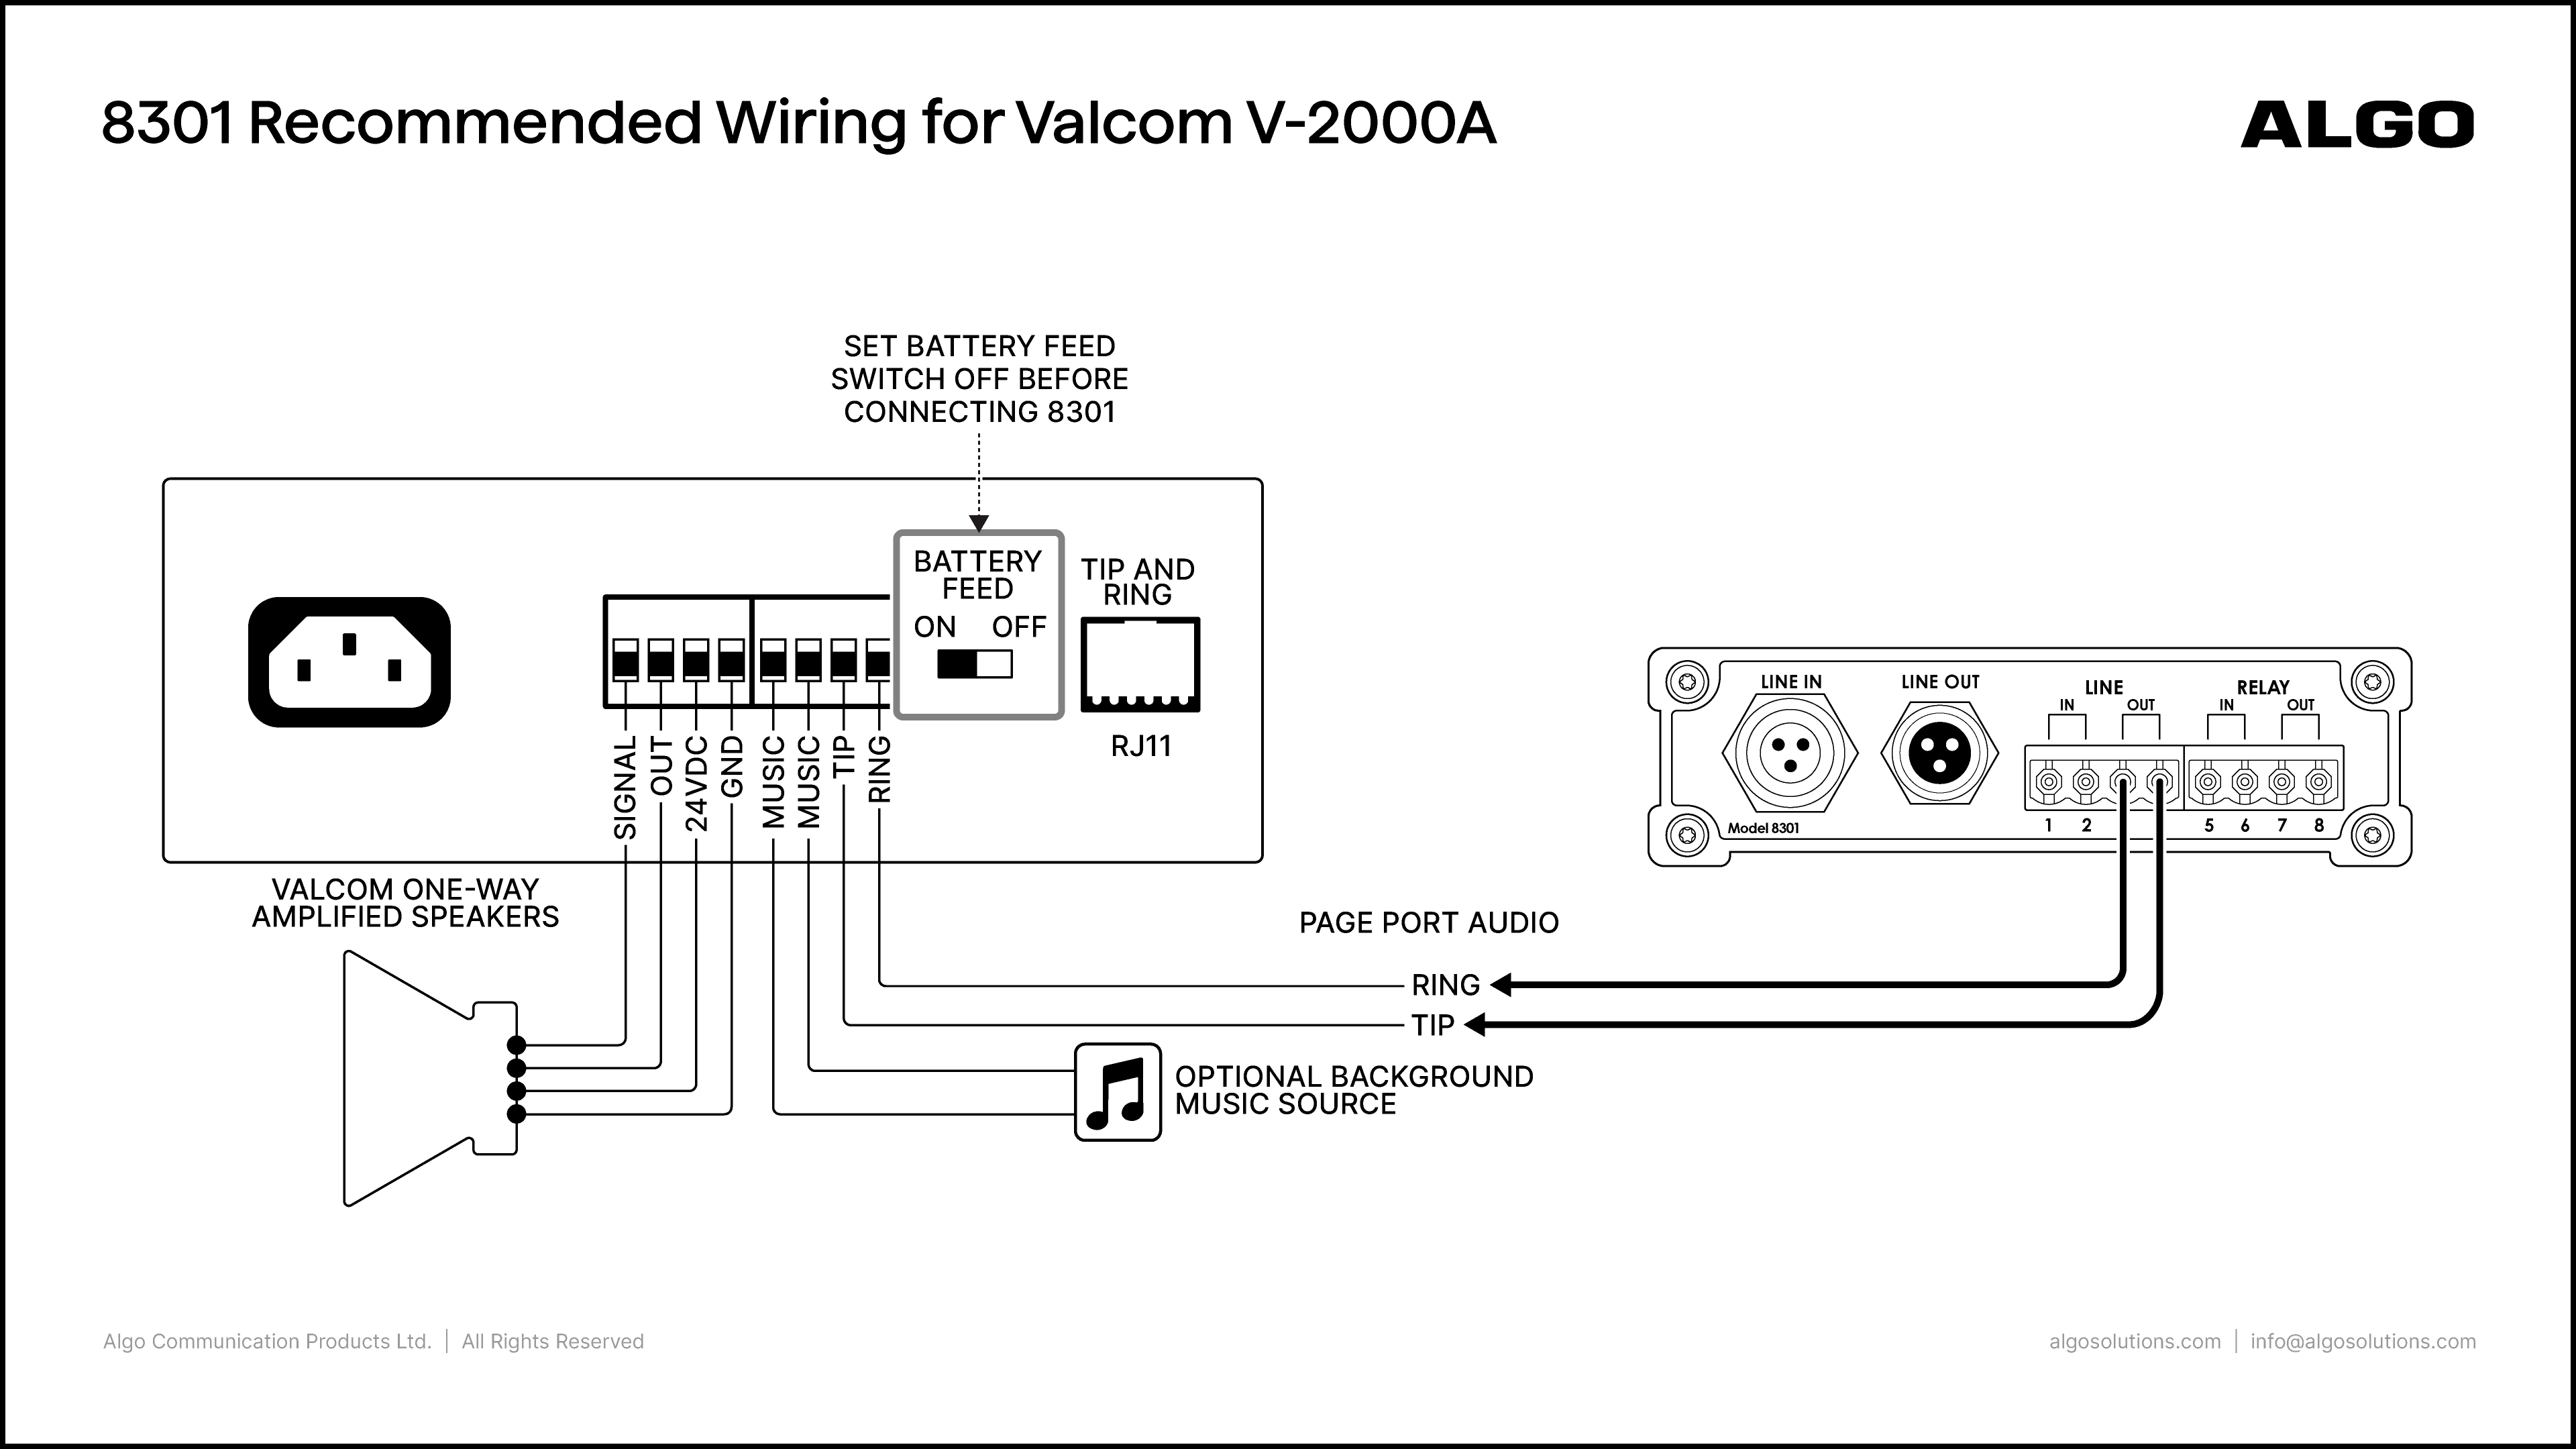
  • Line Out (3, 4)

  • Ring, TIP

Notes:

  • Set the Battery Feed switch off before connecting the 8301

  • On the 8301 web interface, go to Basic Settings → Features and set the Line Out Analog Output Level to -10dBm 600 ohm (0.245 Vrms)

Valcom V-2001a with 8301

Algo Product:

8301 IP Paging Adapter & Scheduler

Amplifier Product:

Valcom V-2001a

Port Connections:

Algo

Valcom

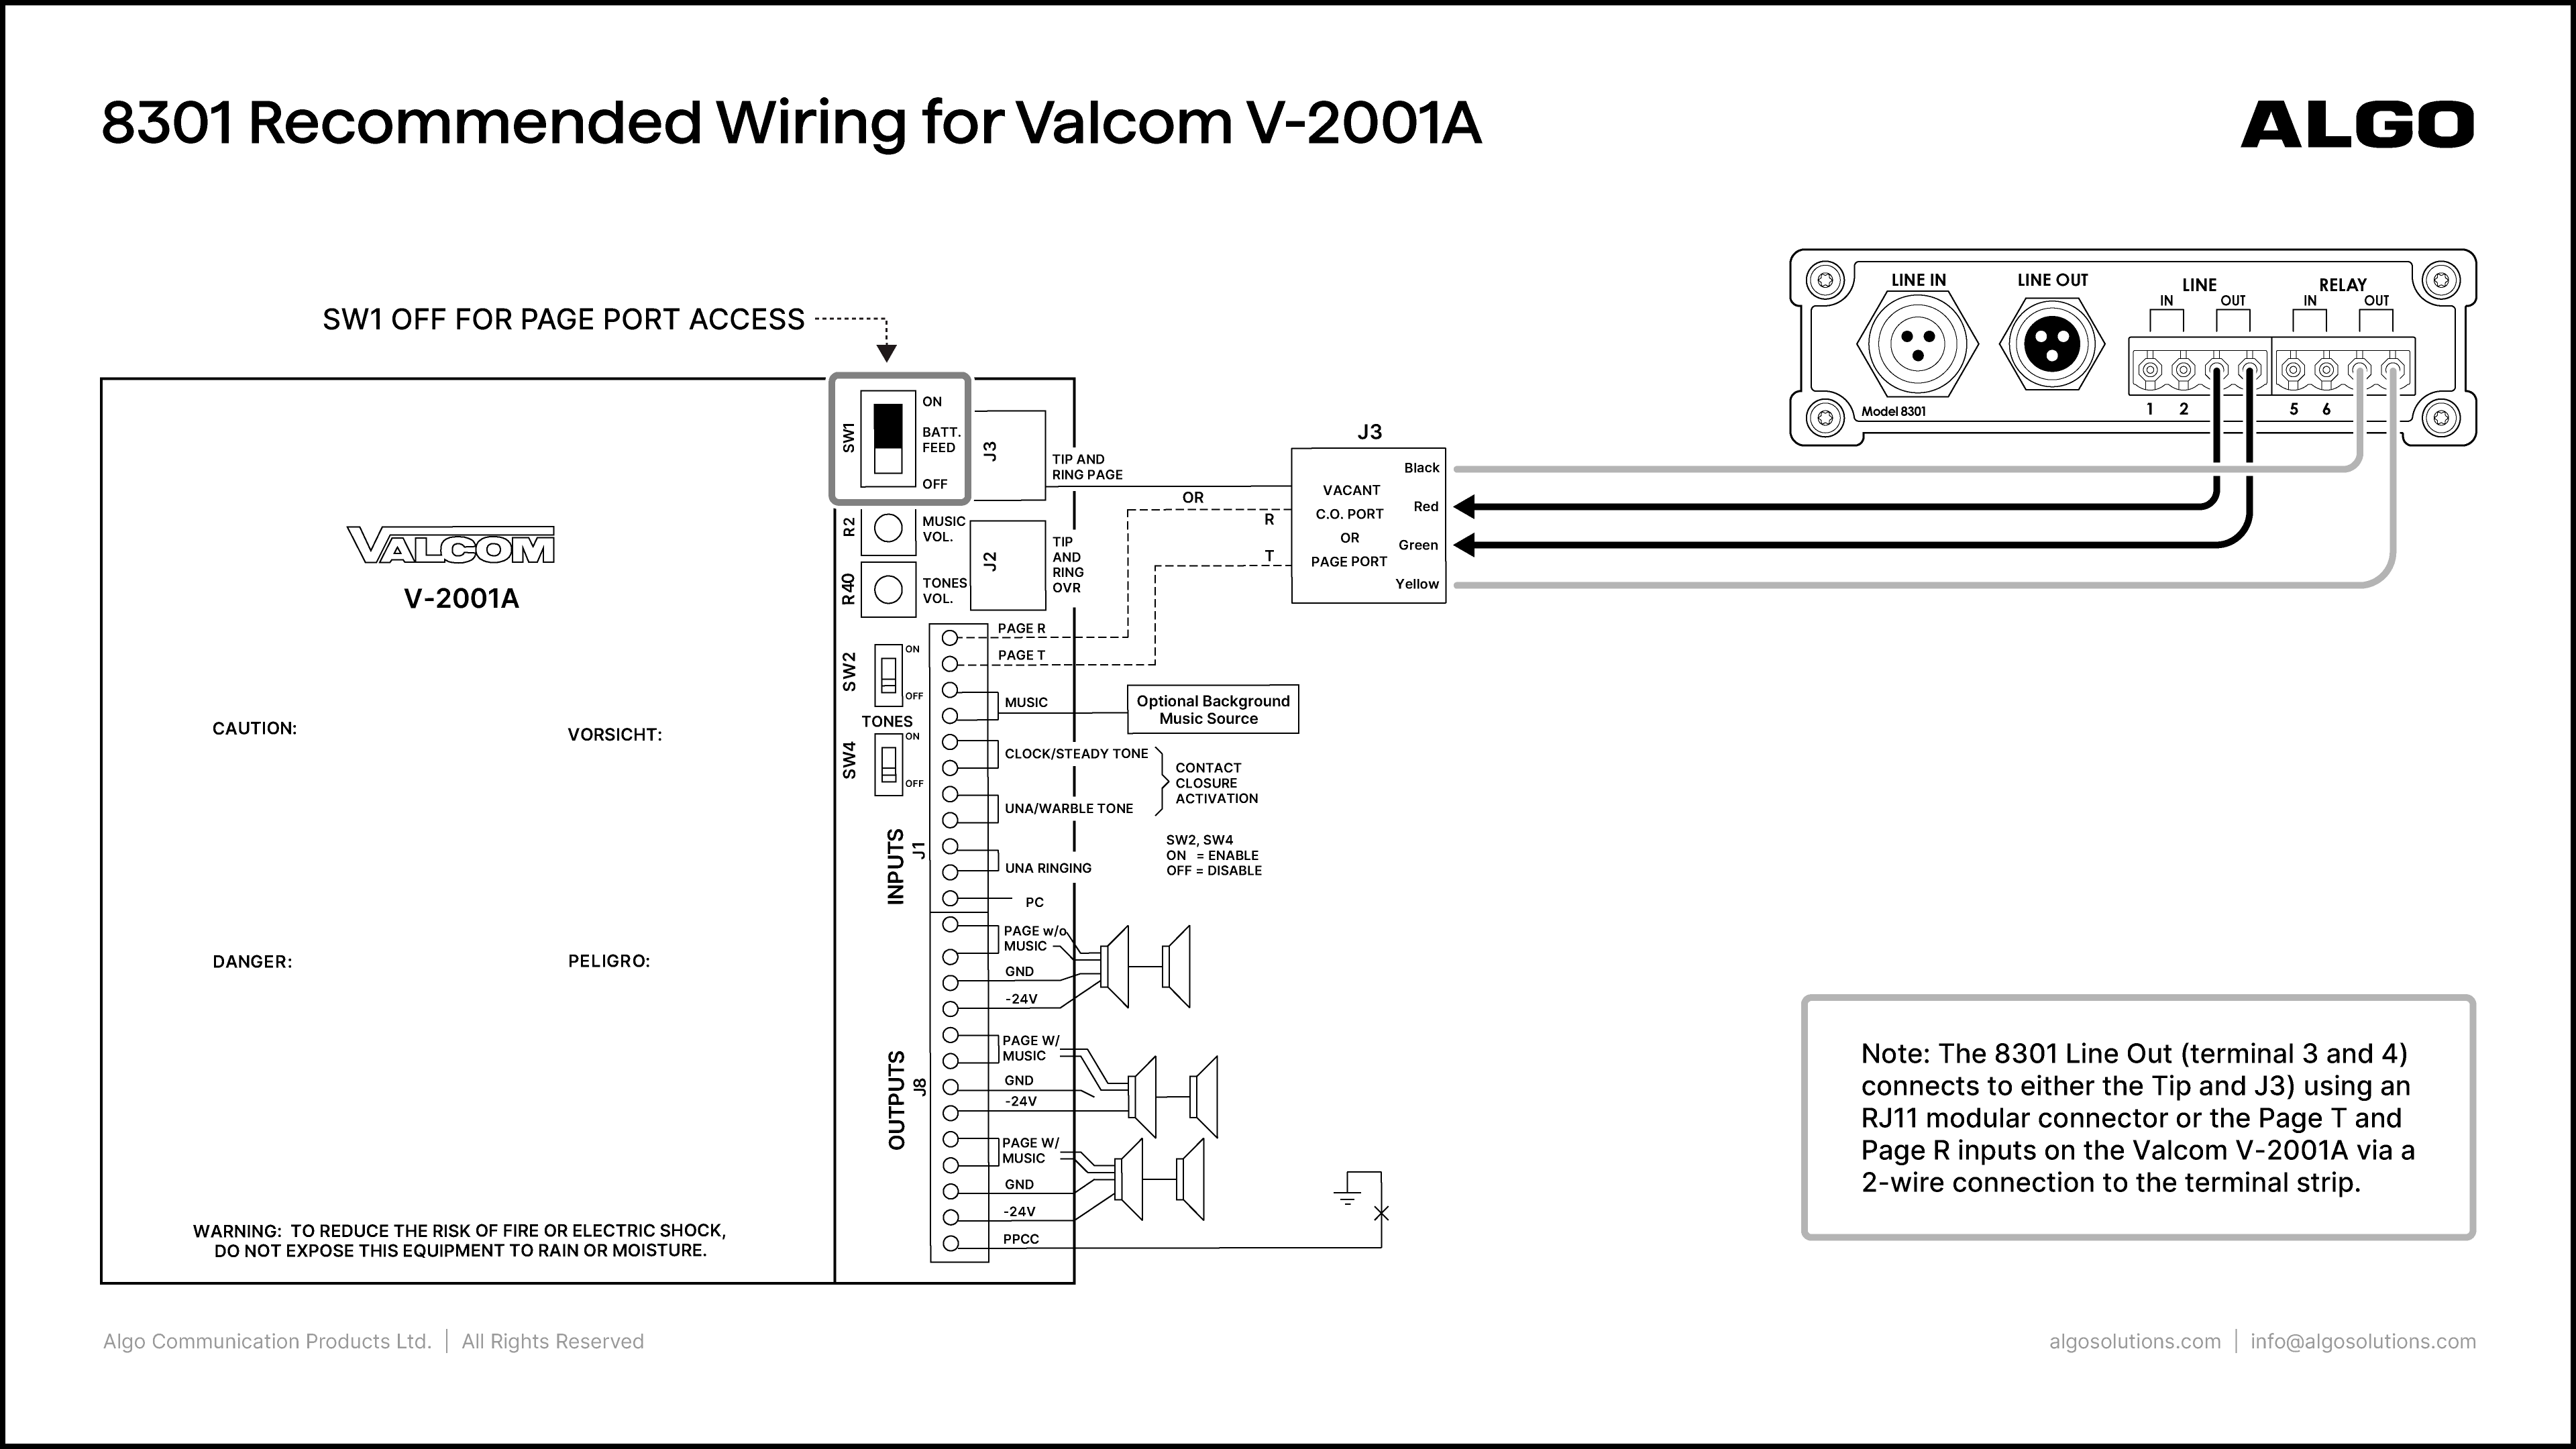
  • Line Out (3, 4)

  • Relay Out (7, 8)

  • J3 - Red, Green

  • J3 - Black, Yellow

Notes:

  • On the 8301 web interface, go to Basic Settings → Features and set the Line Out Analog Output Level to -10dBm 600 ohm (0.245 Vrms)

  • The 8301 Line Out (terminal 3 and 4) connects to either the Tip and J3) using an RJ11 modular connector or the Page T and Page R inputs on the Valcom V-2001A via a 2-wire connection to the terminal strip.

  • Sw1 Off for Page Port Access

Valcom V-2003a with 8301

Algo Product:

8301 IP Paging Adapter & Scheduler

Amplifier Product:

Valcom V-2003a

Port Connections:

Algo

Valcom

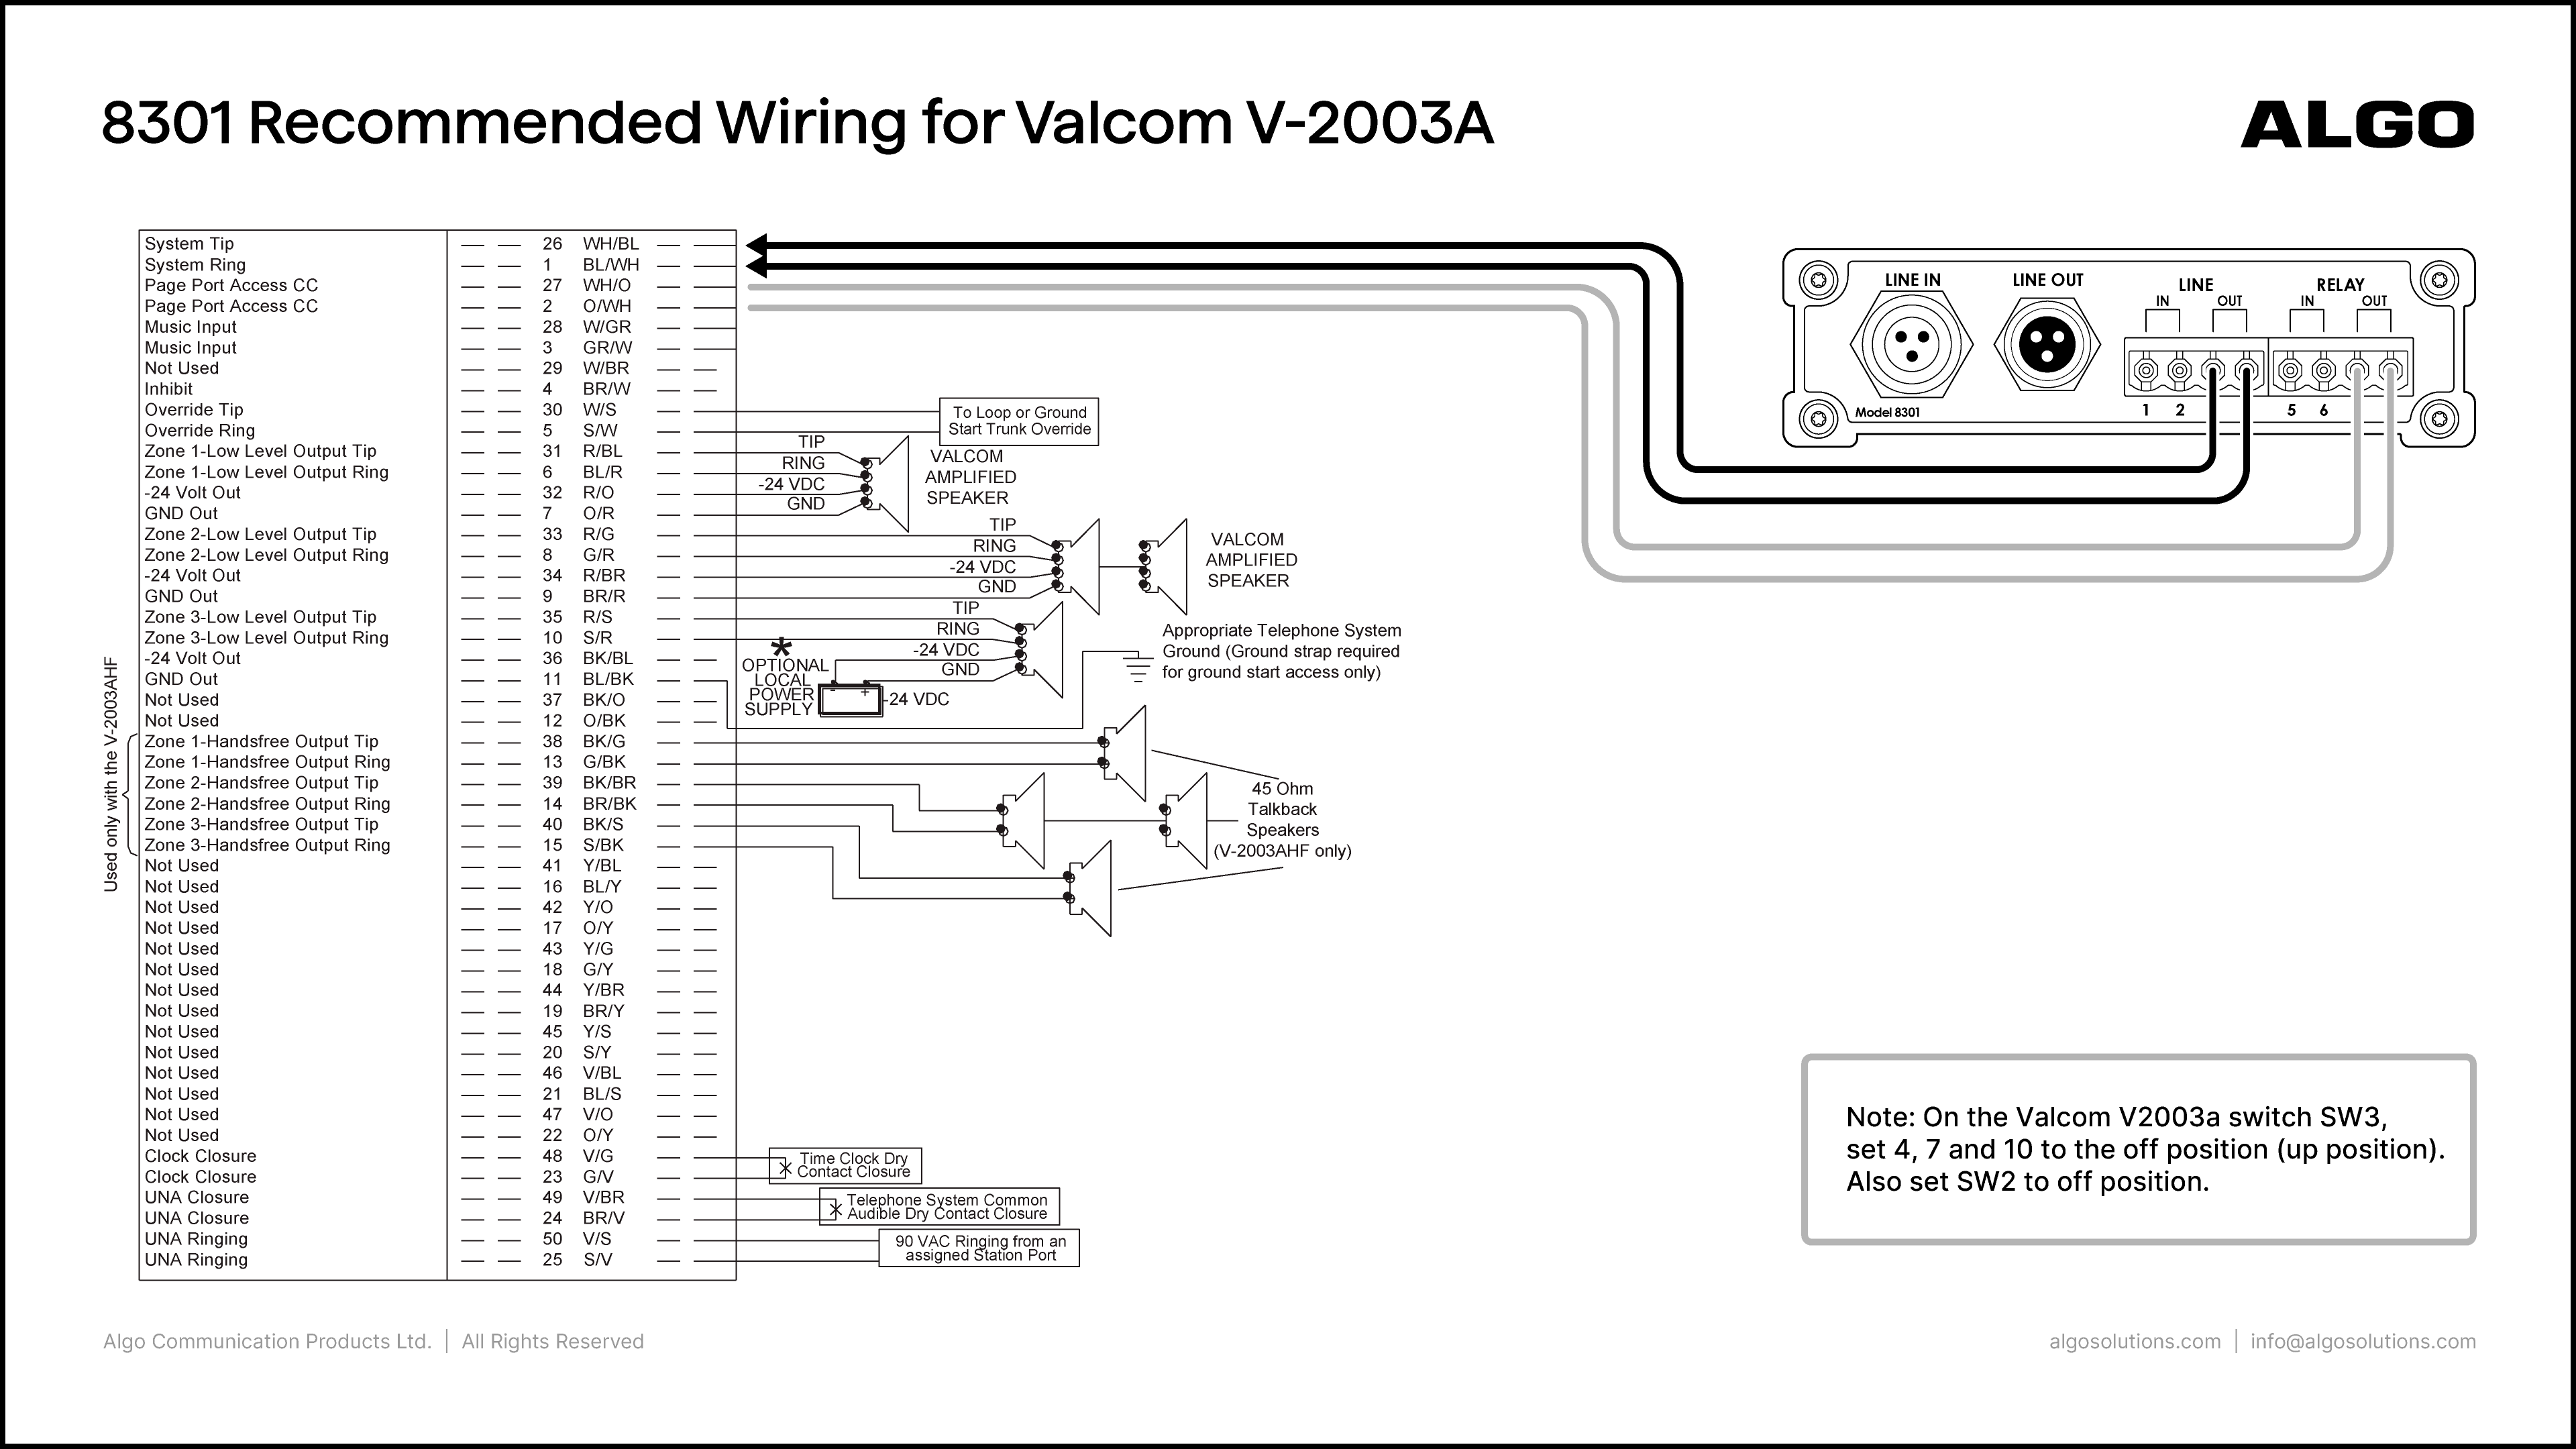
  • Line Out (3, 4)

  • Relay Out (7, 8)

  • 26 WH/BL, 1 BL/WH

  • 27 WH/O, 2 O/WH

Notes:

  • On the Valcom V2003a switch SW3, set 4, 7 and 10 to the off position (up position). Also set SW2 to off position.

  • On the 8301 web interface, go to Basic Settings → Features and set the Line Out Analog Output Level to -10dBm 600 ohm (0.245 Vrms)

  • To play DTMF tones and control the zones, make sure to enable Generate In-Band DTMF Tones (Advanced Settings → Advanced Audio).

Valcom V-2006a with 8301

Algo Product:

8301 IP Paging Adapter & Scheduler

Amplifier Product:

Valcom V-2006a

Port Connections:

Algo

Valcom

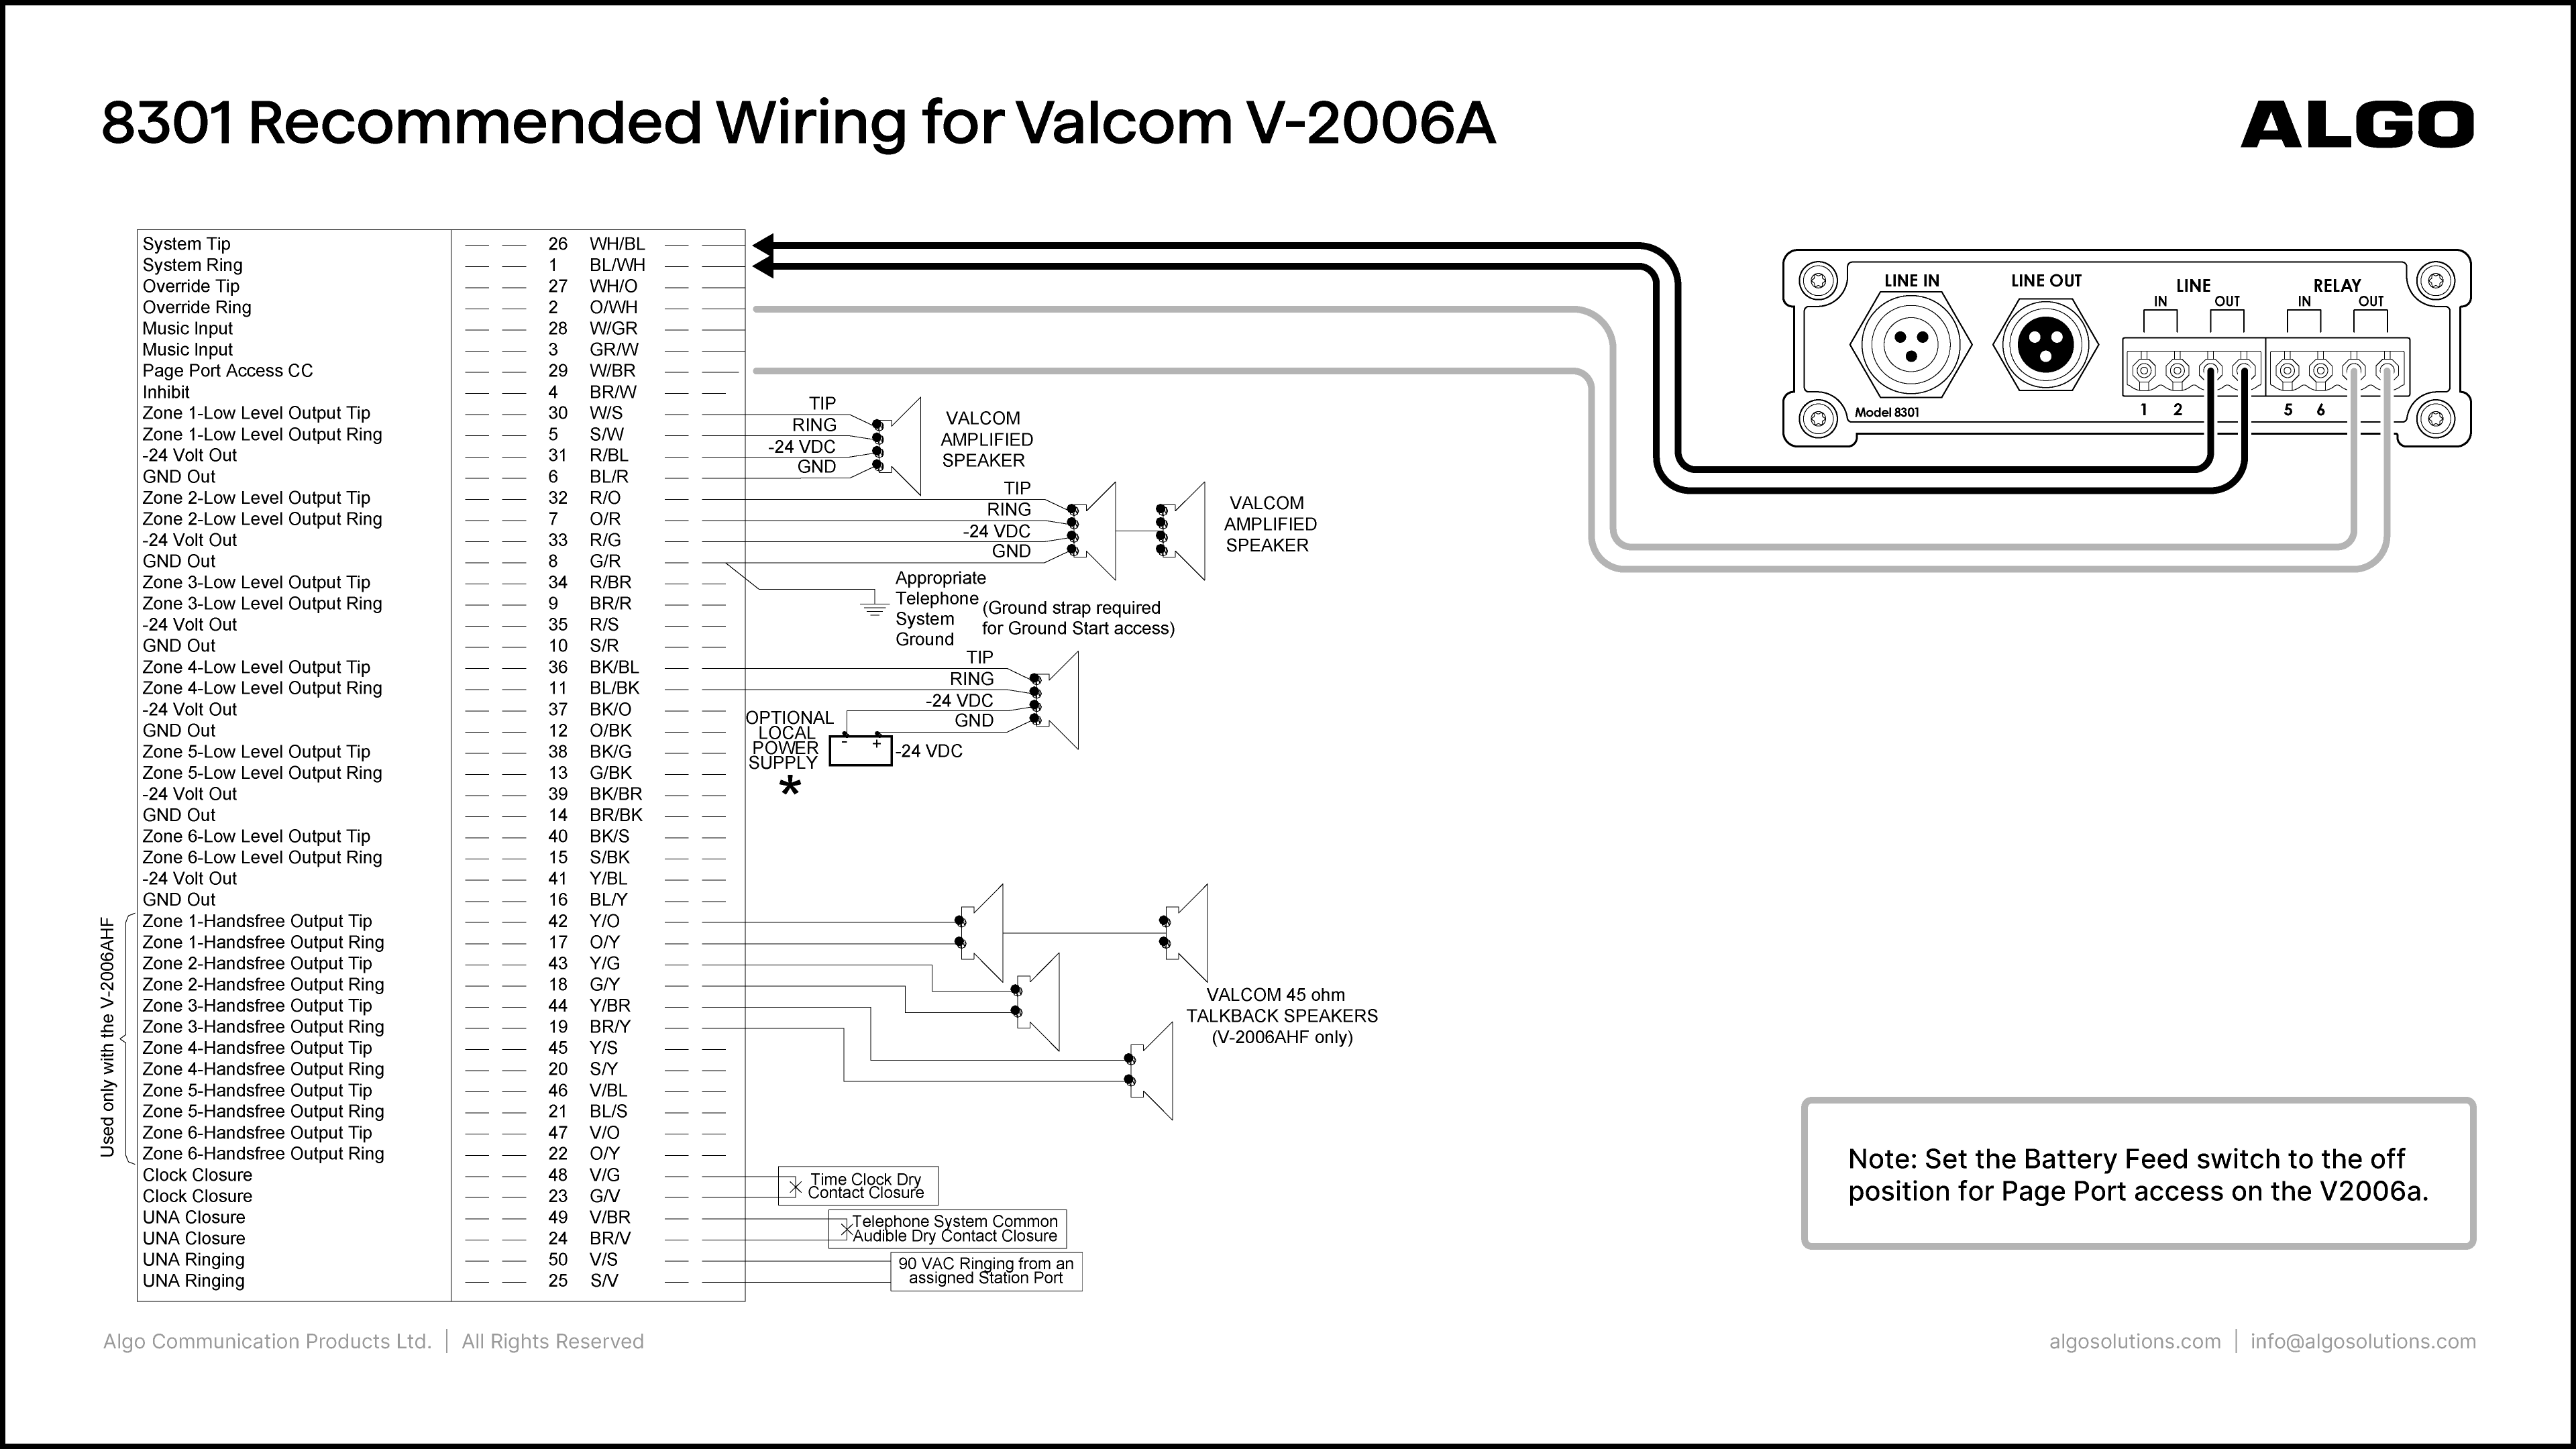
  • Line Out (3, 4)

  • Relay Out (7, 8)

  • 26 WH/BL, 1 BL/WH

  • 2 O/WH, 29 W/BR

Notes:

  • Set the Battery Feed switch to the off position for page port access on the V2006a

  • On the 8301 web interface, go to Basic Settings → Features and set the Line Out Analog Output Level to -10dBm 600 ohm (0.245 Vrms)

  • To play DTMF tones and control the zones, make sure to enable Generate In-Band DTMF Tones (Advanced Settings → Advanced Audio).

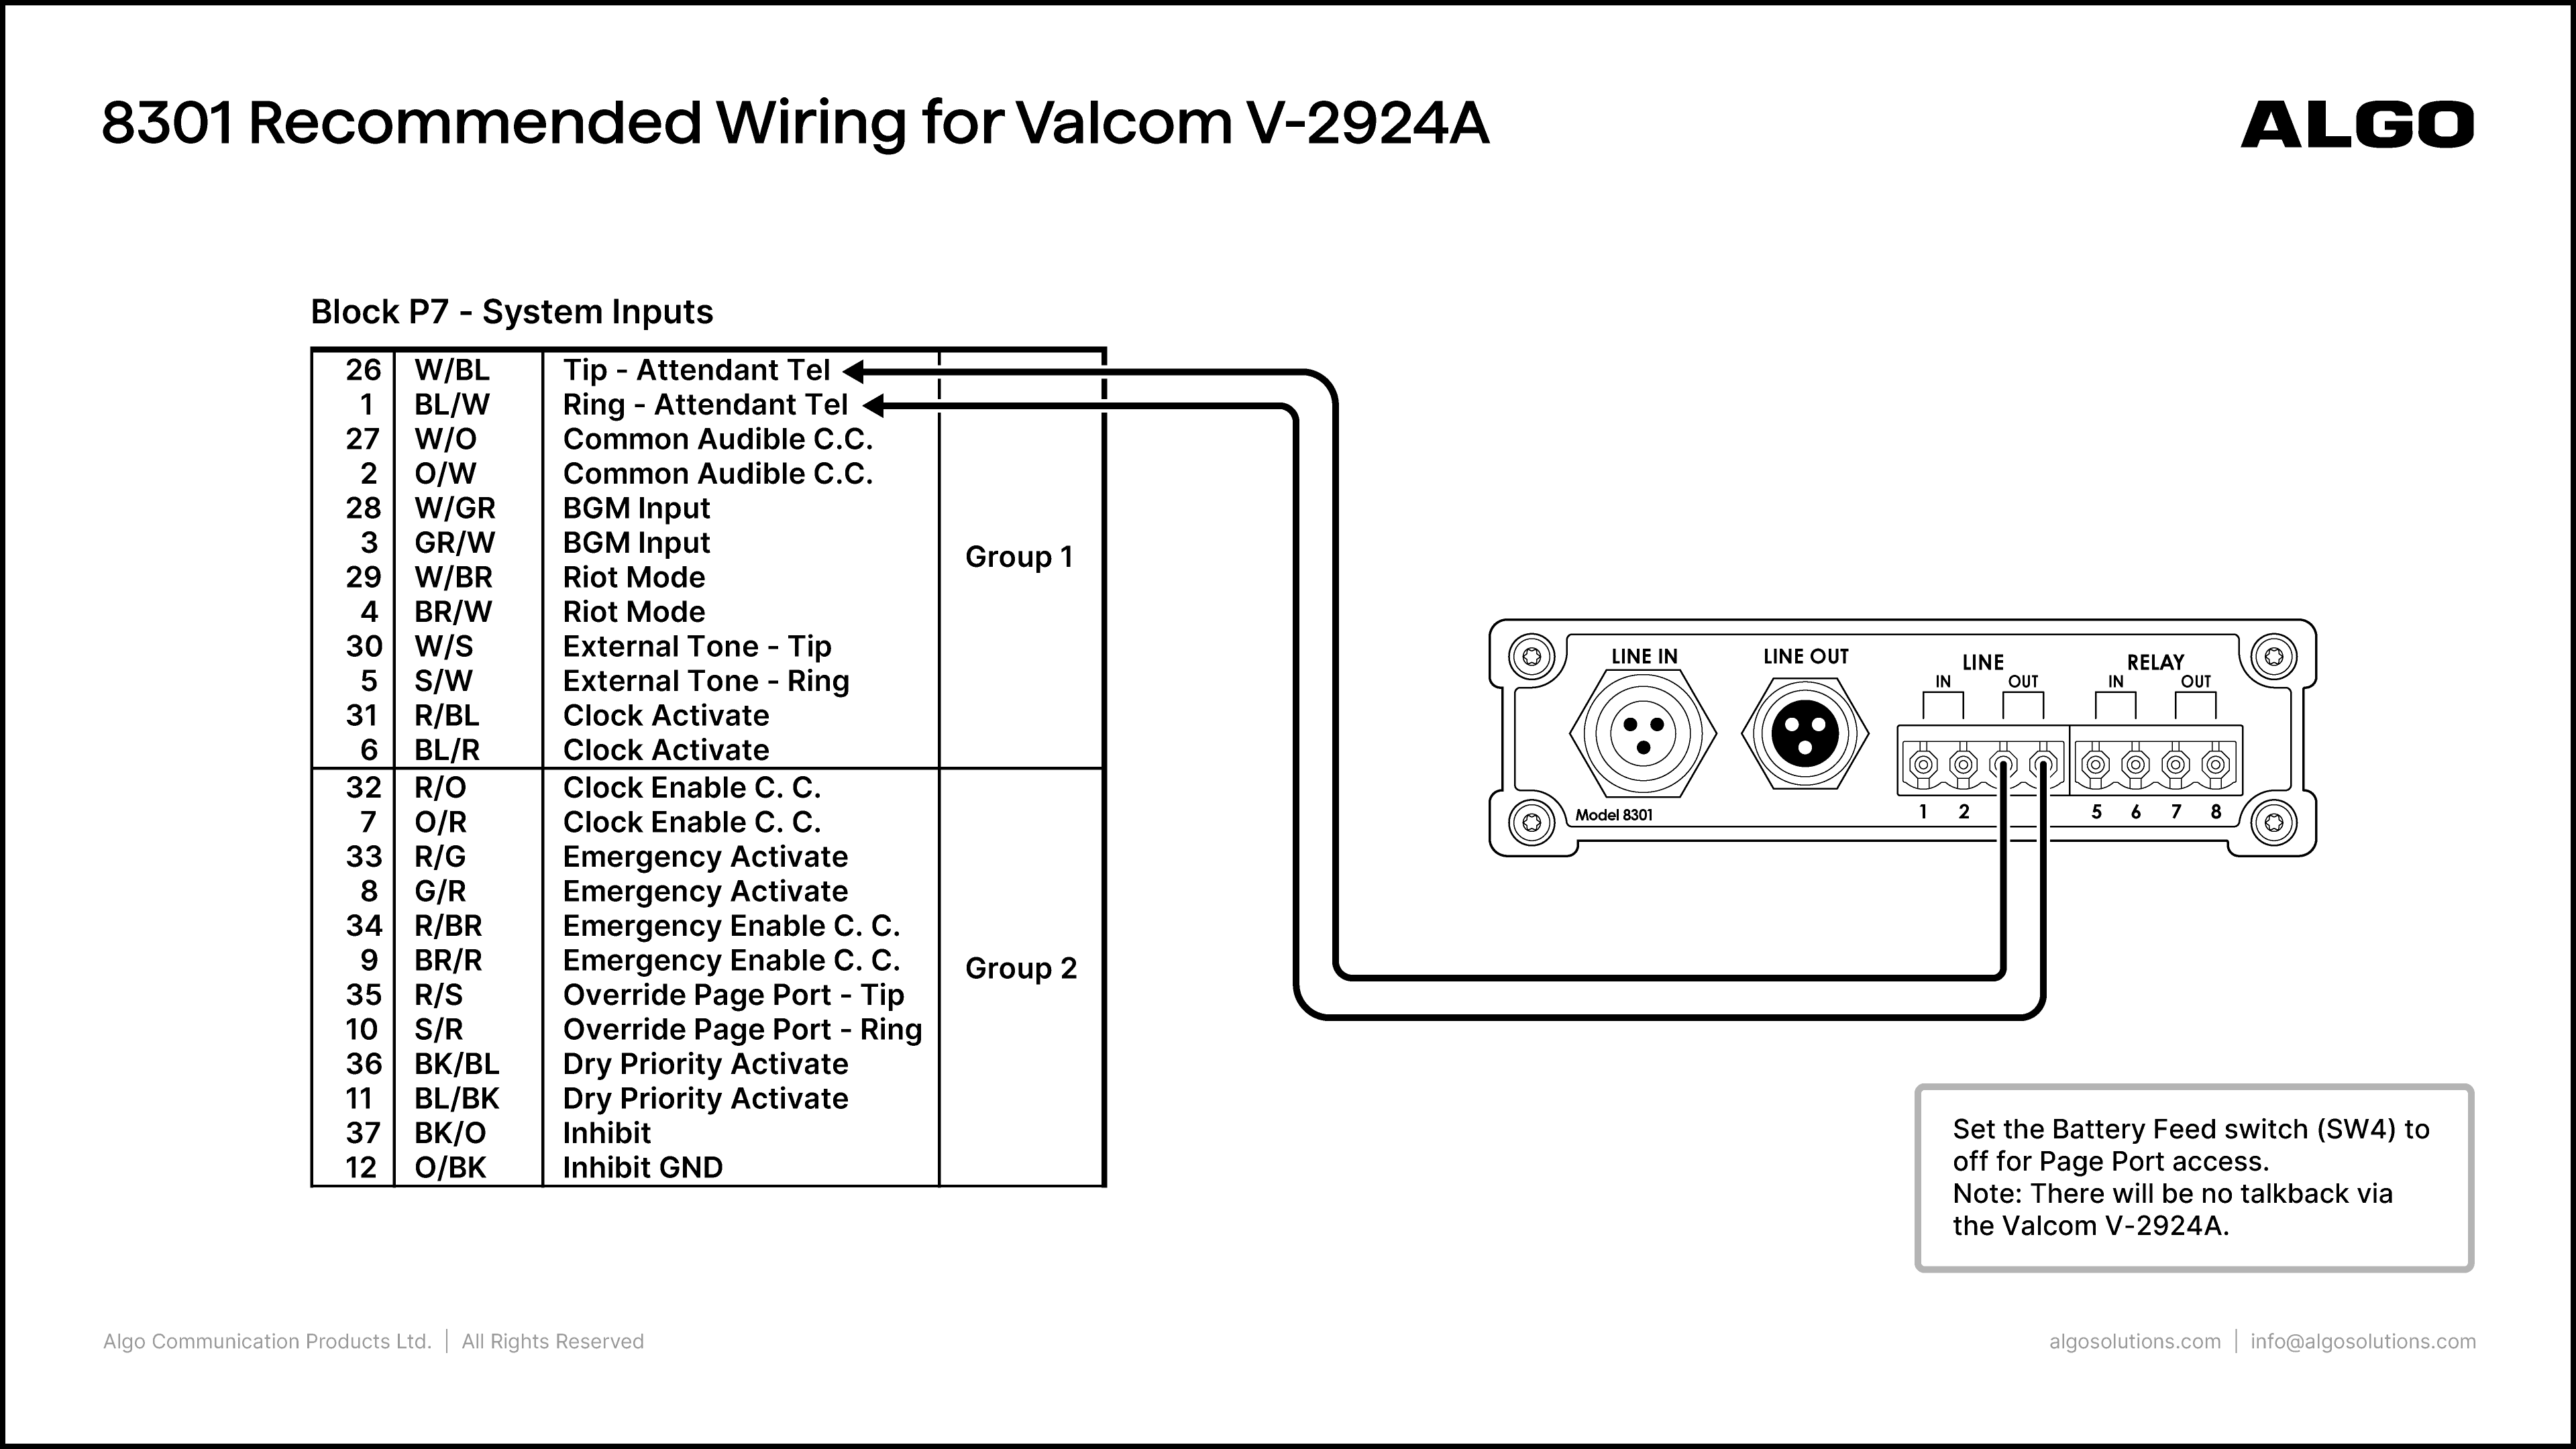
Valcom V-2924A with 8301

Algo Product:

8301 IP Paging Adapter & Scheduler

Amplifier Product:

Valcom V-2924A

Port Connections:

Algo

Valcom

  • Line Out (3, 4)

  • 26 W/BL Tip, 1 BL/W Ring

Notes:

  • Set the Battery Feed switch (SW4) to off for Page Port access

  • Note there will be no talkback via the Valcom V-2924A

  • On the 8301 web interface, go to Basic Settings → Features and set the Line Out Analog Output Level to -10dBm 600 ohm (0.245 Vrms)

  • To play DTMF tones and control the zones, make sure to enable Generate In-Band DTMF Tones (Advanced Settings → Advanced Audio)

Valcom V-9940 with 8301

Algo Product:

8301 IP Paging Adapter & Scheduler

Amplifier Product:

Valcom V-9940

Port Connections:

Algo

Valcom

  • Line Out (3, 4)

  • Ring In, Tip In

Notes:

  • Ensure that only DIP Switches 1 and 8 are ON. If the device is not working, try turning DIP Switch 1 OFF.

  • On the 8301 web interface, go to Basic Settings → Features and set the Line Out Analog Output Level to -20dBm 600 ohm (0.077 Vrms)

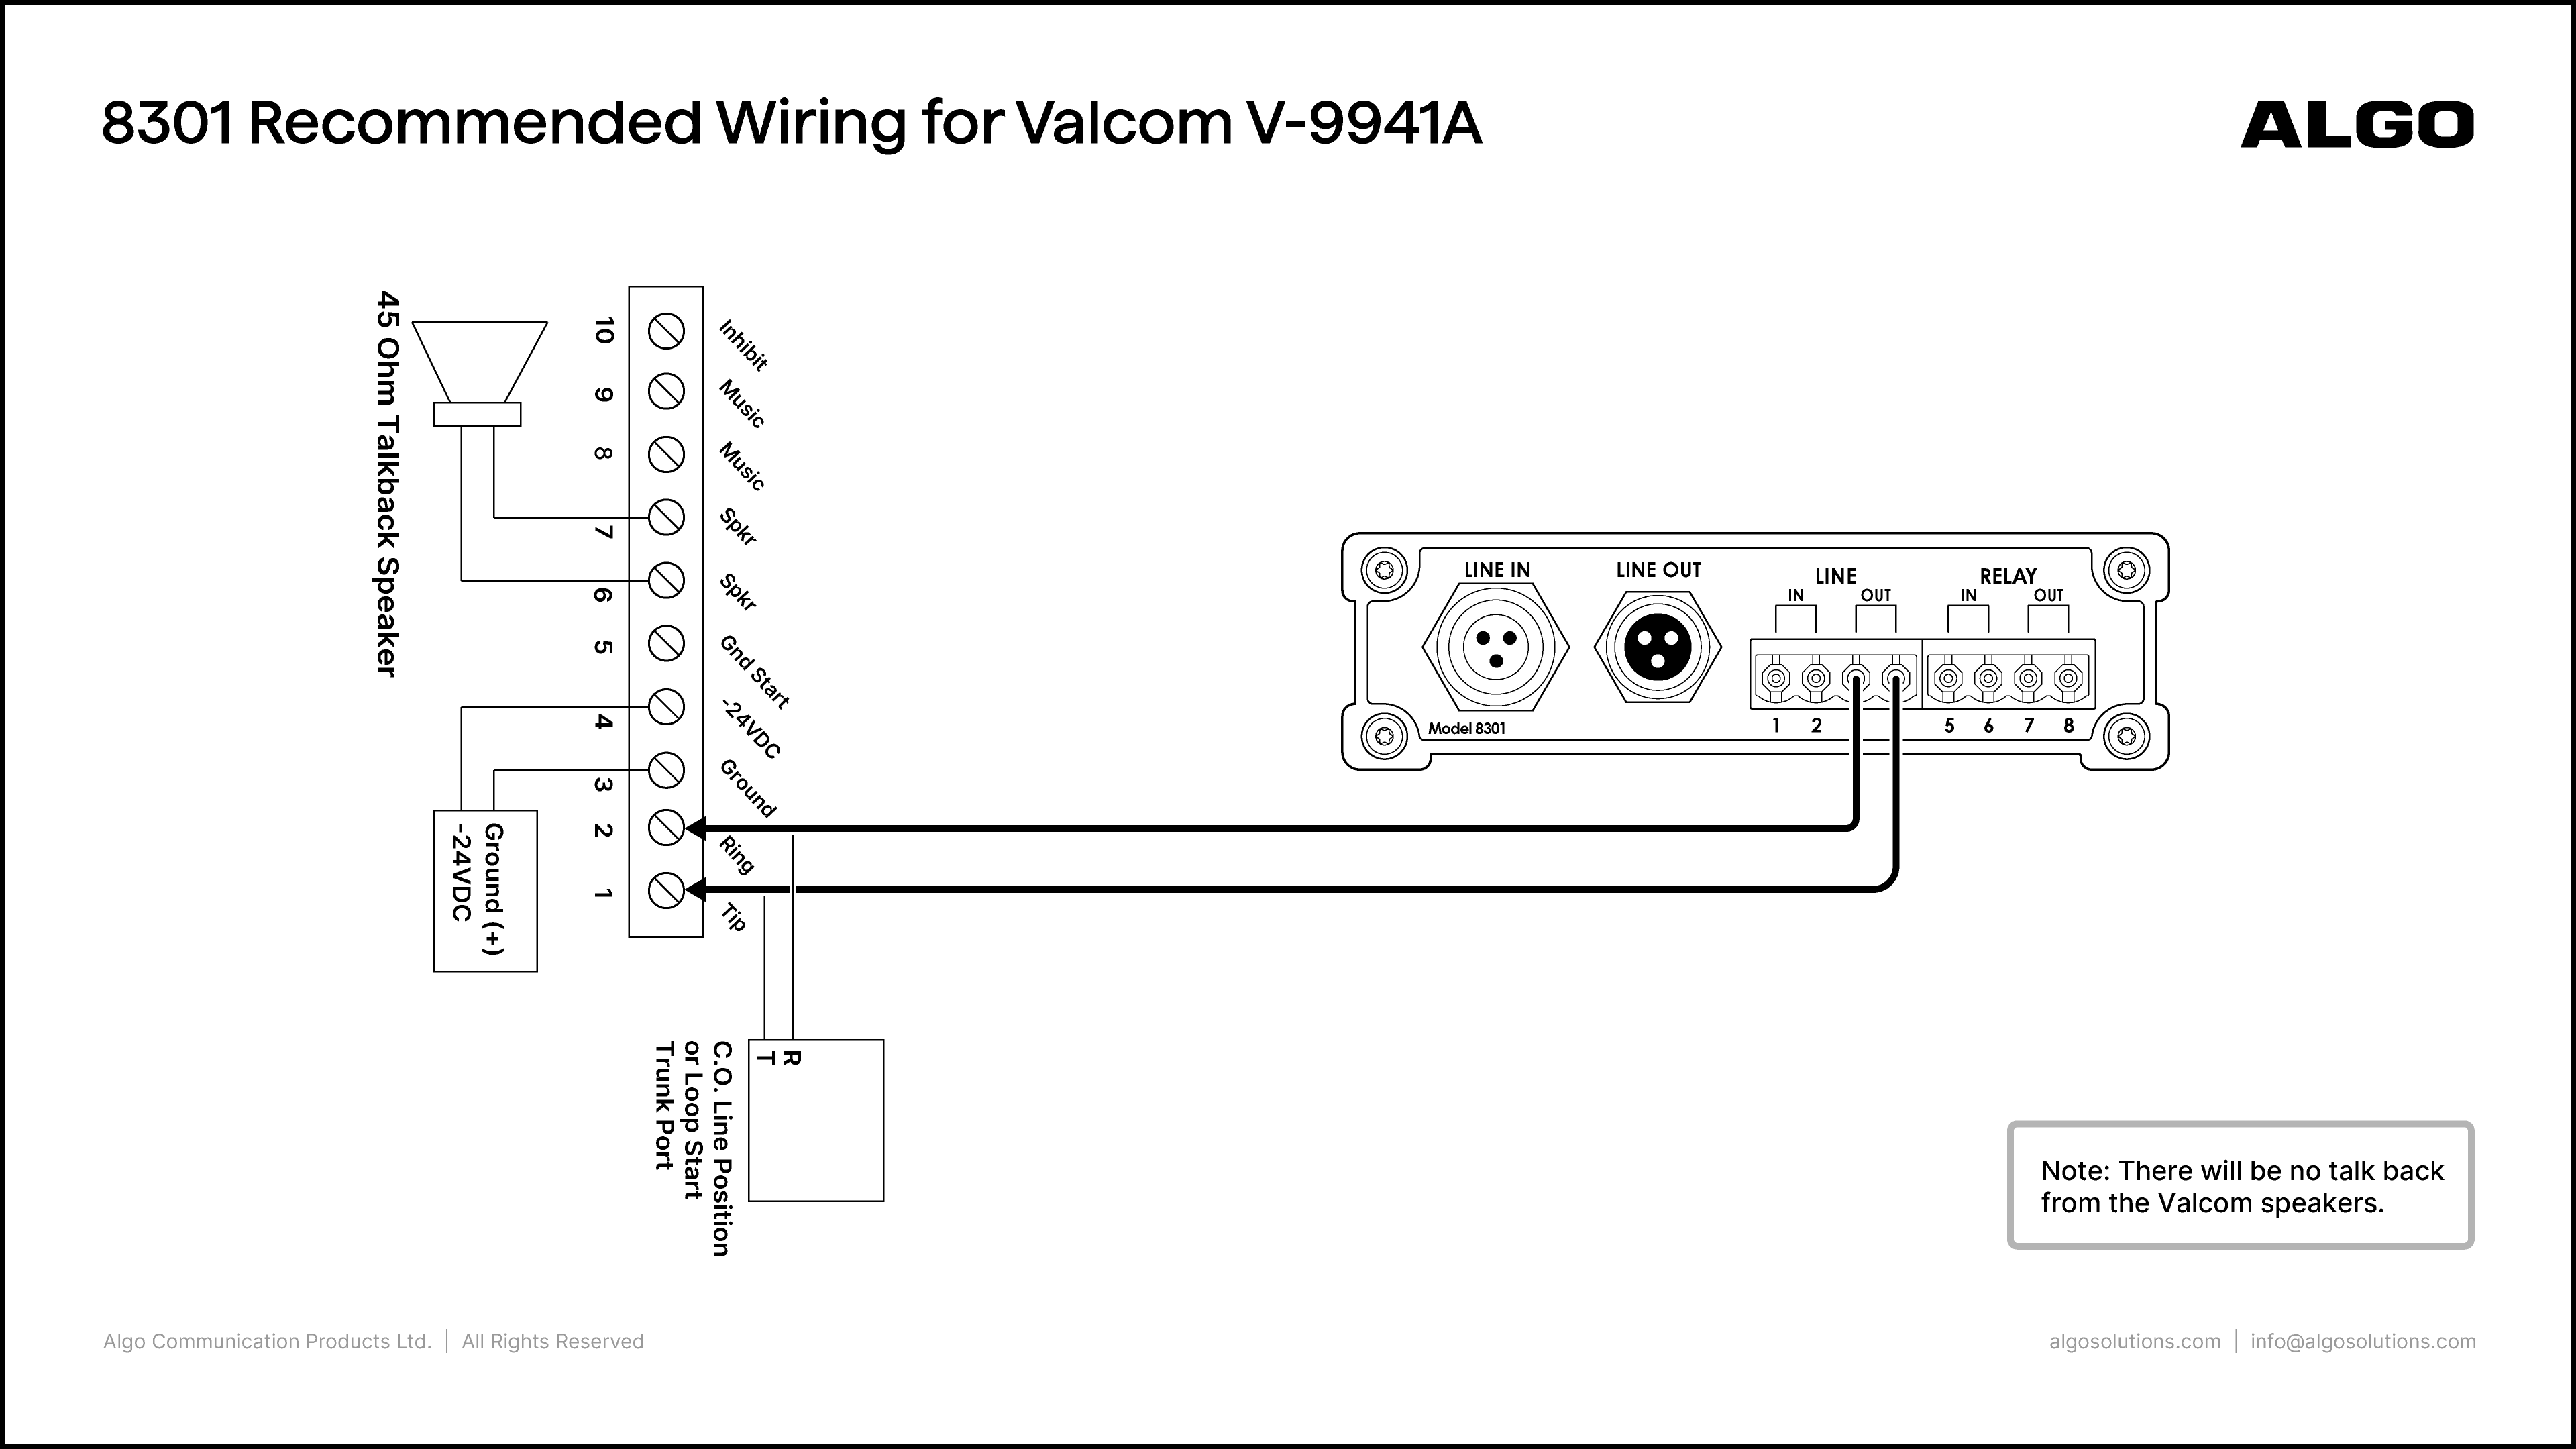
Valcom V-9941A with 8301

Algo Product:

8301 IP Paging Adapter & Scheduler

Amplifier Product:

Valcom V-9941A

Port Connections:

Algo

Valcom

  • Line Out (3, 4)

  • Ring (2), Tip (1)

Notes:

  • Note there will be no talk back from the Valcom speakers

  • On the 8301 web interface, go to Basic Settings → Features and set the Line Out Analog Output Level to 0dBm 600 ohm (0.775 Vrms)

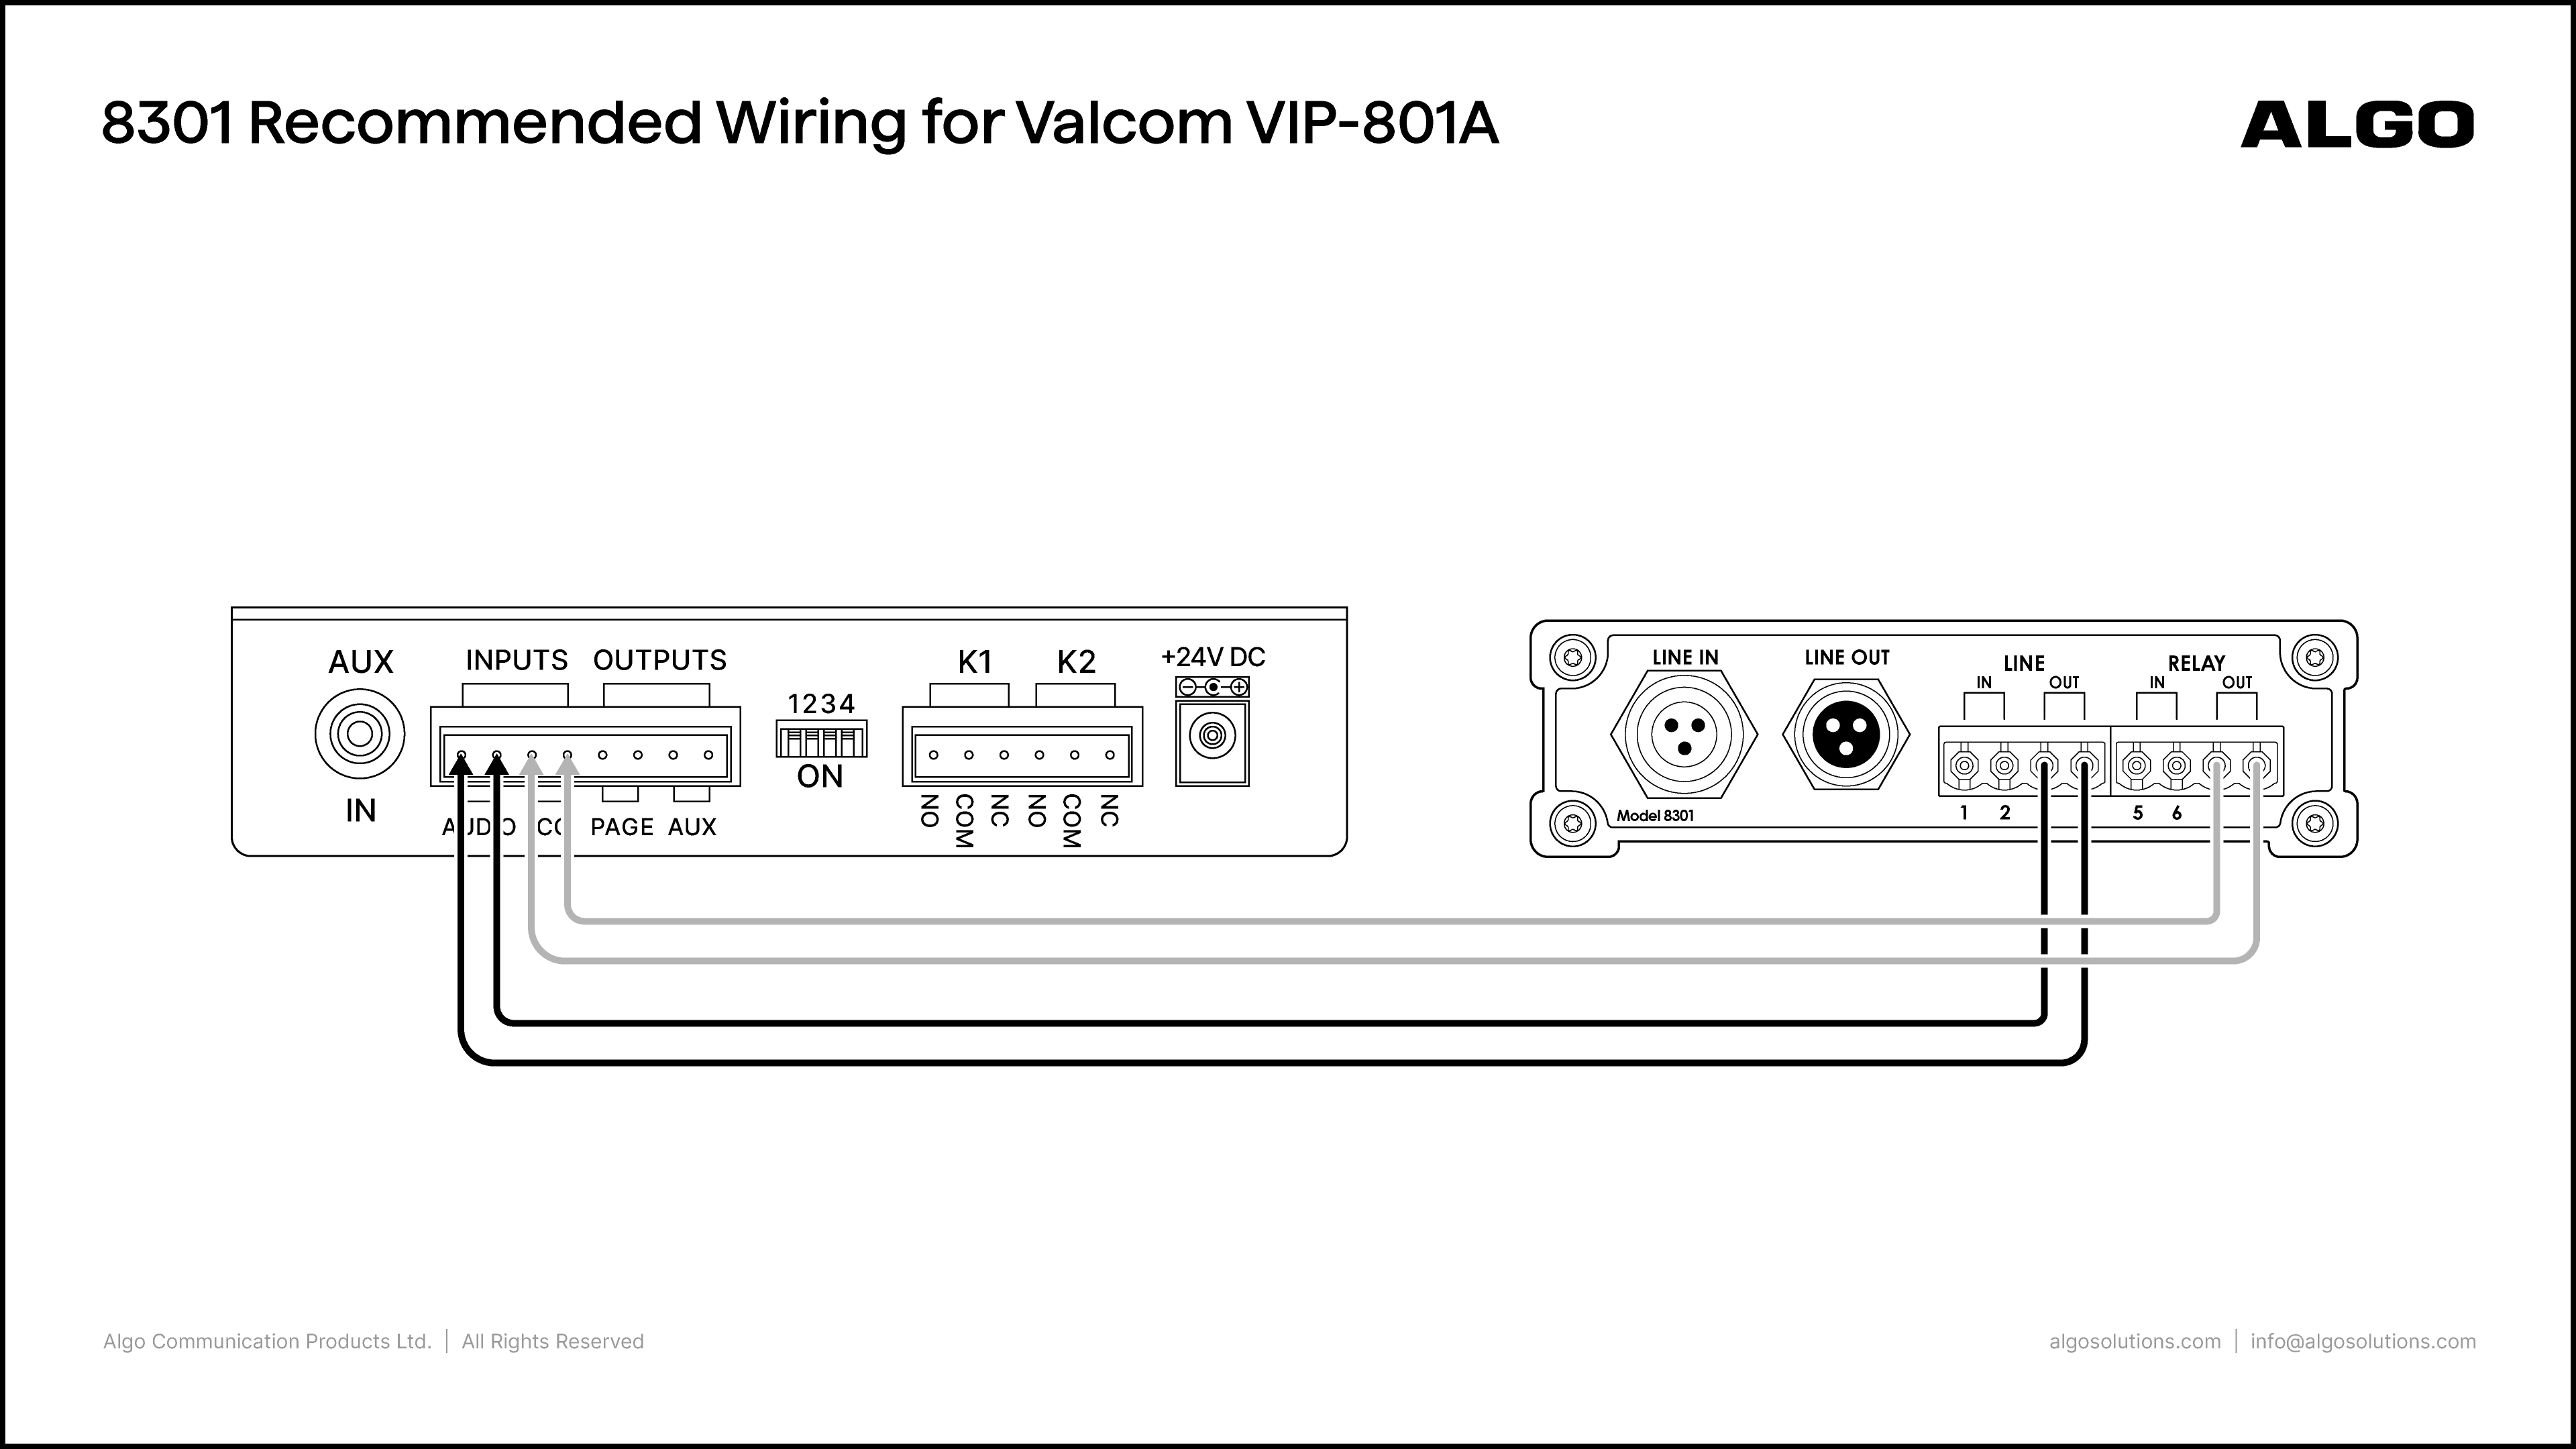
Valcom VIP-801A with 8301

Algo Product:

8301 IP Paging Adapter & Scheduler

Amplifier Product:

Valcom VIP-801A

Port Connections:

Algo

Valcom

  • Line Out (3, 4)

  • Relay Out (7, 8)

  • Inputs (Audio)

  • Inputs (CC)

Notes:

  • On the 8301 web interface, go to Basic Settings → Features and set the Line Out Analog Output Level to -10dBm 600 ohm (0.245 Vrms)

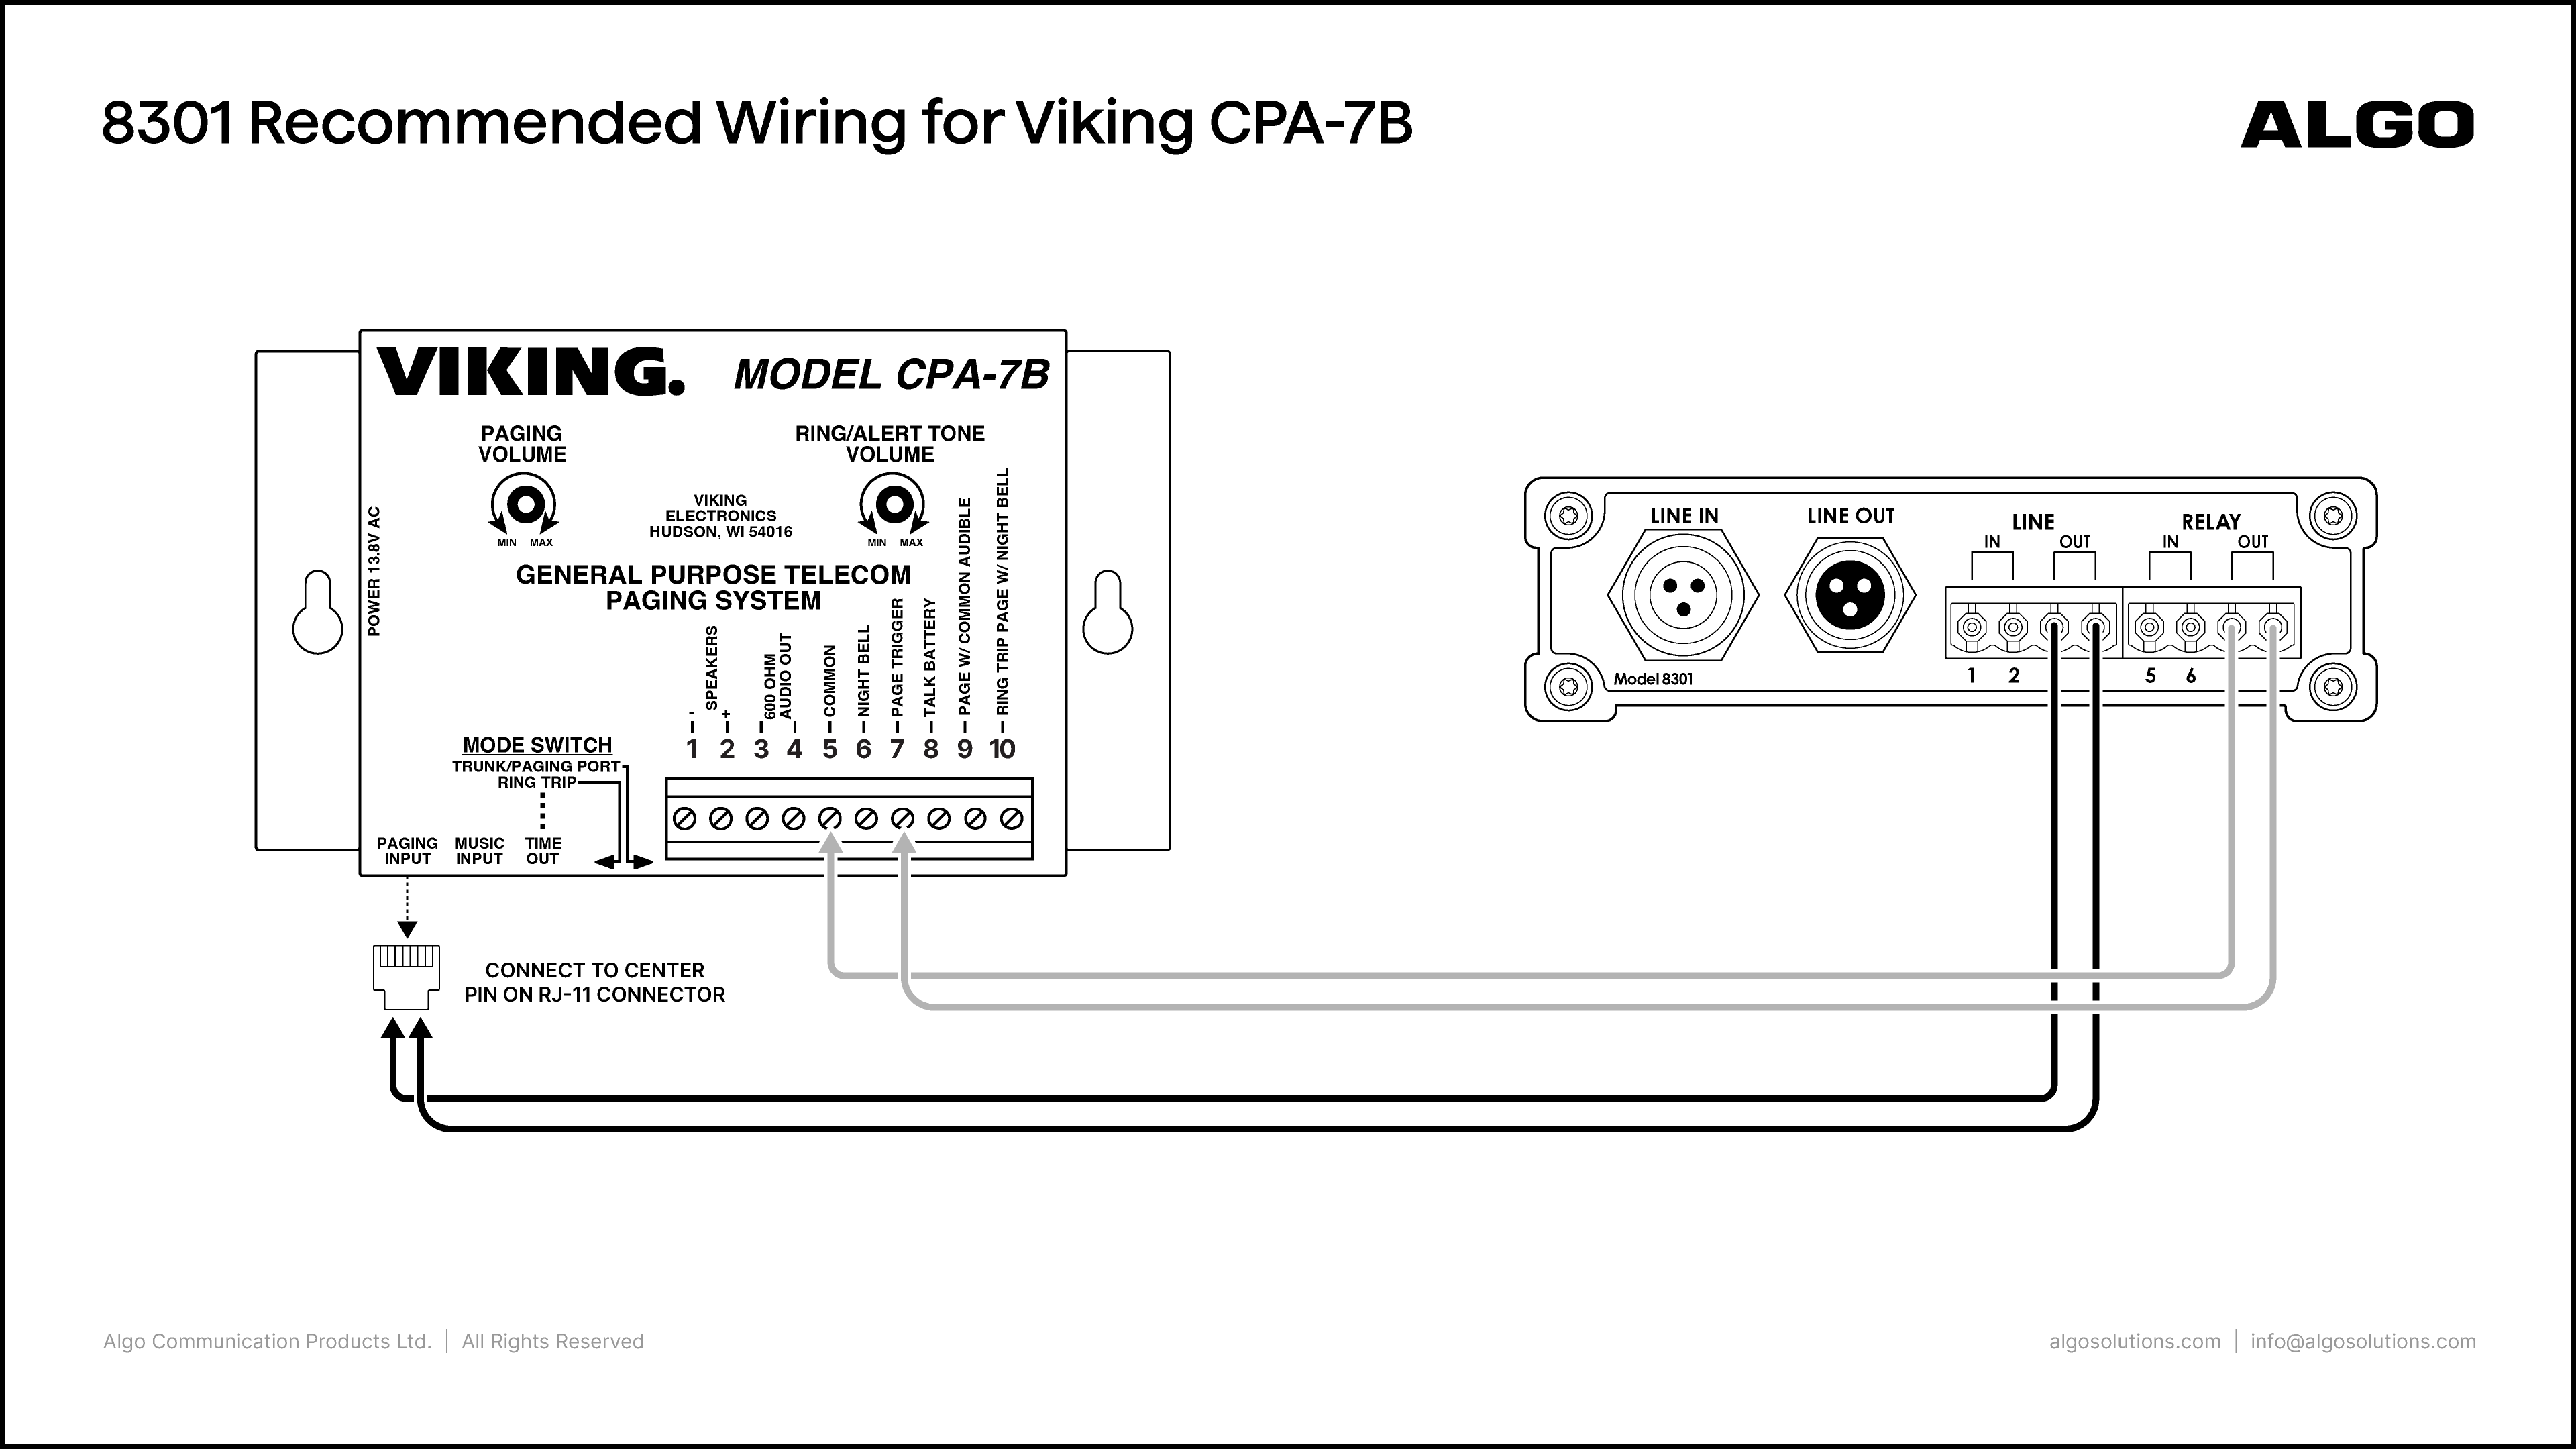
Viking CPA-7B with 8301

Algo Product:

8301 IP Paging Adapter & Scheduler

Amplifier Product:

Viking CPA-7B

Port Connections:

Algo

Viking

  • Line Out (3, 4)

  • Relay Out (7, 8)

  • Paging Input

  • 5-Common, 7-Page Trigger

Notes:

  • On the 8301 web interface, go to Basic Settings → Features and set the Line Out Analog Output Level to 0dBm 600 ohm (0.775 Vrms)

Viking PA-2A with 8301

Algo Product:

8301 IP Paging Adapter & Scheduler

Amplifier Product:

Viking PA-2A

Port Connections:

Algo

Viking

  • Line Out (3, 4)

  • Trunk or Paging Port (5, 6)

Notes:

  • Set DIP switch 4 for talk battery to the OFF position on the PA-2A to prevent damaging the 8301

  • On the 8301 web interface, go to Basic Settings → Features and set the Line Out Analog Output Level to 0dBm 600 ohm (0.775 Vrms)

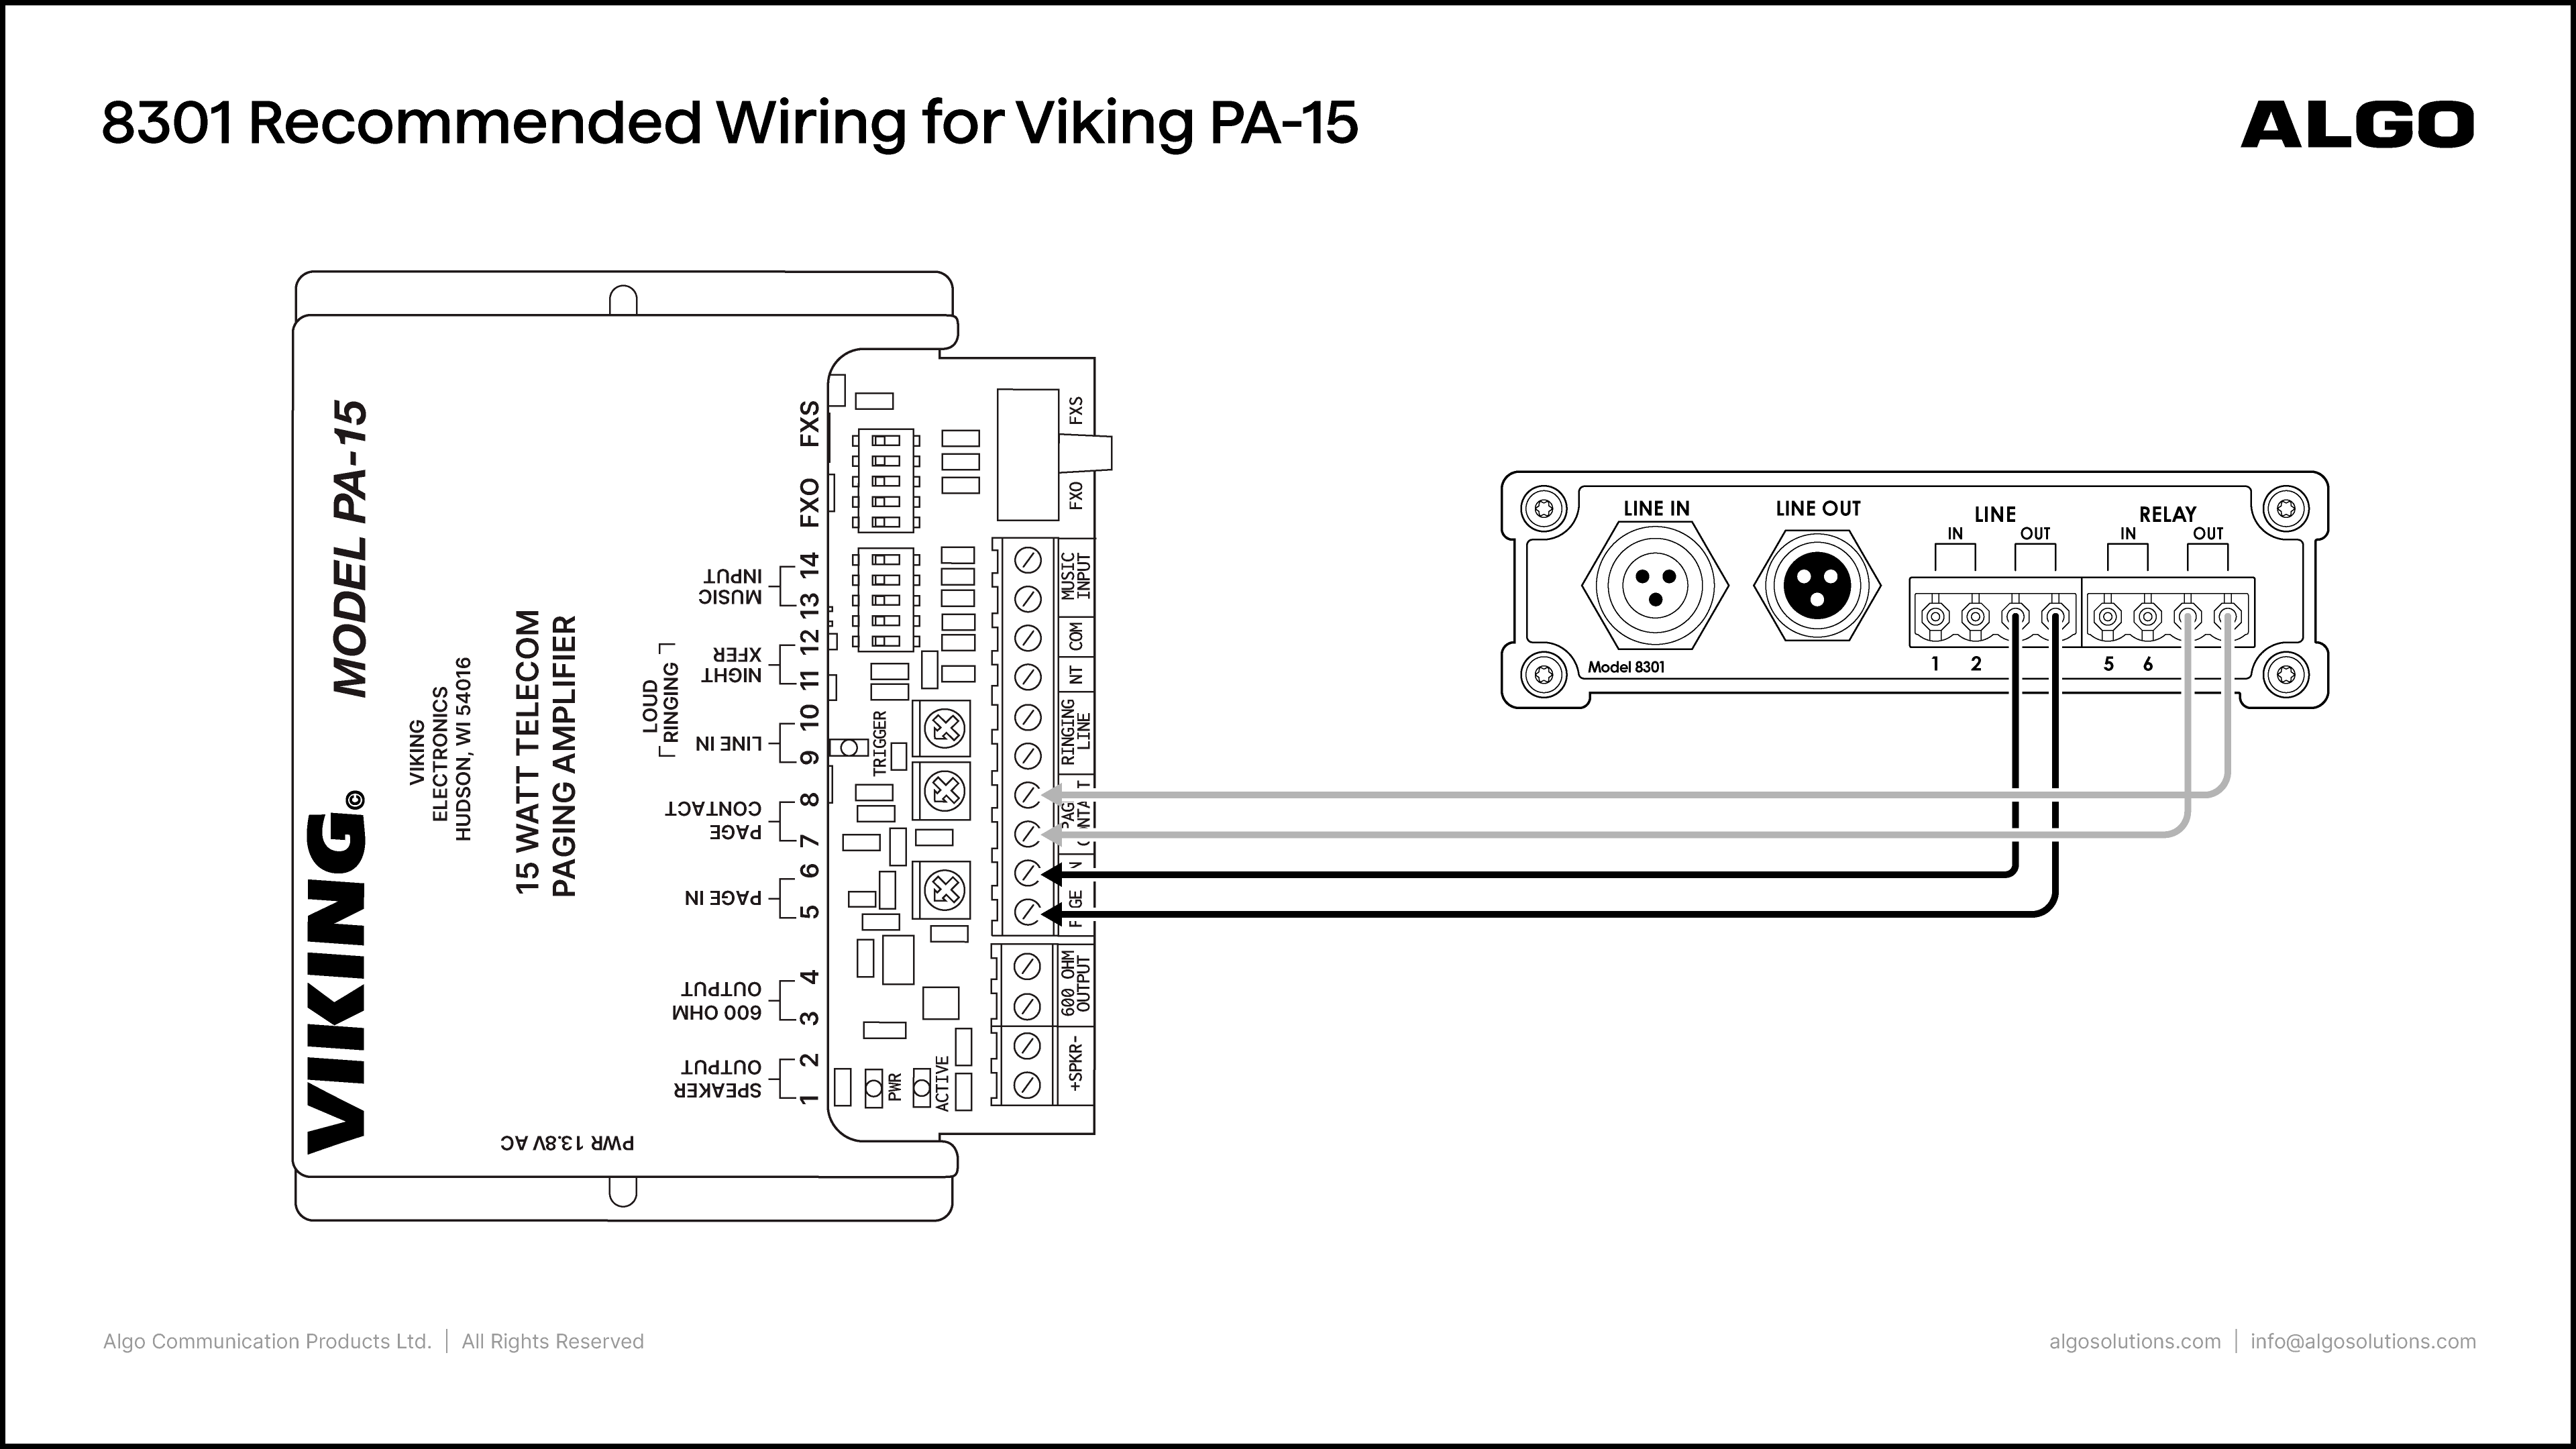
Viking PA-15 with 8301

Algo Product:

8301 IP Paging Adapter & Scheduler

Amplifier Product:

Viking PA-15

Port Connections:

Algo

Viking

  • Line Out (3, 4)

  • Relay Out (7, 8)

  • Page In (5, 6)

  • Page Contact (7, 8)

Notes:

  • On the 8301 web interface, go to Basic Settings → Features and set the Line Out Analog Output Level to 0dBm 600 ohm (0.775 Vrms)

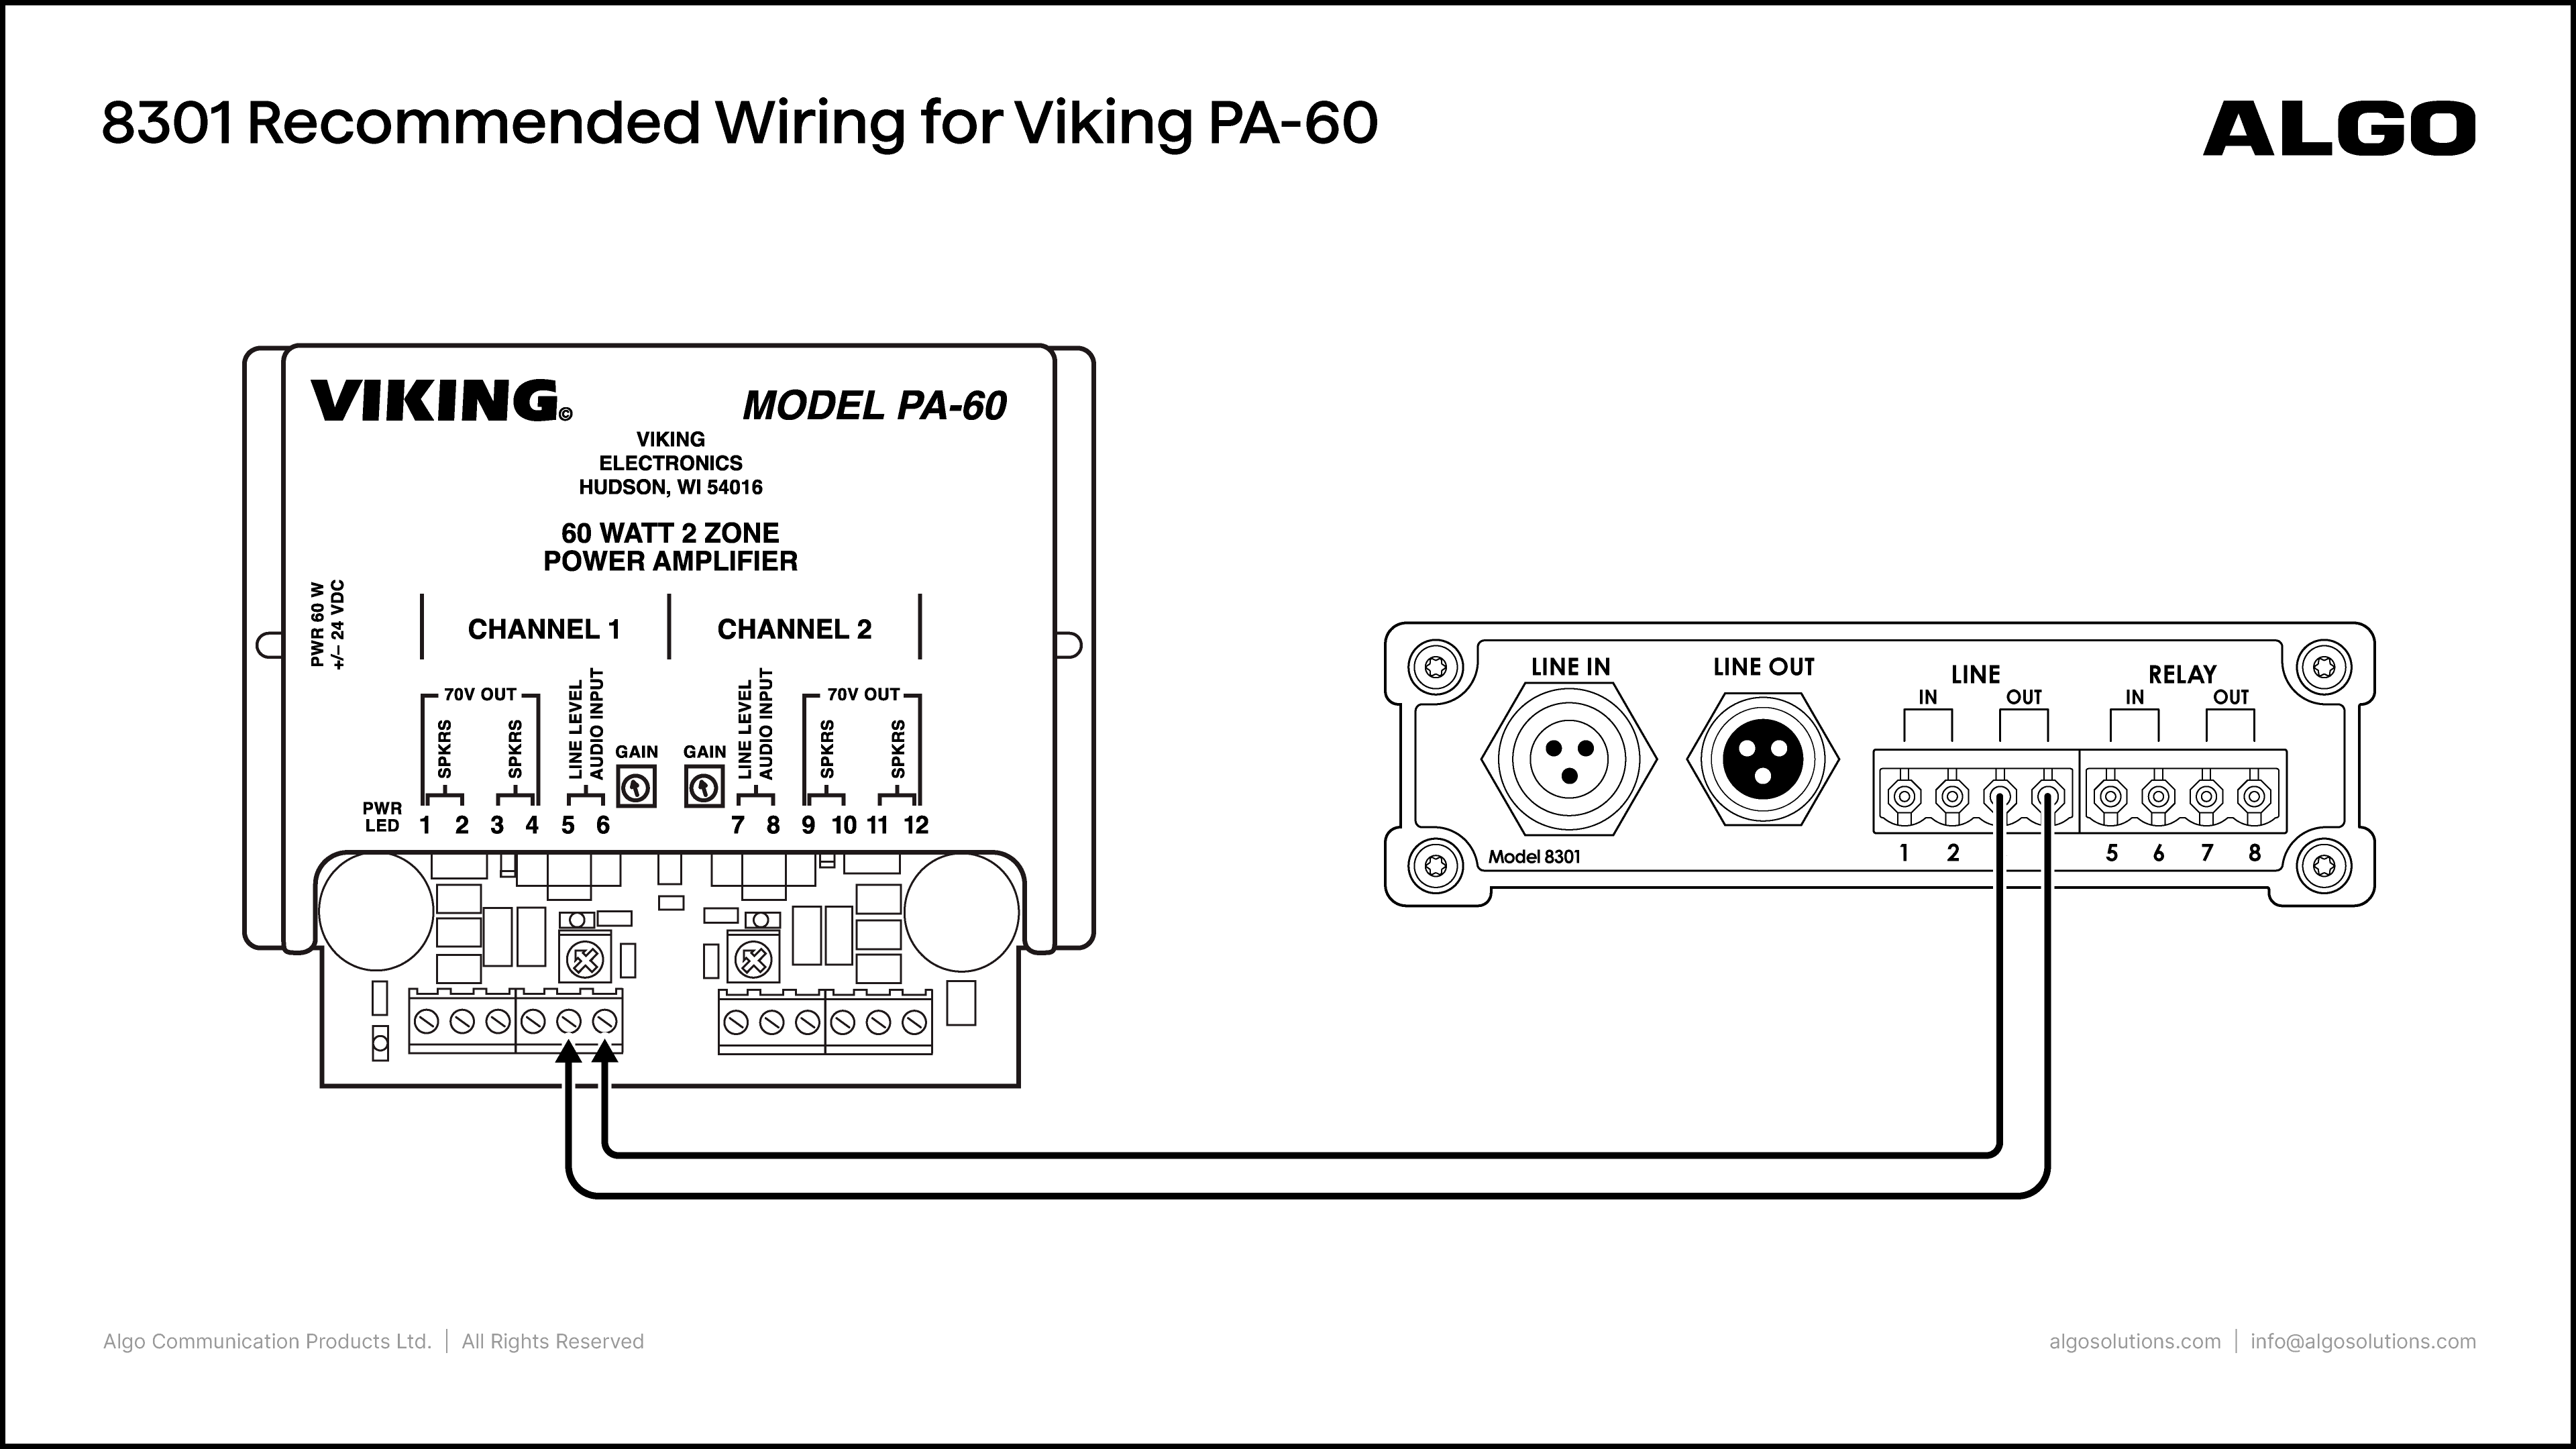
Viking PA-60 with 8301

Algo Product:

8301 IP Paging Adapter & Scheduler

Amplifier Product:

Viking PA-60

Port Connections:

Algo

Viking

  • Line Out (3, 4)

  • Line Level Audio Input (5, 6)

Notes:

  • On the 8301 web interface, go to Basic Settings → Features and set the Line Out Analog Output Level to 0dBm 600 ohm (0.775 Vrms)

  • If there are speakers connected to both channels, then an 8301 per channel will be required. One 8301 can be SIP registered and configured to Multicast to the second for zone paging including All Call.

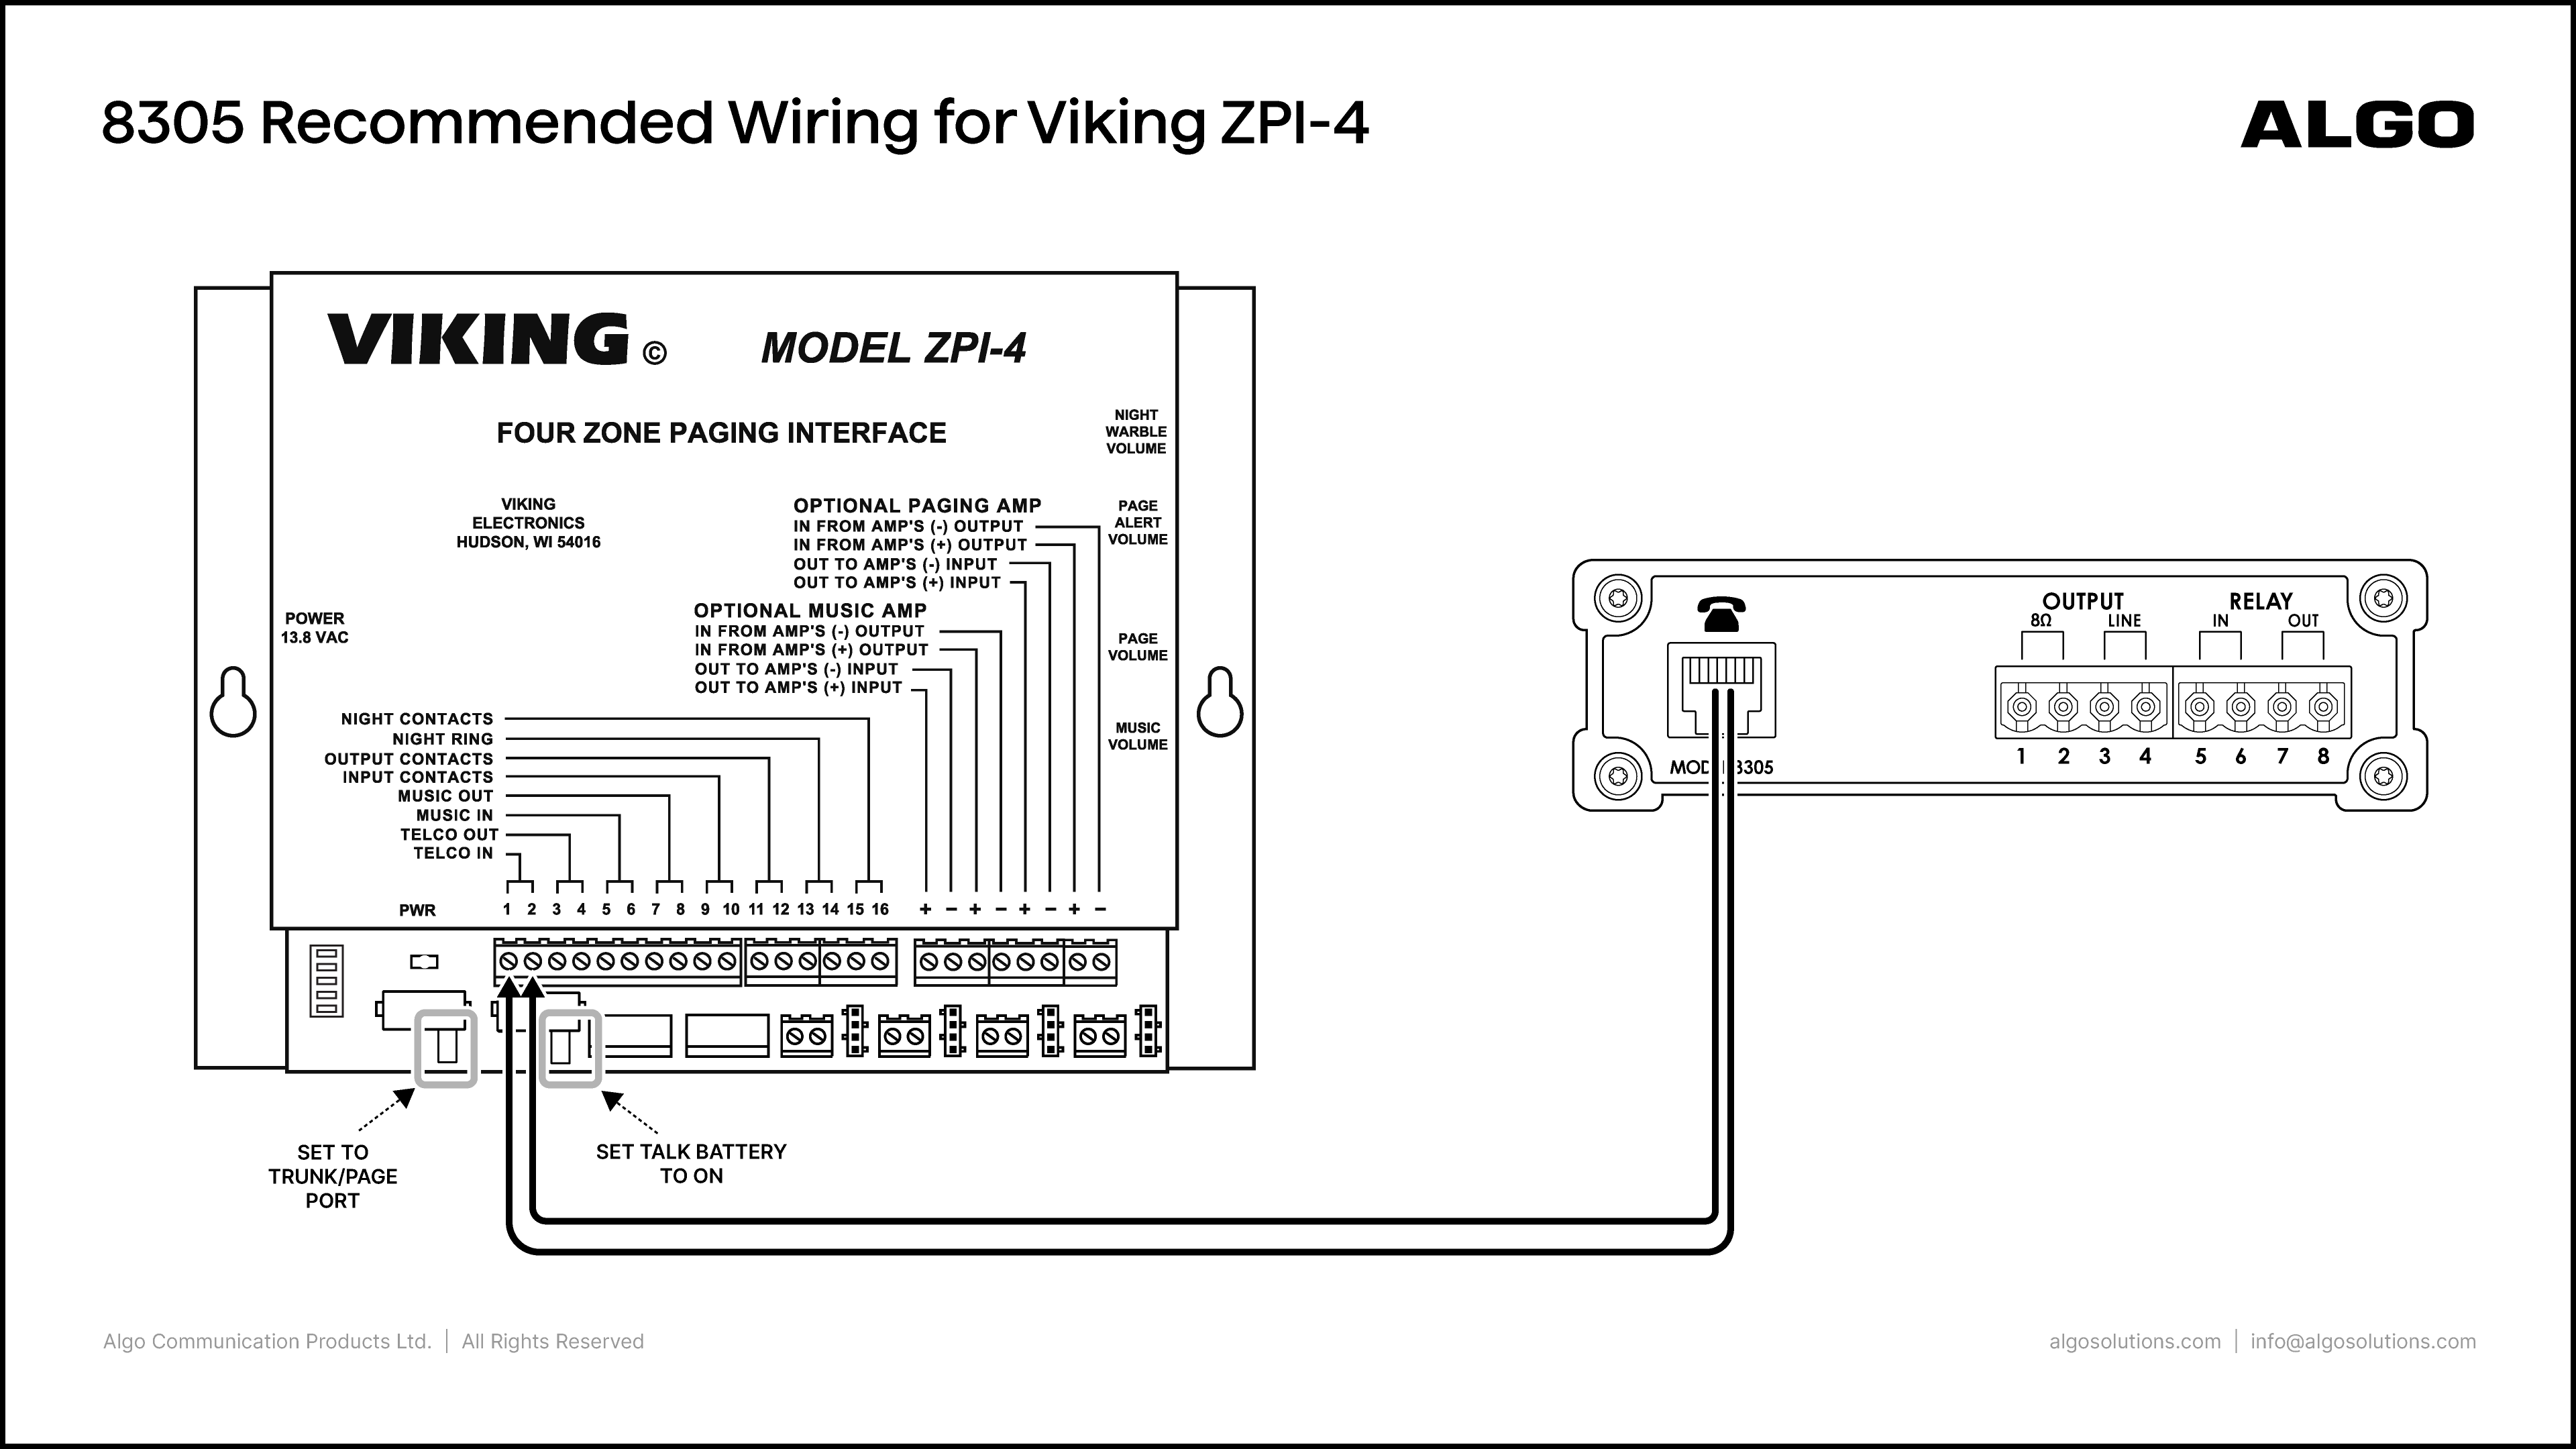
Viking ZPI-4 with 8305

Algo Product:

8305 Multi-Interface IP Paging Adapter

Amplifier Product:

Viking ZPI-4

Port Connections:

Algo

Viking

  • Telephone Port

  • Telco in (2, 1)

Notes:

  • On the 8305 web interface, go to Basic Settings → Features and set Analog Output Port/Level to Phone or 8Ω Port